Documentation for Substance Designer 3D is now available on Experience League. After March 14th, HelpX pages will automatically redirect to the equivalent Experience League page.
Refer to the FAQ for more information about which documentation is affected.
- Substance 3D home
- User guide
- Glossary
- Getting started
- Workspace
- Workspace
- Customizing your workspace
- Home screen
- Main toolbar
- Preferences
- Explorer
- Graph view
- Library
- Properties
- 2D view
- 3D view
- Dependency manager
- Resources
- Resources
- Importing, linking and new resources
- Bitmap resource
- Vector graphics (SVG) resource
- 3D scene resource
- AxF (Appearance eXchange Format)
- Font resource
- Warnings from dependencies
- Substance graphs
- Substance graphs
- Substance graph key concepts
- Creating a Substance graph
- Instances and subgraphs
- Graph parameters
- Manage parameters
- 'Visible if' expressions
- Inheritance in Substance graphs
- Output size
- Values in Substance graphs
- Publishing Substance 3D asset files (SBSAR)
- Exporting bitmaps
- Exporting PSD files
- Sample Substance graphs
- Warnings in Substance graphs
- Nodes reference for Substance graphs
- Nodes reference for Substance graphs
- Atomic nodes
- Node library
- Node library
- Texture generators
- Texture generators
- Noises
- Noises
- 3D Perlin noise
- 3D Perlin noise fractal
- 3D Ridged noise fractal
- 3D Simplex noise
- 3D Voronoi
- 3D Voronoi fractal
- 3D Worley noise
- Anisotropic noise
- Blue noise fast
- BnW spots 1
- BnW spots 2
- BnW spots 3
- Cells 1
- Cells 2
- Cells 3
- Cells 4
- Clouds 1
- Clouds 2
- Clouds 3
- Creased
- Crystal 1
- Crystal 2
- Directional noise 1
- Directional noise 2
- Directional noise 3
- Directional noise 4
- Directional scratches
- Dirt 1
- Dirt 2
- Dirt 3
- Dirt 4
- Dirt 5
- Dirt gradient
- Fluid
- Fractal sum 1
- Fractal sum 2
- Fractal sum 3
- Fractal sum 4
- Fractal sum base
- Fur 1
- Fur 2
- Fur 3
- Gaussian noise
- Gaussian spots 1
- Gaussian spots 2
- Grunge concrete
- Grunge Damas
- Grunge galvanic large
- Grunge galvanic small
- Grunge leaks
- Grunge leaky paint
- Grunge map 001
- Grunge map 002
- Grunge map 003
- Grunge map 004
- Grunge map 005
- Grunge map 006
- Grunge map 007
- Grunge map 008
- Grunge map 009
- Grunge map 010
- Grunge map 011
- Grunge map 012
- Grunge map 013
- Grunge map 014
- Grunge map 015
- Grunge rough dirty
- Grunge rust fine
- Grunge scratches dirty
- Grunge scratches fine
- Grunge scratches rough
- Grunge shavings
- Grunge splashes dusty
- Grunge spots
- Grunge spots dirty
- Liquid
- Messy fibers 1
- Messy fibers 2
- Messy fibers 3
- Microscope view
- Moisture noise 1
- Moisture noise 2
- Perlin noise
- Plasma
- Caustics
- Voronoi
- Voronoi fractal
- Waveform 1
- White noise
- White noise fast
- Patterns
- Patterns
- 3D linear gradient
- 3D volume mask
- Alveolus
- Arc pavement
- Brick 1
- Brick 2
- Brick generator
- Checker 1
- Cube 3D
- Cube 3D GBuffers
- Fibers 1
- Fibers 2
- Gaussian 1
- Gaussian 2
- Gradient axial
- Gradient axial reflected
- Gradient circular
- Gradient linear 1
- Gradient linear 2
- Gradient linear 3
- Gradient radial
- Height extrude
- Mesh 1
- Mesh 2
- Panorama shape
- Polygon 1
- Polygon 2
- Scratches generator
- Shape
- Shape extrude
- Shape mapper
- Shape splatter
- Shape splatter blend
- Shape splatter data extract
- Shape splatter to mask
- Splatter
- Splatter circular
- Star
- Starburst
- Stripes
- Tile generator
- Tile random
- Tile random 2
- Tile sampler
- Triangle grid
- Weave 1
- Weave 2
- Weave generator
- Filters
- Filters
- Adjustments
- Adjustments
- Apply color palette
- Auto levels
- Channel mixer
- Chrominance extract
- Clamp
- Color match
- Color to mask
- Contrast/Luminosity
- Convert to linear
- Convert to sRGB
- Create color palette (16)
- Grayscale conversion advanced
- Hald CLUT
- HDR range viewer
- Height map frequencies mapper
- Highpass
- Histogram compute
- Histogram equalize
- Histogram range
- Histogram render
- Histogram scan
- Non-uniform histogram scan
- Histogram select
- Histogram shift
- ID to mask grayscale
- Invert
- Lighting cancel high frequencies
- Lighting cancel low frequencies
- Luminance highpass
- Min max
- Modify color palette
- Pow
- Quantize color (Simple)
- Quantize color
- Quantize grayscale
- Replace color
- Replace color range
- Threshold
- View color palette
- Blending
- Blurs
- Channels
- Effects
- Effects
- 3D texture position
- 3D texture SDF
- 3D texture surface render
- 3D texture volume render
- Ambient occlusion (HBAO)
- Ambient occlusion (RTAO)
- Anisotropic Kuwahara color
- Anisotropic Kuwahara grayscale
- Bevel
- Bevel smooth
- Cross section
- Curvature
- Curvature smooth
- Curvature sobel
- Diffusion color
- Diffusion grayscale
- Diffusion UV
- Directional distance
- Edge detect
- Emboss with gloss
- Extend shape
- Flood fill
- Flood fill mapper
- Flood fill to Bbox size
- Flood Fill to gradient
- Flood Fill to grayscale/color
- Flood Fill to index
- Flood Fill to position
- Flood Fill to random color
- Flood Fill to random grayscale
- FXAA
- Glow
- Mosaic
- Multi directional warp
- Non-uniform directional warp
- Reaction diffusion fast
- RT irradiance
- RT shadow
- Shadows
- Shape drop shadow
- Shape glow
- Shape stroke
- Summed area table
- Swirl
- Uber emboss
- Vector morph
- Vector warp
- Normal map
- Tiling
- Transforms
- Material filters
- Material filters
- 1-click
- Effects (Material)
- Transforms (Material)
- Blending (Material)
- PBR utilities
- Scan processing
- Mesh-based generators
- Mesh-based generators
- Mask generators
- Weathering
- Utilities (Mesh-based generators)
- Spline & Path tools
- Spline & Path tools
- Working with Path & Spline tools
- Paths to spline
- Path tools
- Spline tools
- Spline tools
- Point list
- Scatter on Spline color
- Scatter on Spline grayscale
- Scatter Splines on Splines
- Spline 2D transform
- Spline (Cubic)
- Spline (Poly quadratic)
- Spline (Quadratic)
- Spline append
- Spline bridge (2 Splines)
- Spline bridge (List)
- Spline bridge mapper color
- Spline bridge mapper grayscale
- Spline circle
- Spline fill
- Spline flow mapper
- Spline mapper color
- Spline mapper grayscale
- Spline merge list
- Spline render
- Spline sample height
- Spline sample thickness
- Spline select
- Spline warp
- UV mapper color
- UV mapper grayscale
- 3D view (Library)
- 3D view (Library)
- HDRI tools
- Node library
- Substance function graphs
- Substance function graphs
- What is a Substance function graph?
- Create and edit a function
- The Substance function graph
- Variables
- FX-maps
- FX-Maps
- How it works
- The Iterate node
- The Quadrant node
- Using Substance function graphs in FX-Maps
- Warnings in Substance function graphs
- Sample Substance function graphs
- Nodes reference for Substance function graphs
- Nodes reference for Substance function graphs
- Function nodes overview
- Atomic function nodes
- Function node library
- MDL graphs
- Working with 3D scenes
- Bakers
- Best practices
- Pipeline and project configuration
- Color management
- Package metadata
- Scripting
- Scripting
- Plugin basics
- Plugin search paths
- Plugins packages
- Plugin manager
- Python editor
- Accessing graphs and selections
- Nodes and properties
- Undo and redo
- Application callbacks
- Creating user interface elements
- Adding actions to the Explorer toolbar
- Using color management
- Using spot colors
- Logging
- Using threads
- Debugging plugins using Visual Studio Code
- Porting previous plugins
- Packaging plugins
- Scripting API reference
- Technical issues
- Release notes
2D view
This pages describes the user interface and features of the 2D View panel in Substance 3D Designer.
In this page


Overview
The 2D View is one of the main panels of Designer's user interface. Its main purposes are the following:
- displaying value or image output by a specified node or going through a specified node connector
- displaying bitmaps and vector graphics resources
- displaying additional information about the content it currently holds, such as color channels or exact color values
- controlling parameters' gizmos
When a displayed image or value is modified, the 2D View updates automatically to stay in sync with the current state of the data.
Multiple 2D View panels can be active at any time, and each can display different images or values. You can control when a new panel should be used by using the ![]() Pin feature of the user interface panel.
Pin feature of the user interface panel.
Displaying content in the 2D View
All mentions of actions made on nodes in this section only apply to Substance graphs.
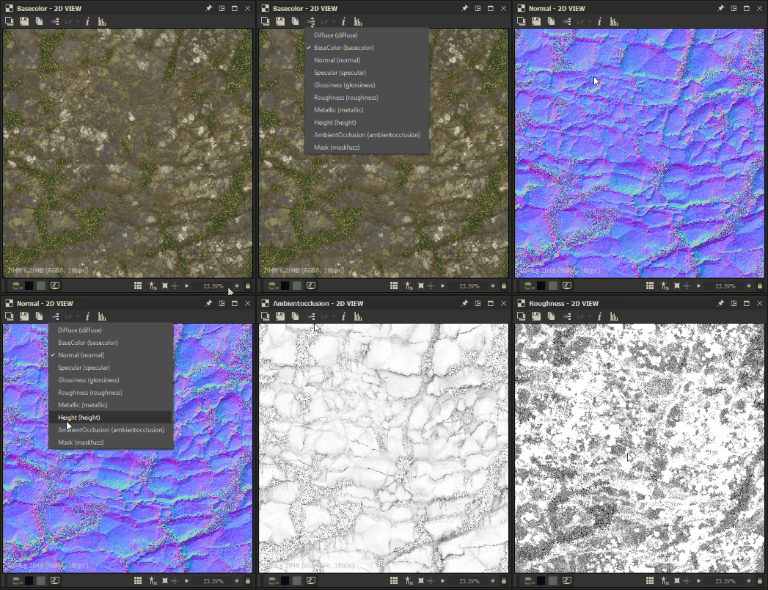
The most straightforward way to display any image in the 2D View is to double-click LMB...
- ...on a Bitmap or vector graphics resource in the Explorer
- ...on a node or node connector in the Graph View
Images can also be dragged and dropped directly into the viewport by holding LMB on a resource in the Explorer panel, or RMB on a node in the Graph View.
In the Graph View, you can send an image to the 2D View using the View output in 2D View contextual menu option, which is accessed by clicking RMB...
- ...on a node to display that node's output. If the node has more than one output, select the desired output in the submenu
- ...on empty space in the Graph View to display that graph's output. If the graph has more than one output, select the desired output in the submenu
When loading a graph, its first output is automatically displayed in the 2D View by default. You can disable this behaviour in the Preferences. Go to Edit > Preferences > Graph > Substance compositing graph and uncheck the View output in 2D view when opening a graph option.
-
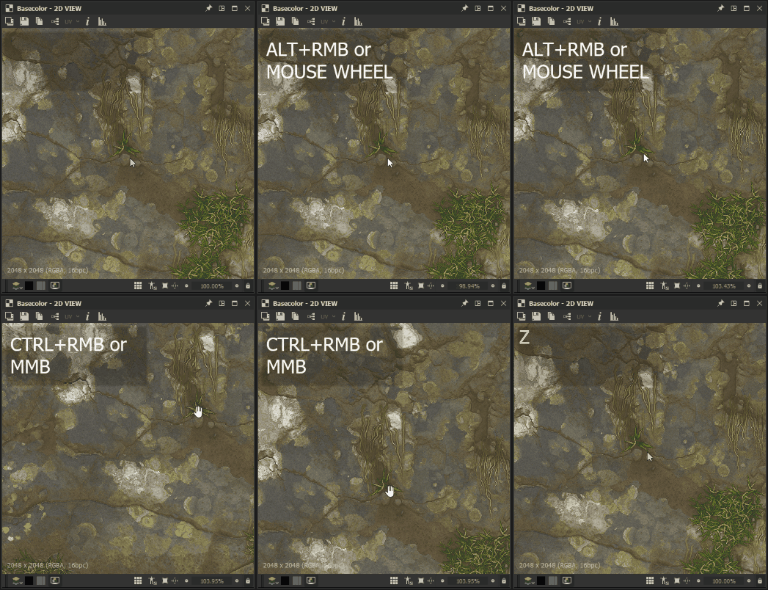
Pan: Ctrl+RMB / MMB
-
Zoom: Alt+RMB / MouseWheel / 'Display scale' tool:

-
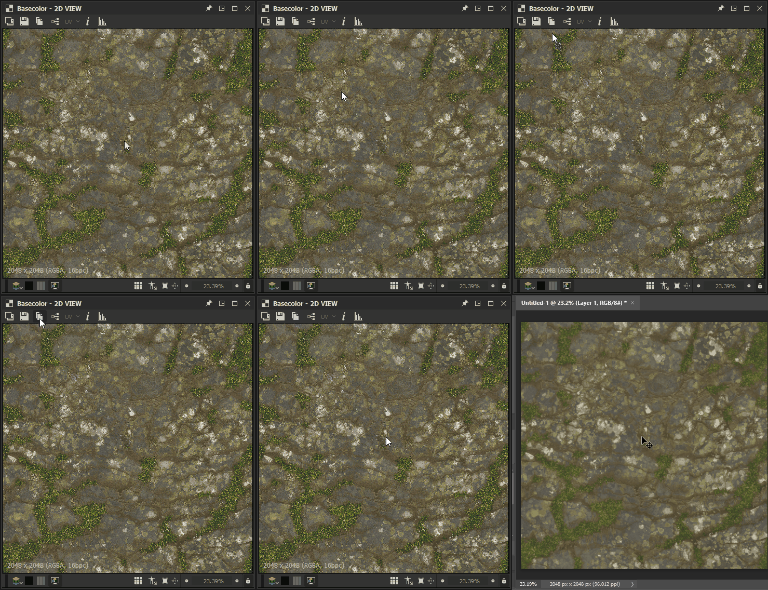
Adjust to fit viewport: F / 'Fit to view' button

-
Adjust to 1:1 scale: Z / 'Fit to scale' button


Using a trackpad (macOS only)
- Pan: Two-finger swipe
- Zoom: Two-finger pinch / Two-finger swipe while holding Cmd
It is not possible to pan the image if the current display size of the image is lower than the size of the viewport.
It is not possible to zoom in/out of the image if the displayed content does not exist anymore – e.g. a image's reference node or resource was deleted.
Each of the zooming methods is inverted with the other:
- Mouse wheel up pulls the image closer
- Alt+RMB and drag up pushes the image away
The zoom direction can be inverted in the Preferences.
The image native resolution, color format and bit depth appear in the bottom left area of the viewport.
In addition to navigation, the viewport offers the following features:
-
Tiled display: repeats the image in the viewport in a tiled pattern. This is useful for checking how a pattern or texture will repeat. It is enabled using the Space bar or
 Tiled display button
 -
Physical size display: Displays the image with a ratio matching the Physical size property of the graph It is enabled using the
 Physical size ratio button
 -
Keep view size: This option locks the display scale so it stays consistent throughout different images. It is enabled by default and can be disabled using the
 Keep view size button
The Display toolbar, which is located at the bottom of the 2D View panel by default, lets you control how the image is displayed in the viewport.
The leftmost section includes controls for color and transparency, while the rightmost section includes the viewport controls detailed in the Viewport section of this page.


Color channels
You can display a single channel of the image using the ![]() Color channels button. This opens a combo Box letting you select which of the Red, Green, Blue and Alpha channels should be displayed. The normal aspect of the image with all channels is restored by selecting the RGB option.
Color channels button. This opens a combo Box letting you select which of the Red, Green, Blue and Alpha channels should be displayed. The normal aspect of the image with all channels is restored by selecting the RGB option.
The following keyboard shortcuts can be used to quickly switch over to different color channels:
- RGB: C
- Red: R
- Green: G
- Blue: B
- Alpha: A
The icon of the Color channels button changes depending on the currently display channel(s).
Keyboard shortcuts can only be used if the 2D View panel has focus. You may click on this panel at least once to ensure this is the case.
Since the panel needs focus, these shortcuts do not interfere with any custom shortcuts you may have set for creating nodes in the graph – learn more about this feature here.


Transparency toggle
Transparency display can be toggled on and off, using the ![]() /
/![]() Show checkerboard button. When this is enabled, transparency is displayed using a checkerboard pattern.
Show checkerboard button. When this is enabled, transparency is displayed using a checkerboard pattern.
There are two main ways to interpret transparency, which can be selected using the ![]() /
/![]() Transparency mode button:
Transparency mode button:
![]() Straight: transparency information is only stored in the alpha channel, and does not impact any other aspect of the image
Straight: transparency information is only stored in the alpha channel, and does not impact any other aspect of the image
![]() Premultiplied: transparency information is stored in the alpha channel, and also impacts the RGB channels since they are effectively multiplied against the alpha channel
Premultiplied: transparency information is stored in the alpha channel, and also impacts the RGB channels since they are effectively multiplied against the alpha channel
To display correct colors, the appropriate transparency mode should be selected in the 2D View panel to match the transparency method which was applied when the image was created.


Color space
For the most accurate representation of color, images are displayed by default in a color space which matches the one used by the monitor.
The available controls and the effect of the ![]() /
/![]() Color space button will depend on the Color management mode set in the Project settings. Learn more about these controls in the Color management section in this page.
Color space button will depend on the Color management mode set in the Project settings. Learn more about these controls in the Color management section in this page.
Bitmap painting tools
The Bitmap painting tools are available for Bitmap resources matching these criteria:
- The bitmap uses 8-bit precision
- The bitmap resource is imported into the package, linked images are not supported


You can learn more in the Bitmap painting editor page of the documentation.
Vector graphics editor
The Vector graphics editor is available for imported SVG resources, linked resources are not supported.


You can learn more in the Vector Graphic Editor (deprecated) page of the documentation.


Color management
The 2D View offers simple color management controls to let you choose which display color space should be used when displaying the image.
These controls will adapt to the current Color management mode set in the Project settings, as follows:
- Legacy: you can disp.lay the image in the
 sRGB or
  Linear sRGB color spaces;
 - Adobe ACE: you can
 enable color management and set the most appropriate color space for the current monitor as detected by the Adobe ACE engine, or
  disable color management and display the image using the Raw color values;
- OCIO: you can
 enable color management and set the most appropriate one for the current monitor as detected by the OCIO engine, use the combo box and select any of the display color spaces available in the OCIO configuration file currently used, or
  disable color management and display the image using the Raw color values.
Be mindful that these controls only impact the display color space. The original color space of images and the working color space should also be taken into account to make sure colors are displayed accurately in the 2D View.
Go to the Color management section of this documentation to learn more about this feature and its broader implementation in Designer.


