Have a question to ask or an idea to share? Come and participate in Adobe XD Community. We would love to hear from you and see your creations!
- Adobe XD User Guide
- Introduction
- Design
- Artboards, guides, and layers
- Shapes, objects, and path
- Text and fonts
- Components and states
- Masking and effects
- Layout
- Videos and Lottie animations
- Prototype
- Create interactive prototypes
- Animate prototypes
- Object properties supported for auto-animate
- Create prototypes with keyboard and gamepad
- Create prototypes using voice commands and playback
- Create timed transitions
- Add overlays
- Design voice prototypes
- Create anchor links
- Create hyperlinks
- Preview designs and prototypes
- Share, export, and review
- Share selected artboards
- Share designs and prototypes
- Set access permissions for links
- Work with prototypes
- Review prototypes
- Work with design specs
- Share design specs
- Inspect design specs
- Navigate design specs
- Review and comment design specs
- Export design assets
- Export and download assets from design specs
- Group sharing for enterprise
- Back up or transfer XD assets
- Design systems
- Cloud documents
- Integrations and plugins
- Work with external assets
- Work with design assets from Photoshop
- Copy and paste assets from Photoshop
- Import or open Photoshop designs
- Work with Illustrator assets in Adobe XD
- Open or import Illustrator designs
- Copy vectors from Illustrator to XD
- Plugins for Adobe XD
- Create and manage plugins
- Jira integration for XD
- Slack plugin for XD
- Zoom plug-in for XD
- Publish design from XD to Behance
- XD for iOS and Android
- Troubleshooting
- Known and fixed issues
- Installation and updates
- Launch and crash
- Cloud documents and Creative Cloud Libraries
- Prototype, publish, and review
- Import, export, and working with other apps
Looking for information on using Creative Cloud Libraries to create and share design systems in XD? You're in the right place!
Creative Cloud Libraries help your team to centrally manage and distribute design and brand systems assets at scale.
Start by curating your sticker sheet with a set of components and styles that constitute design and brand system in an XD cloud document. When ready to share those reusable assets with your broader team, publish your sticker sheet cloud document as a library and invite your teams, with the right set of permissions.
Once your team accept the library invitations, they can reuse assets from that library and be in sync with any future library updates.
Why use Creative Cloud Libraries?
Meet Natalia, owner of a design library


"As the owner of a design library, I want to publish my design assets and components to a library and invite others to consume the design system library."
Meet Pedro, consumer of a design library


"As the consumer of a design library, I want to seamlessly reuse the shared assets from the library and be notified when Natalia modifies them."
Sounds familiar? If you want to publish all assets and components to a library and invite others to consume your design systems from XD, look no further!
Before you proceed
Be familiar with these concepts in XD:
Publish and share linked libraries
To build and distribute a design system through libraries, start by curating your design system assets (colors, character styles, and components) in the Document Assets panel of your source cloud document.
Once you define your design system assets, publish those assets as a library linked to your source document. Share them with your team to reuse them consistently across all your XD projects and other Creative Cloud apps.


To publish a linked library, follow these steps:
- Click Libraries in the toolbar and open the Document Assets panel view.
- Click Publish as a library to open the Libraries manager.
- In the Libraries manager, click Publish. Alternatively, click Create new and then click Publish linked library.
The published library contains all the assets in the Document Assets panel of your source document.
![]() You can add assets to a linked library only from its source document but can consume the assets in any Creative Cloud apps. If you choose Create new > Create empty library, you get a regular Creative Cloud library not linked to the cloud document. You can add assets to a regular Creative Cloud library from any Creative Cloud app.
You can add assets to a linked library only from its source document but can consume the assets in any Creative Cloud apps. If you choose Create new > Create empty library, you get a regular Creative Cloud library not linked to the cloud document. You can add assets to a regular Creative Cloud library from any Creative Cloud app.


Publish a team library
If you are a Creative Cloud for teams or enterprise user, in addition to publishing a personal library, you maybe able to publish team libraries. Team libraries have shared ownership.
To publish a team library, follow the steps below:
- Open the library manager.
- Choose Create new > Create empty library, or Publish linked library.
- Select the team space, and publish the team library.
To learn about team libraries and its benefits, see Creative Cloud Libraries for business.
Once you publish the library, the Share dialog will appear to help you invite your team members.


- Click Share and add the team members with whom you want to share the library.
- Setting Can edit permission allows your team members to publish new updates to your library. Setting Can view permission allows your team members to consume the library content but won't allow them to update or modify the library.
Once you invite your team members, they are prompted to accept the library invitation through an email or their Creative Cloud desktop app.
Invite document coeditors to libraries with edit permissions
![]() Cloud document permissions don't automatically sync with its linked library. So, when you publish a library, ensure that you invite all your document coeditors to the library with Can edit permissions.
Cloud document permissions don't automatically sync with its linked library. So, when you publish a library, ensure that you invite all your document coeditors to the library with Can edit permissions.


What happens if document coeditors don't have edit permissions to the library?
There can only be one linked library for a cloud document. So, if you don't invite a document coeditor to your library, the coeditor can publish a new library from the same document without knowing that a library already exists. When the coeditor publishes a new library, it gets linked to the document and your original library gets delinked.
If you invite a coeditor to the library with Can view permission, the coeditor won't get an option to update the library. They will see an Up to date status in the Libraries window of the source document.


Learn with an example
- Natalia is the owner of an XD document, Brand_Systems, and invites Pedro as a coeditor to the document.
- Natalia creates a linked library from the document, which is also automatically named as Brand_Systems, and forgets to invite Pedro to the library.
- Pedro adds new assets to the document and wants to publish a library unaware that a linked library exists.
- Pedro selects the Publish button in the Libraries window of the document, creating a new linked library, Brand_Systems(1) in the process. Creation of Brand_Systems(1) delinks the original library from the document.
- Natalia sees that links to the assets in the library from another document are now broken.
Did your original library get delinked from the source document by a coeditor? See Relink library with source document.
Best practices
- When you publish a new linked library from your cloud document, ensure that you invite all the document coeditors to your library with Can Edit permission. Only if you want them to consume the library assets, invite them to your library with Can View permission.
- As you invite new coeditors to the document, ensure that you invite them to the linked library and provide the necessary permission.
Things to watch out for
- When you publish a library for the first time, depending on its size, might take a few minutes to publish. You can track the progress of the library publishing from the progress indicator in the libraries manager.
- When you first accept the library invitation, it might take few minutes to sync the library. Click the cloud icon in your Creative Cloud desktop app to check the library sync status. Once the library is fully synced, you can access it from XD and other Creative Cloud apps.
Consume libraries
If you have accepted the library invite, you can start using assets from the library in XD and in other Creative Cloud apps. To use assets from the library in XD, follow the steps below:
Find your shared library


In the Libraries panel view, find your shared library.
![]() You can choose to show some libraries in the Libraries panel view, and hide others.
You can choose to show some libraries in the Libraries panel view, and hide others.
Consume assets from the shared library


Click the library that you want to consume assets from.
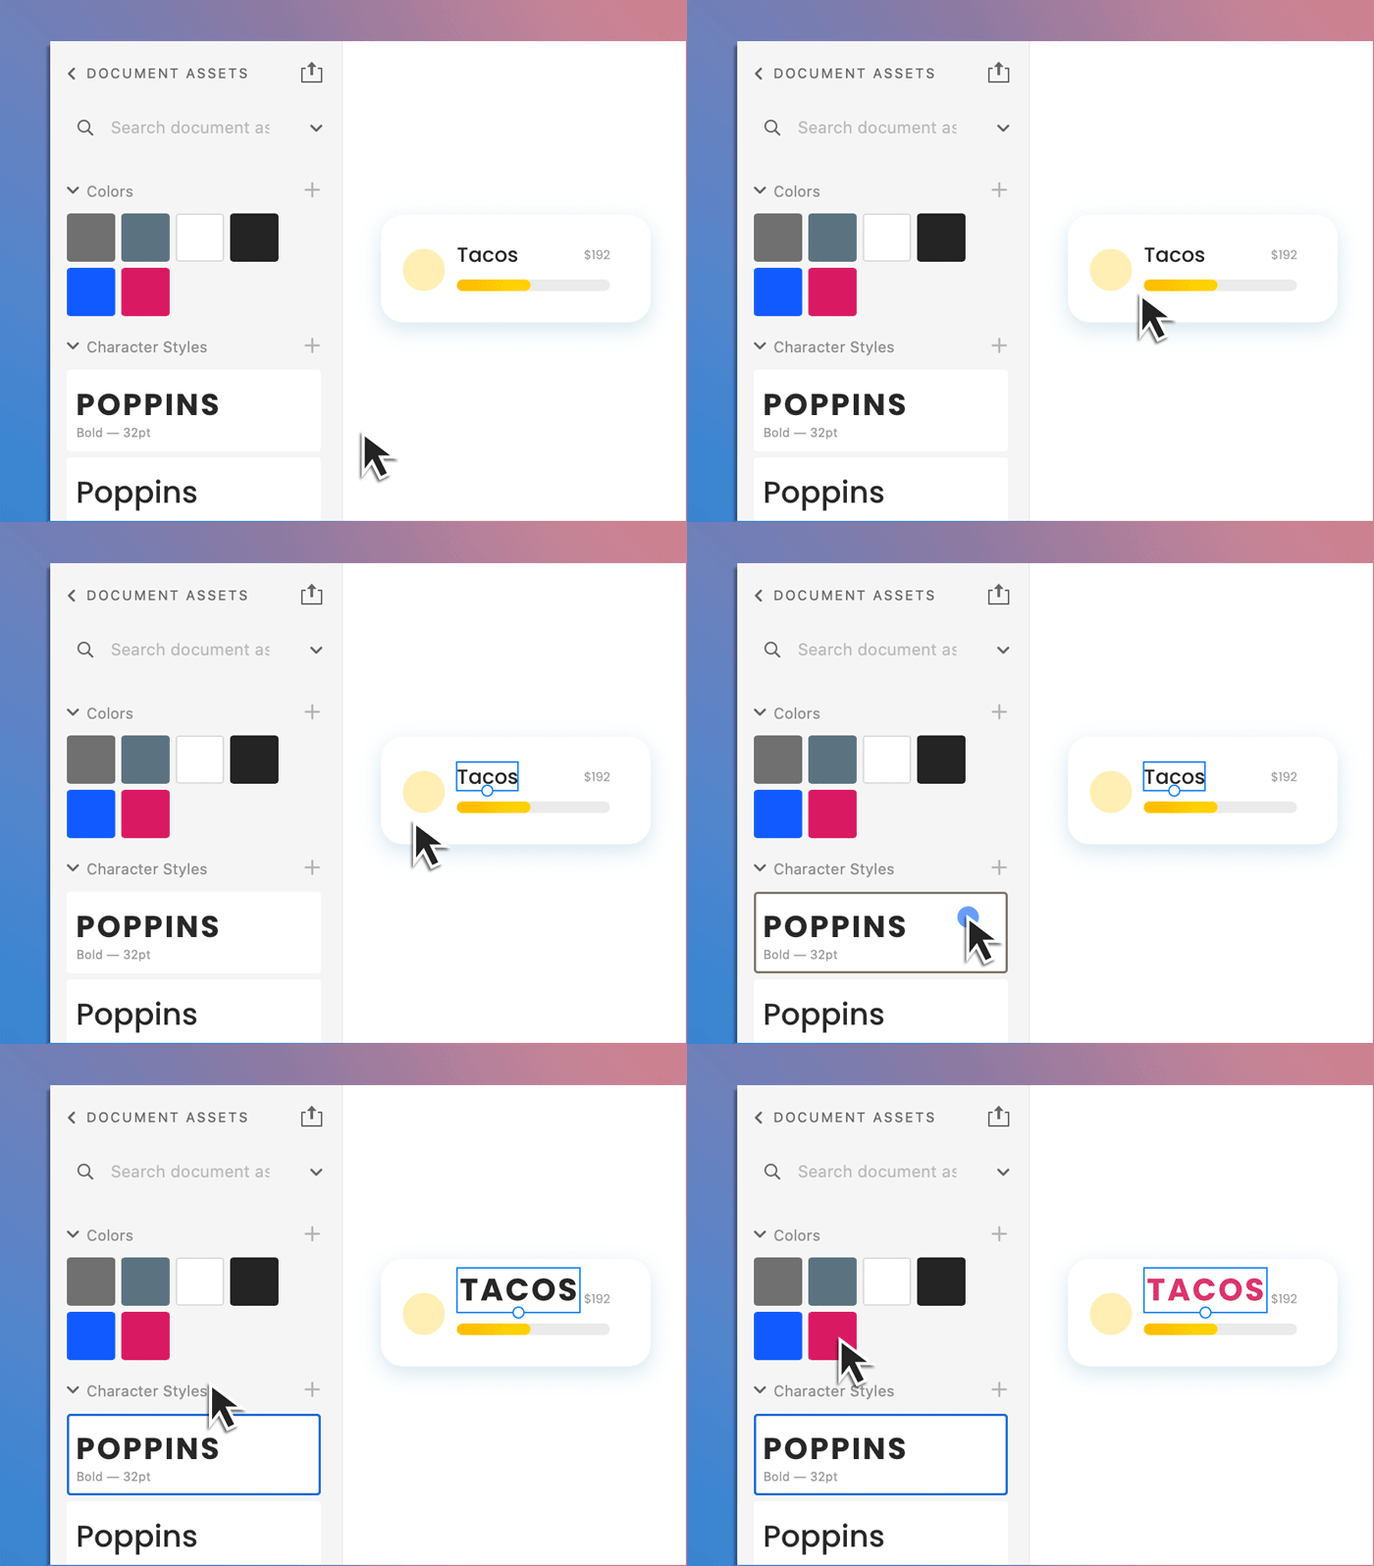
Apply colors or character styles


You can apply colors or character styles to objects or components on canvas, and drag components to canvas that become linked assets.
View linked assets in your document


Switch to the Document Assets panel view that shows all the local and linked assets used from one or multiple libraries.
You can choose to show some libraries in the Libraries panel view and hide others:
- Open the Libraries manager:
- Document Assets panel view: Click Publish as a library at the top of the panel.
- Libraries panel view: Click + or Manage libraries.
- Use the toggles to show or hide the libraries.
- Close the Libraries manager.


Update published libraries
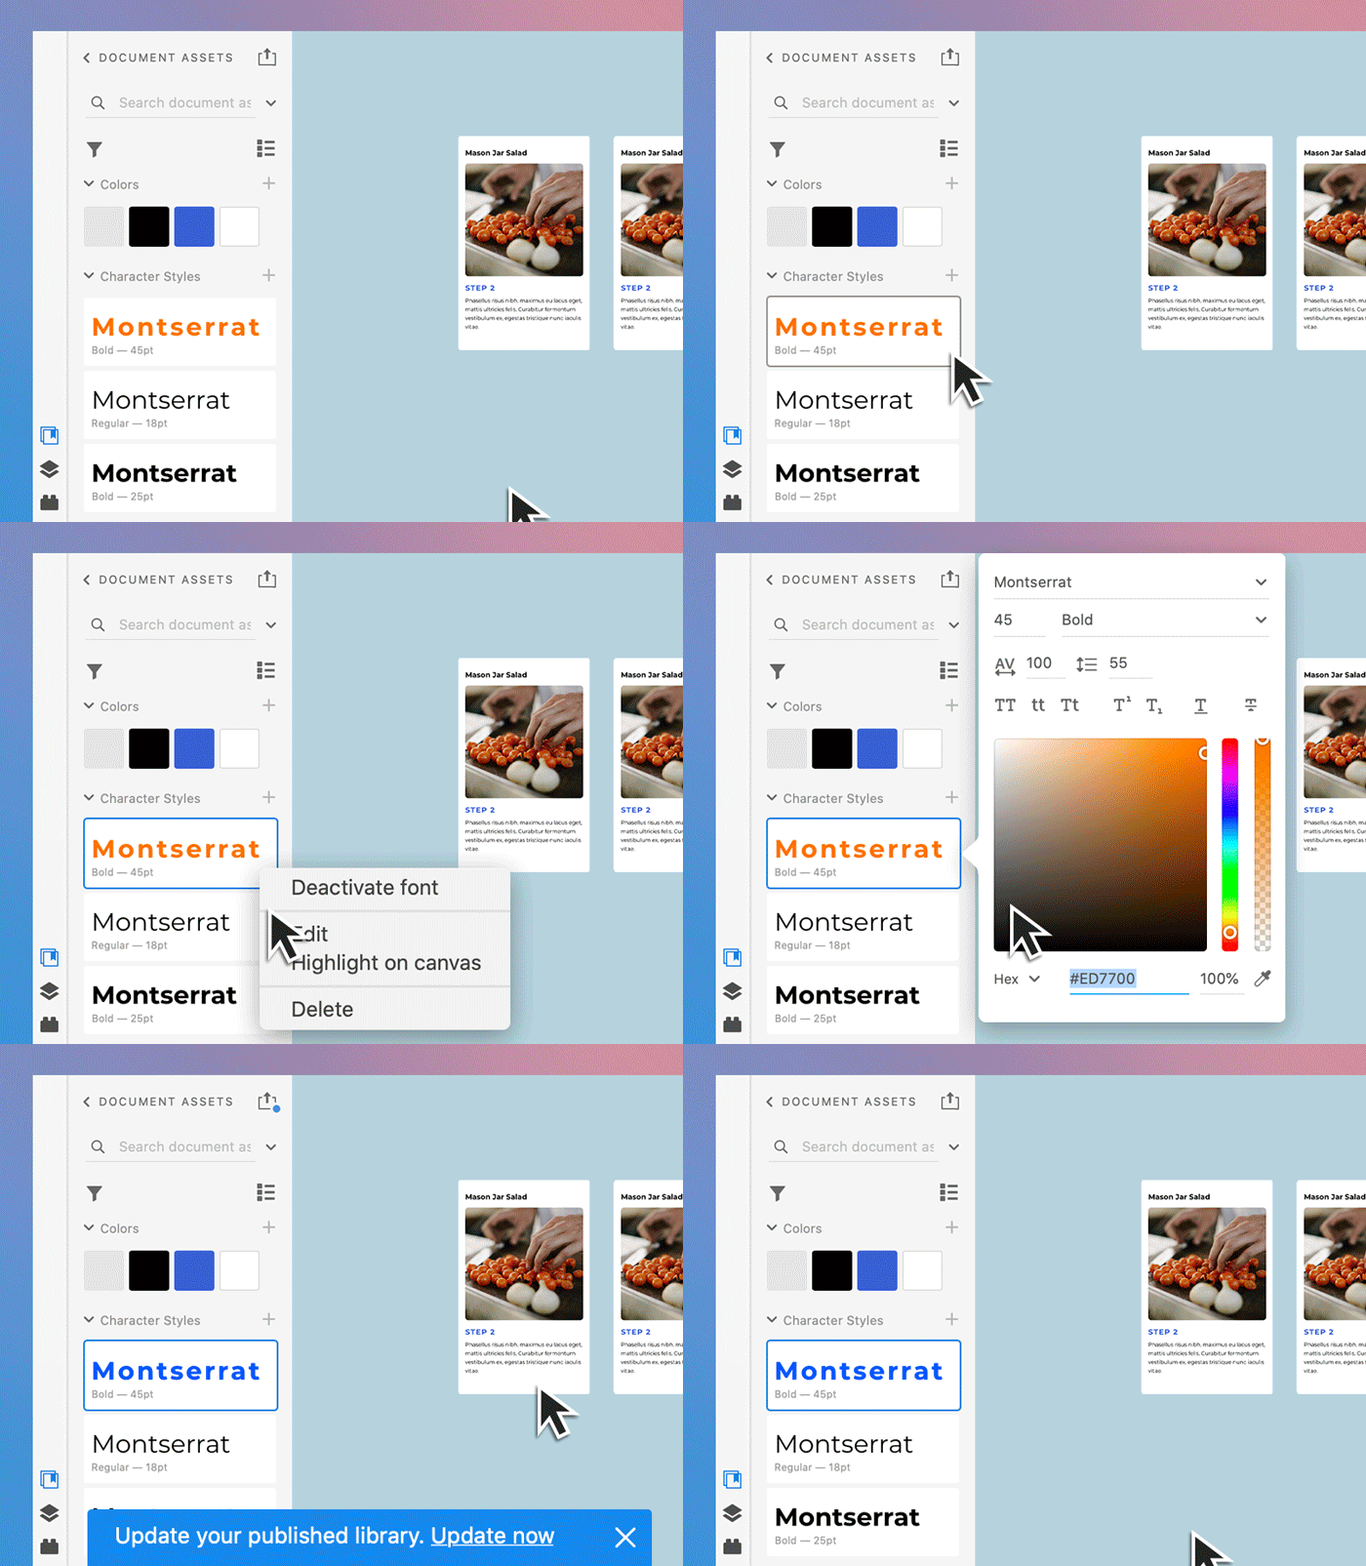
Once you publish a library from an XD cloud document and then modify the assets in your source cloud document, XD notifies you about changes made since you last published the library in the following ways:
- An in-app message after you make changes to a published library to ease the process of updating the library.
- Blue badge on Publish as a library next in the Document Assets panel indicates that an update is ready to be published.
When you are ready to publish updates to your library, use any of these options:
Update from the in-app message


Click Update now in the in-app message that notifies you that an update is ready to be published.
Update from the Libraries manager


Click Publish as a library in the Document Assets panel view to open the Libraries manager. Click Update to push the latest updates to your team.
Preview and accept library updates
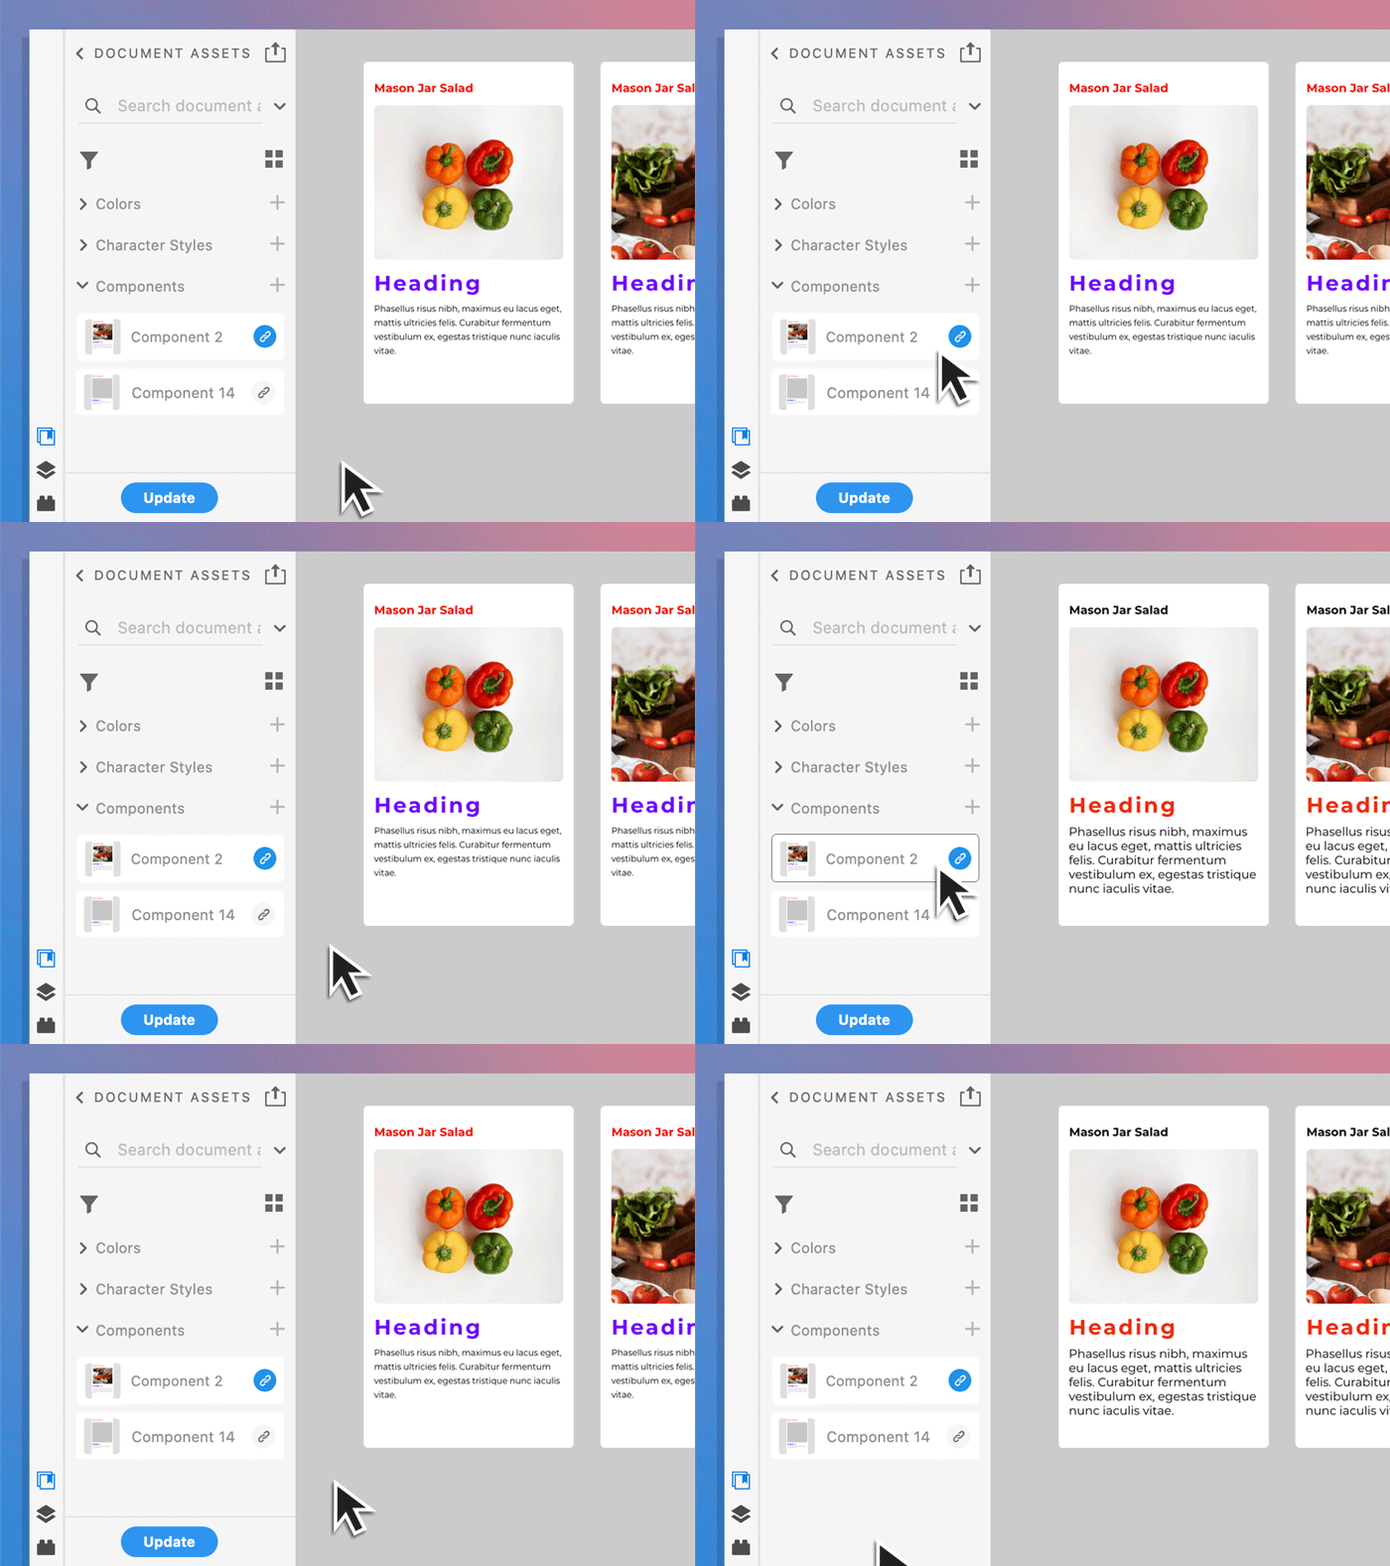
What happens when you update and publish libraries? Your fellow designers using those updated linked assets in their design projects receive the following notifications:
- Document Assets panel view: A blue badge
 on the linked assets that are pending updates, as well as the Update all button at the bottom of the panel.
 - Libraries panel view: A blue badge
 next to Document Assets indicating the number of updates that are pending in your document.
Preview updates from the Document Assets panel view or the design canvas


Hover over the blue update icon ![]() on linked colors, character styles, and components.
on linked colors, character styles, and components.
Update all linked colors, character styles, and components within the document


Click the blue update icon or click Update at the bottom of the Document Assets panel view.
As your document assets and libraries grow in size, you can use search and filter features.
In the Document Assets panel view, enter the search term to search for assets in your document. In the Libraries panel view, search for assets across all your active libraries.
XD provides these three filtering mechanisms to narrow down the assets that you would like to use in your project:
- Asset type: Filter by asset types (colors, character styles, or components) that you want to see. Filter results show both local and linked assets.
- Local assets: If you want to use only the local document assets, select the local assets filter.
- Linked assets source: If you have linked assets from multiple cloud documents or libraries and you want to use assets from a specific source, select the desired library or linked source document from the filter.


To experiment and change certain styles or properties for a linked asset without impacting others who are using it in their documents, you can convert your linked asset to a local asset.
- In the Document Assets panel view, select the linked asset.
- Right-click the asset and select Make local.
Things to watch out for
If you convert a linked asset to a local asset, you no longer receive notifications to changes made to that linked asset in the library. Other XD documents with that linked asset will continue to receive updates.
Make local works when you use an asset from a library, or copy/paste a linked component across documents, or when you have a broken linked asset.


To learn about relinking a delinked library to its source document, see Relink library with source document.
Unpublish libraries
If you decided that you no longer need a library, you can unpublish it from the Libraries manager. To unpublish a library:
- Open the Libraries manager from the source document of the library.
- Click the three dots next to Share, and then click Unpublish.
When unpublished, any linked assets that were previously taken from this library will become broken links indicated by a red badge. You can either delete those broken assets or convert them to local assets.
Things to watch out for
- If you unpublish a library and later republish it, broken linked assets will not relink to that library.
Consume assets from libraries created in Creative Cloud apps
XD makes it easy for you and your teams to use assets created in different Creative Cloud apps like Photoshop and Illustrator. Whether you created an inspirational library with a collection of graphics, or Adobe Stock images, or a library with a collection of reusable colors and character styles that are not linked to a source document, you can reuse those assets in XD.


When you drag graphics from libraries to your designs, they become linked graphics indicated by the badge. Any modifications made to that linked graphic in Photoshop or Illustrator will automatically update all linked graphic instances in your design. To unlink a linked graphic, click the link badge or use the context menu to unlink it.
To create a similar library in XD with a collection of colors, character styles, or graphics that are not linked to your document, in the Libraries manager, choose Create new > Create empty library.
Things to watch out for
- You can only add components to libraries by publishing your document as a library.
- You cannot edit colors or character styles in your libraries.
- When adding 3D transform graphics to a library, the 3D transformation is lost.
Best practices
- For more control on pushing library asset updates, allowing your team to preview and accept those updates, and ensuring your team is in sync with the latest changes, we recommend publishing a linked library from a document as outlined in this article.
Learn more
Watch this video to learn how to work with libraries in XD.
Viewing time: 6 minutes.
What's next?
We've got you started on how to publish and share libraries, take a step forward and learn how to share design specs with your developers so that they can inspect your designs.
Have a question or an idea?