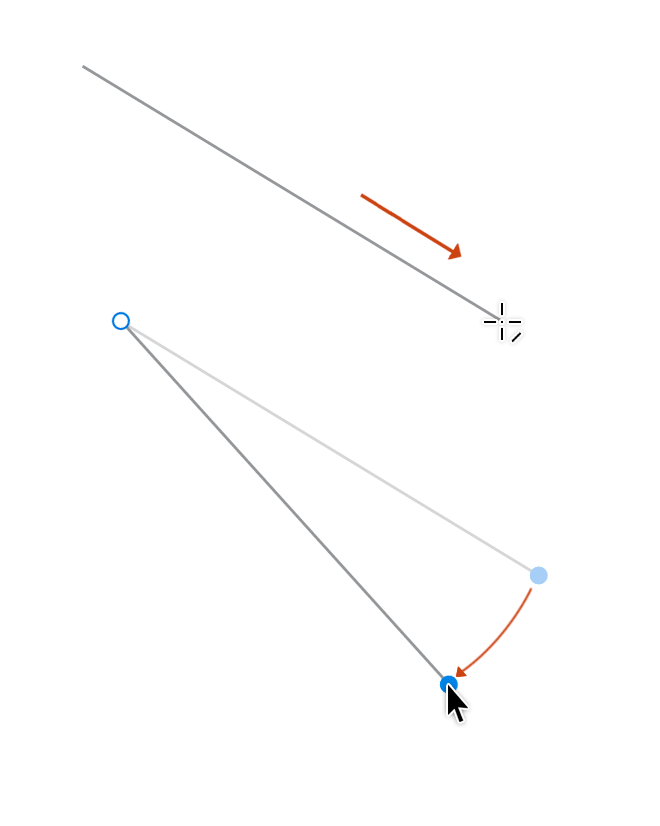
Select the Rectangle tool ![]() .
.
- Adobe XD User Guide
- Introduction
- Design
- Artboards, guides, and layers
- Shapes, objects, and path
- Text and fonts
- Components and states
- Masking and effects
- Layout
- Videos and Lottie animations
- Prototype
- Create interactive prototypes
- Animate prototypes
- Object properties supported for auto-animate
- Create prototypes with keyboard and gamepad
- Create prototypes using voice commands and playback
- Create timed transitions
- Add overlays
- Design voice prototypes
- Create anchor links
- Create hyperlinks
- Preview designs and prototypes
- Share, export, and review
- Share selected artboards
- Share designs and prototypes
- Set access permissions for links
- Work with prototypes
- Review prototypes
- Work with design specs
- Share design specs
- Inspect design specs
- Navigate design specs
- Review and comment design specs
- Export design assets
- Export and download assets from design specs
- Group sharing for enterprise
- Back up or transfer XD assets
- Design systems
- Cloud documents
- Integrations and plugins
- Work with external assets
- Work with design assets from Photoshop
- Copy and paste assets from Photoshop
- Import or open Photoshop designs
- Work with Illustrator assets in Adobe XD
- Open or import Illustrator designs
- Copy vectors from Illustrator to XD
- Plugins for Adobe XD
- Create and manage plugins
- Jira integration for XD
- Slack plugin for XD
- Zoom plug-in for XD
- Publish design from XD to Behance
- XD for iOS and Android
- Troubleshooting
- Known and fixed issues
- Installation and updates
- Launch and crash
- Cloud documents and Creative Cloud Libraries
- Prototype, publish, and review
- Import, export, and working with other apps
Learn to create graphics using the shape tools and the Pen tool in Adobe XD.
Drawing tools
You can quickly draw simple icons and graphics in Adobe XD using the drawing tools on the left toolbar - the rectangle, ellipse, polygon, line, and pen tools. The selection tool helps you select specific line, shapes, or objects to edit them.
You can then combine these shapes in different ways to create compound shapes and objects, or mask portions of the shape. For more information on combining and masking techniques, see Edit objects using Boolean operations and masking techniques.
Draw rectangles and squares
-
-
Perform one of the following actions:
- To draw a rectangle, drag diagonally until the rectangle is the desired size.
- To draw a square, hold down the Shift key while you drag diagonally until the square is the desired size.
-
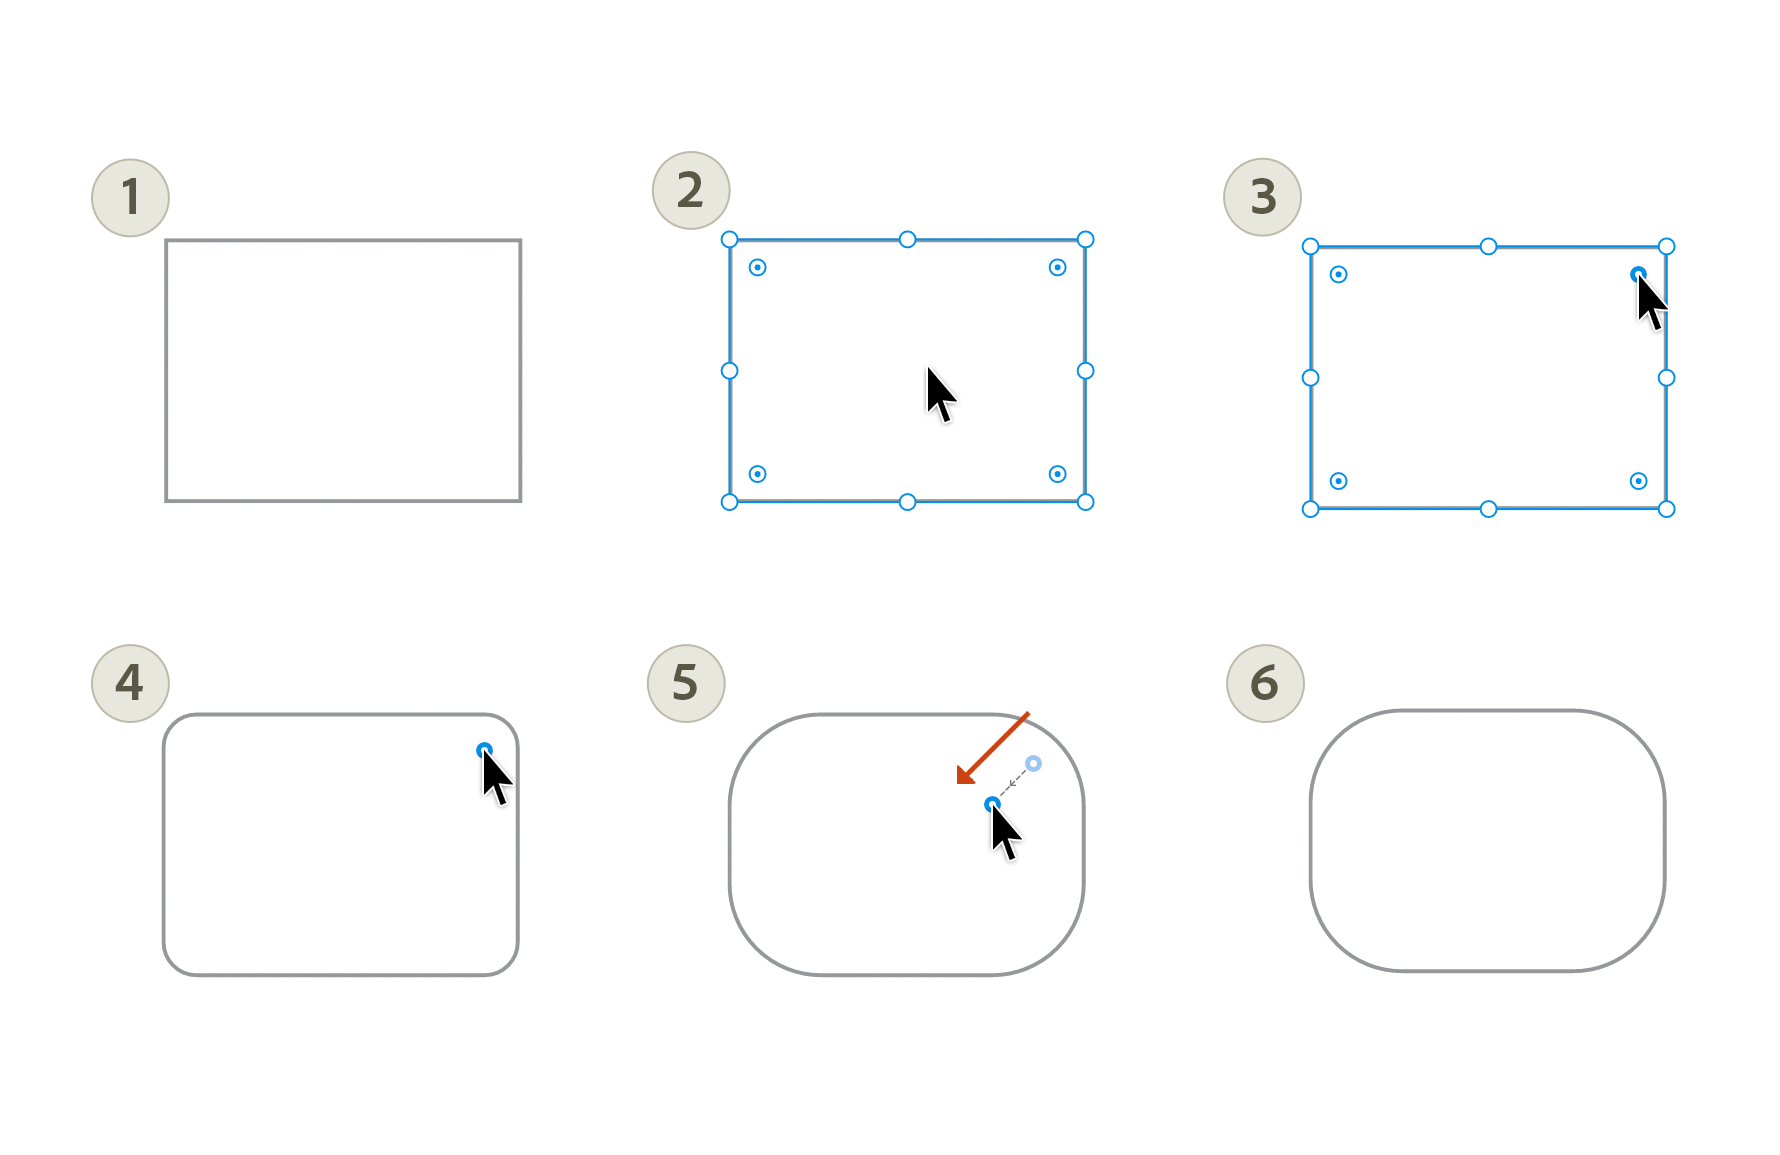
To draw a rounded rectangle, draw a rectangle, and then click it to see the radius editing handles. Click any handle and drag toward the center of the rectangle. You can also use the Property Inspector to enter a specific value for the radius of one or more corners.

Draw rounded rectangles and squares 
Draw rounded rectangles and squares -
To further customize your square or rectangle, you can edit the corner radii.
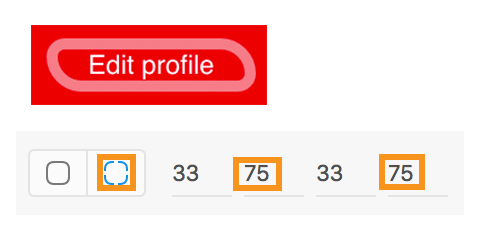
- To adjust the radius of a single corner only, do one of the following:
- Hold the Option key (Mac) or the Alt key (Win), click the handle of the corner, and drag your mouse.
- Edit each corner radius value individually after selecting
 in the Property Inspector.
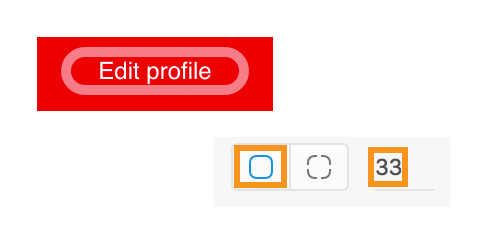
- To adjust the radius of all the corners simultaneously, do one of the following:
- Click a corner radius and drag your mouse.
- Edit the value of the radius after selecting
 in the Property Inspector.

Adjusting the corners one by one 
Adjusting the corners one by one 
Adjusting all four corners simultaneously 
Adjusting all four corners simultaneously - To adjust the radius of a single corner only, do one of the following:
Draw ellipses and circles
-
Select the Ellipse tool
 .
. -
Perform one of the following actions:
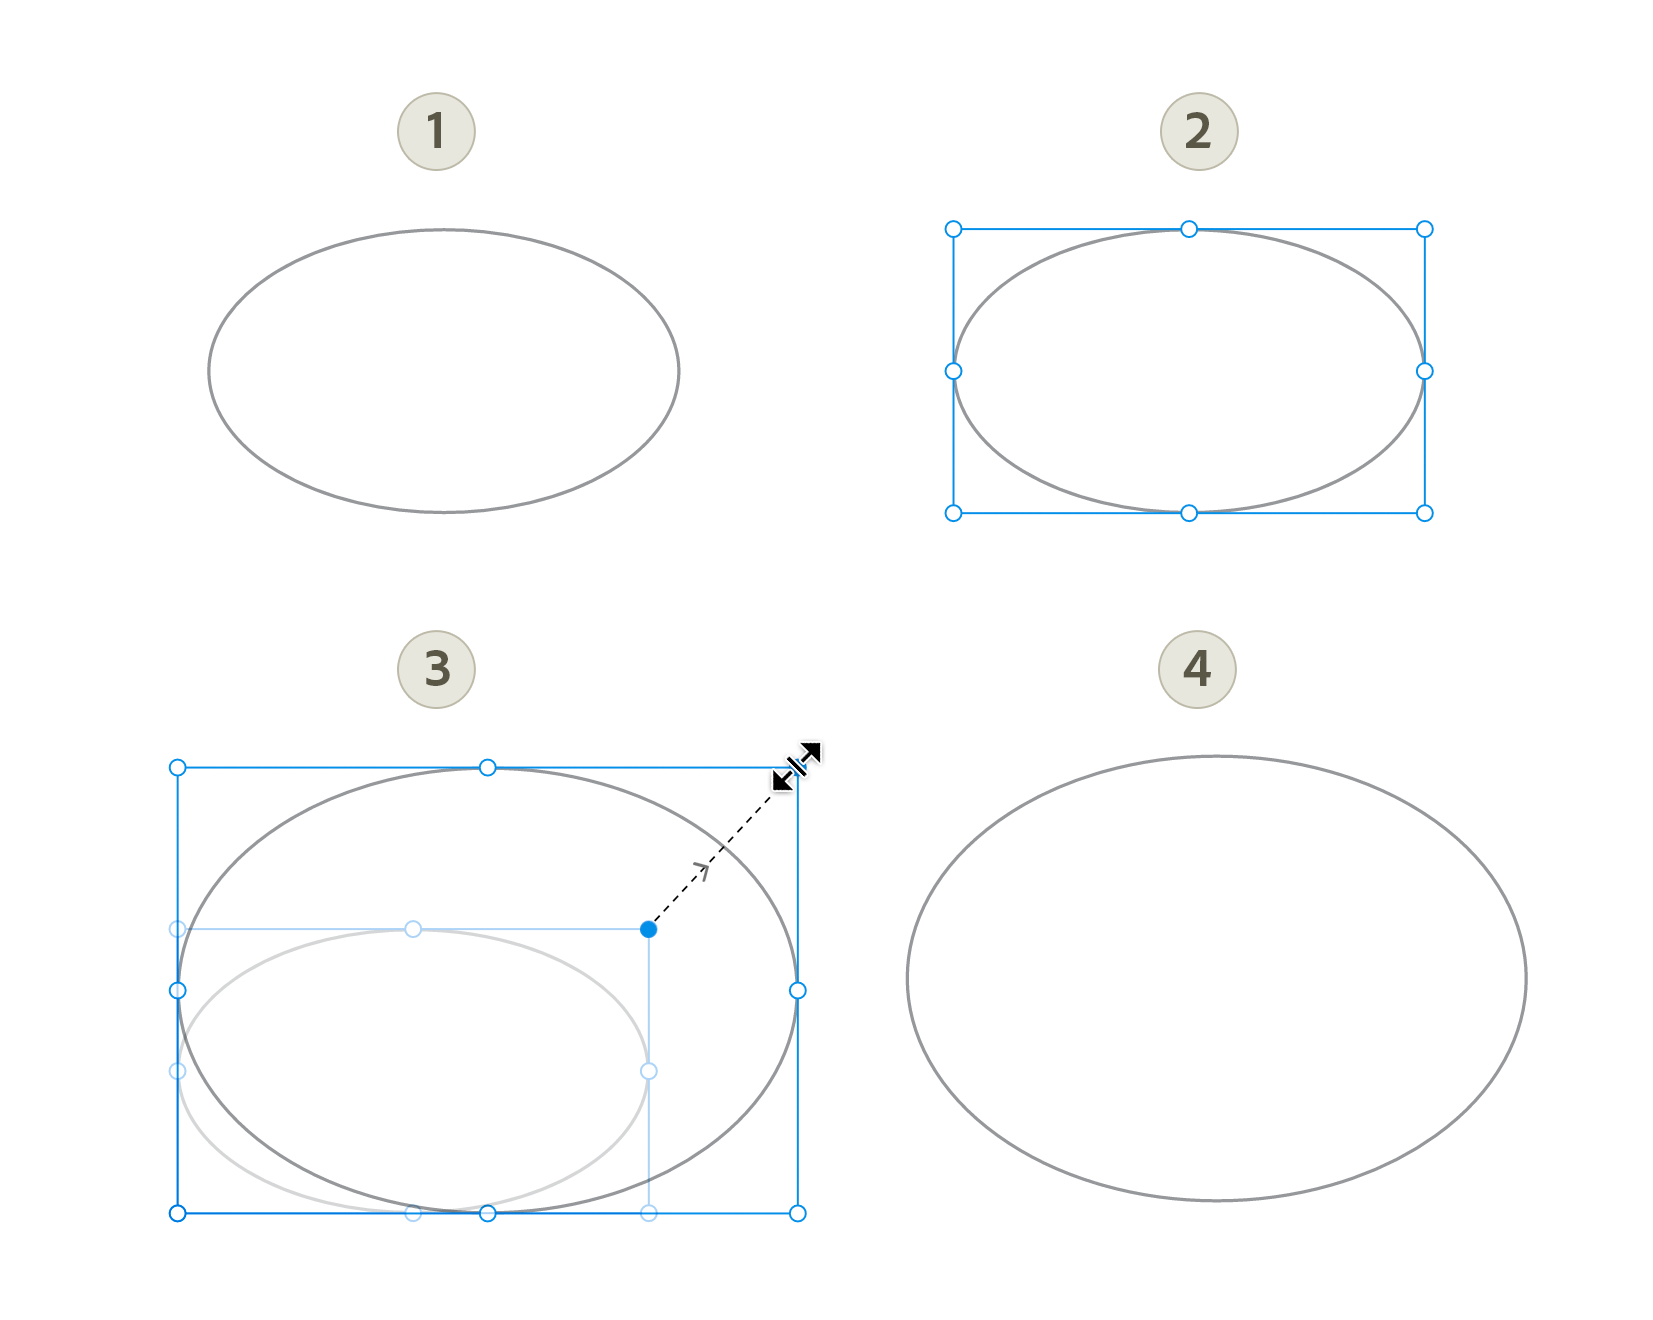
- Drag diagonally until the ellipse is the desired size.
- To create a circle, hold down the Shift key while dragging.

Hold Shift and drag to resize circle. 
Hold Shift and drag to resize circle. - Drag diagonally until the ellipse is the desired size.
Draw Polygons
The Polygon tool helps you create a range of new shapes such as triangles, rhombus, pentagons, stars, and hearts.

-
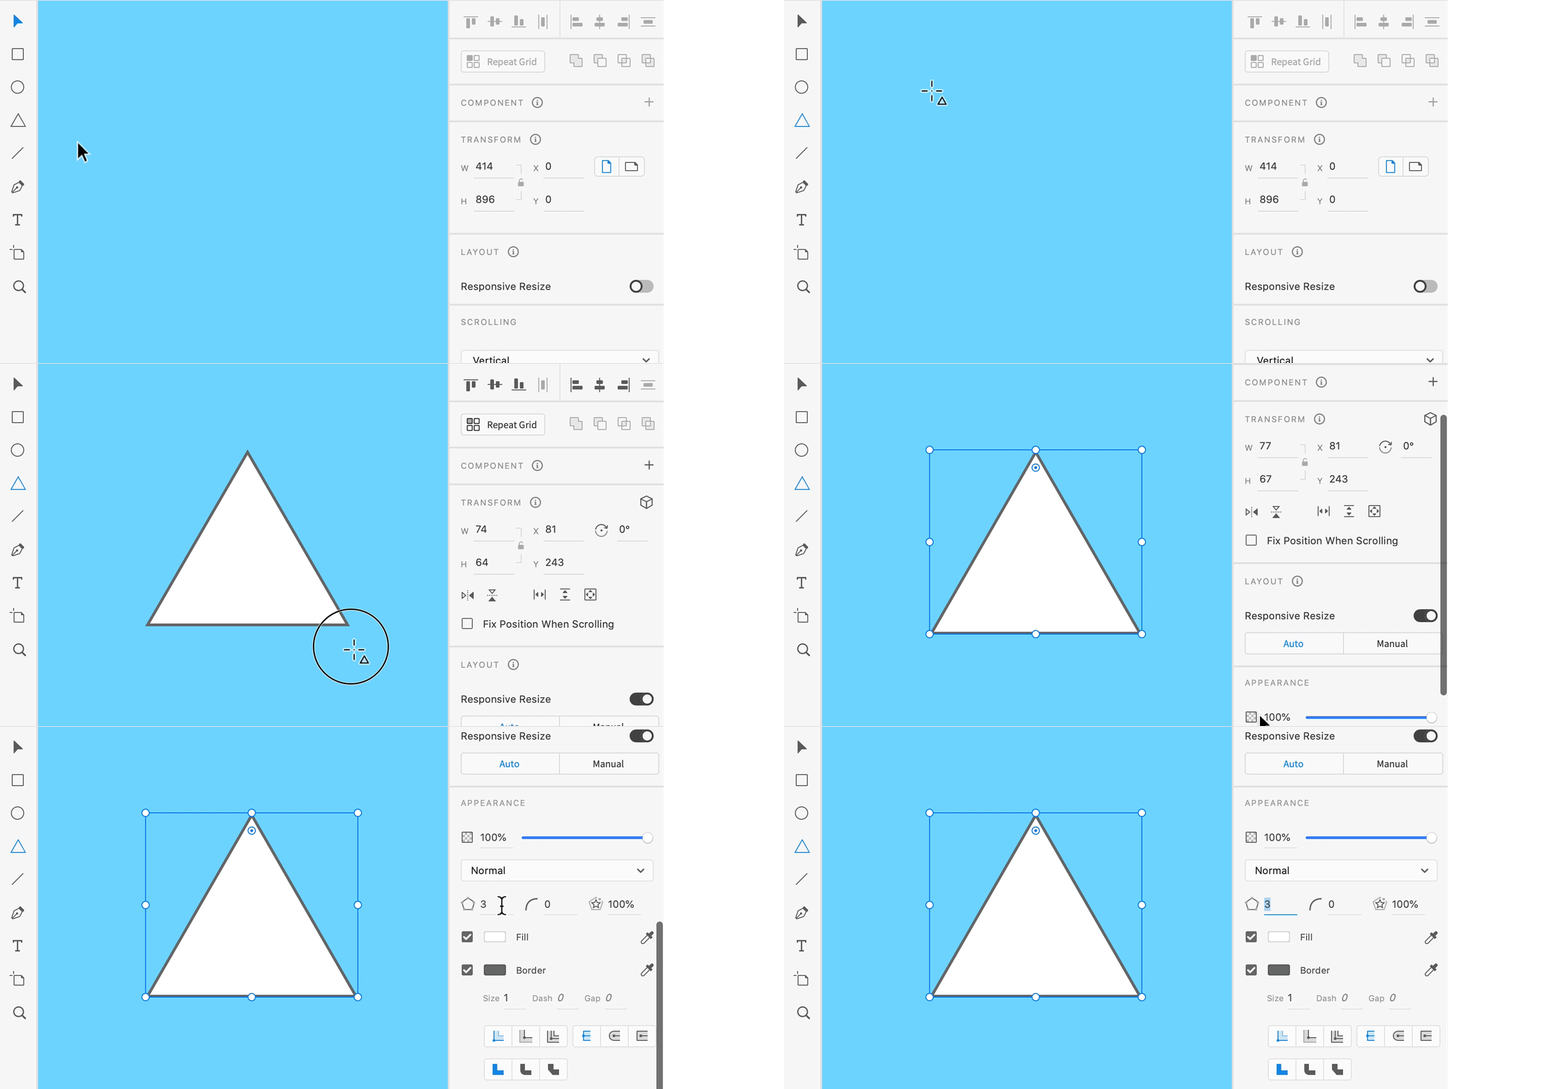
To start drawing a polygon, click “Y” on the keyboard, or select the triangle icon from the Toolbar.
-
On the artboard or canvas, click and drag to draw the shape of the desired size. You’ll notice that the default shape is a triangle.
- Hold down Shift key while drawing to create an equilateral shape.
- Use the left and right arrow keys while drawing to change the polygon to a star shape.
- Use the up and down keyboard arrows while drawing to increase or decrease the number of polygon sides.
-
After creating the shape, you can change the number of polygon sides from the Property Inspector. Select the shape, click the Side Count field in the Property Inspector and type in the desired number of sides.
Polygon properties A. Side count B. Corner radius C. Star ratio
Polygon properties -
To create a star shape using the Polygon tool, start by drawing a polygon on the artboard. Then, click the Star Ratio handle in the upper right corner of the polygon, and drag in towards the radius. You can also adjust the star ratio by clicking the Star Ratio field (
 ) in the Property Inspector. The ratio can be a value between 1 and 100. Use the Corner Count field to define the number of sides you want to have for the polygon. You can draw a star polygon from a regular triangle and go up to a hundred-sided polygon.
 - Hold down Shift key while dragging the Star Ratio handle to change it in increments of 10%. Alternatively, place the cursor on the Star Ratio field, and press the up and down arrow keys to control the ratio size.
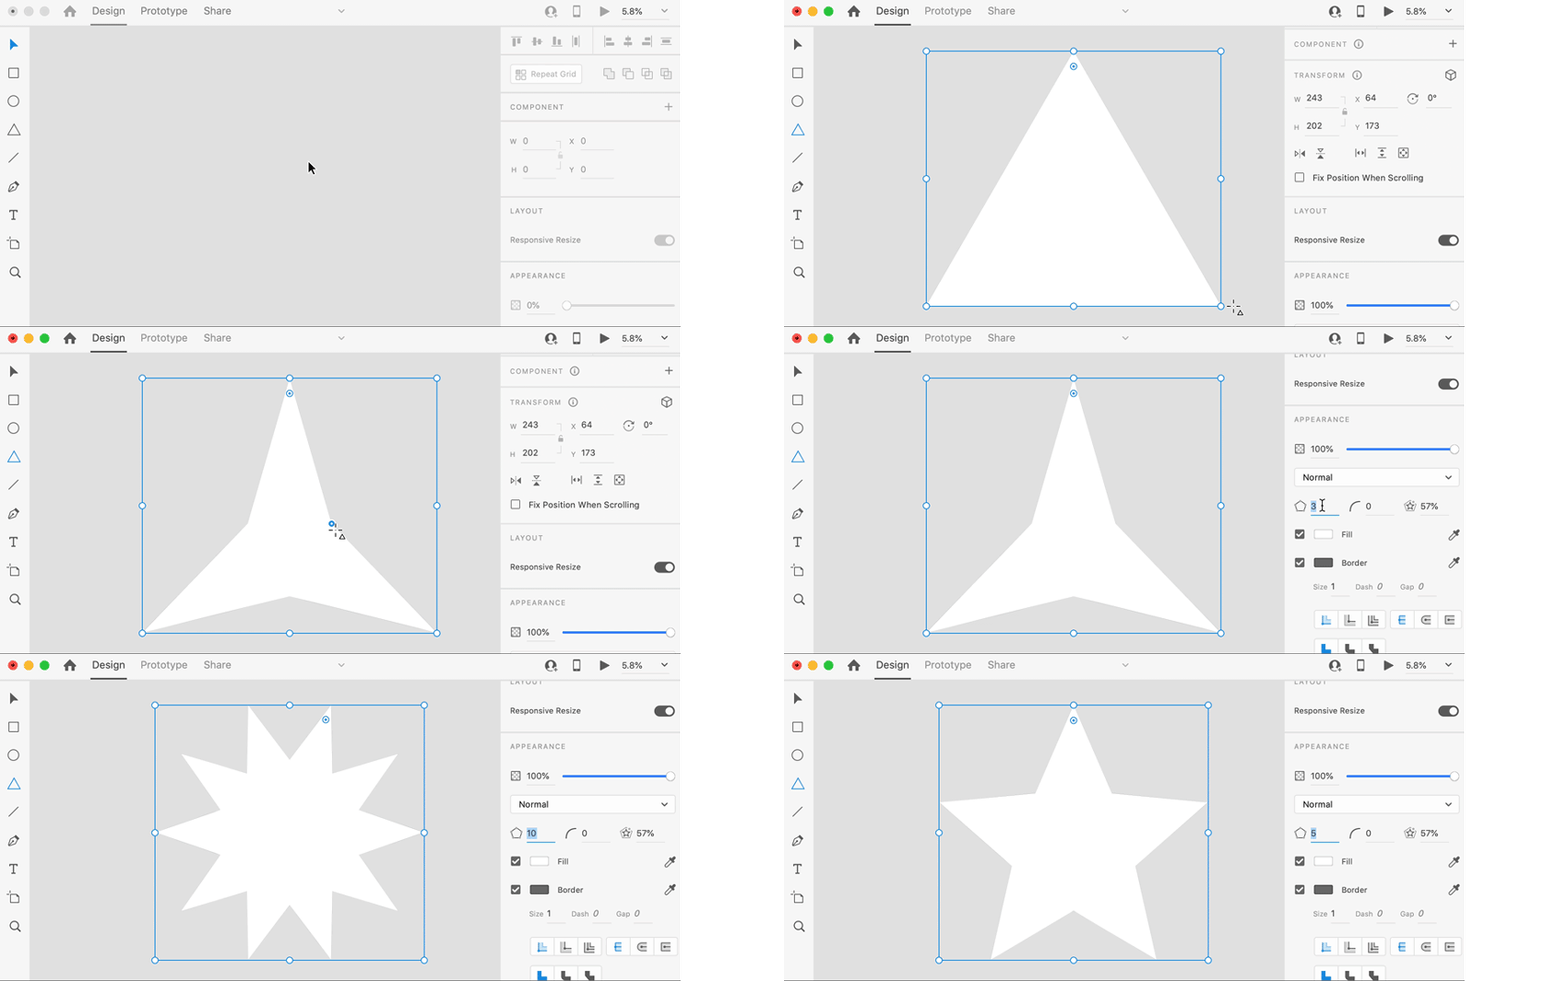

- Hold down Shift key while dragging the Star Ratio handle to change it in increments of 10%. Alternatively, place the cursor on the Star Ratio field, and press the up and down arrow keys to control the ratio size.
-
To create a heart shape, draw a polygon on the artboard. Then, click the Corner Count (
 )
)
field in the Property Inspector and type <3.
-
To change the Corner Radius of the polygon, click and drag the radius decoration handle from the upper corner of the shape, or click the Corner Radius field in the Property Inspector, and enter the desired value.
 Every shape has one radius decoration handle. You cannot change the corner radius of each side of the shape.
 -
Set the shape properties (Fill Color, Border Thickness and Color, Inner Shadow, Drop Shadow and Background Blur) for the polygon. These properties are preserved when you change the number of sides of the shape.
-
Double-click on a polygon to view all the anchor points of the shape. You can create new anchor points by clicking anywhere on the path of the shape.
 Creating or editing the anchor points of a shape will turn it into a path, and it loses its polygon abilities.
Draw lines
-
Select the Line tool
 .
. -
Position the pointer where you want the line to begin, and drag to where you want the line to end.

Draw lines using the Line tool. 
Draw lines using the Line tool.
Draw with the Pen tool
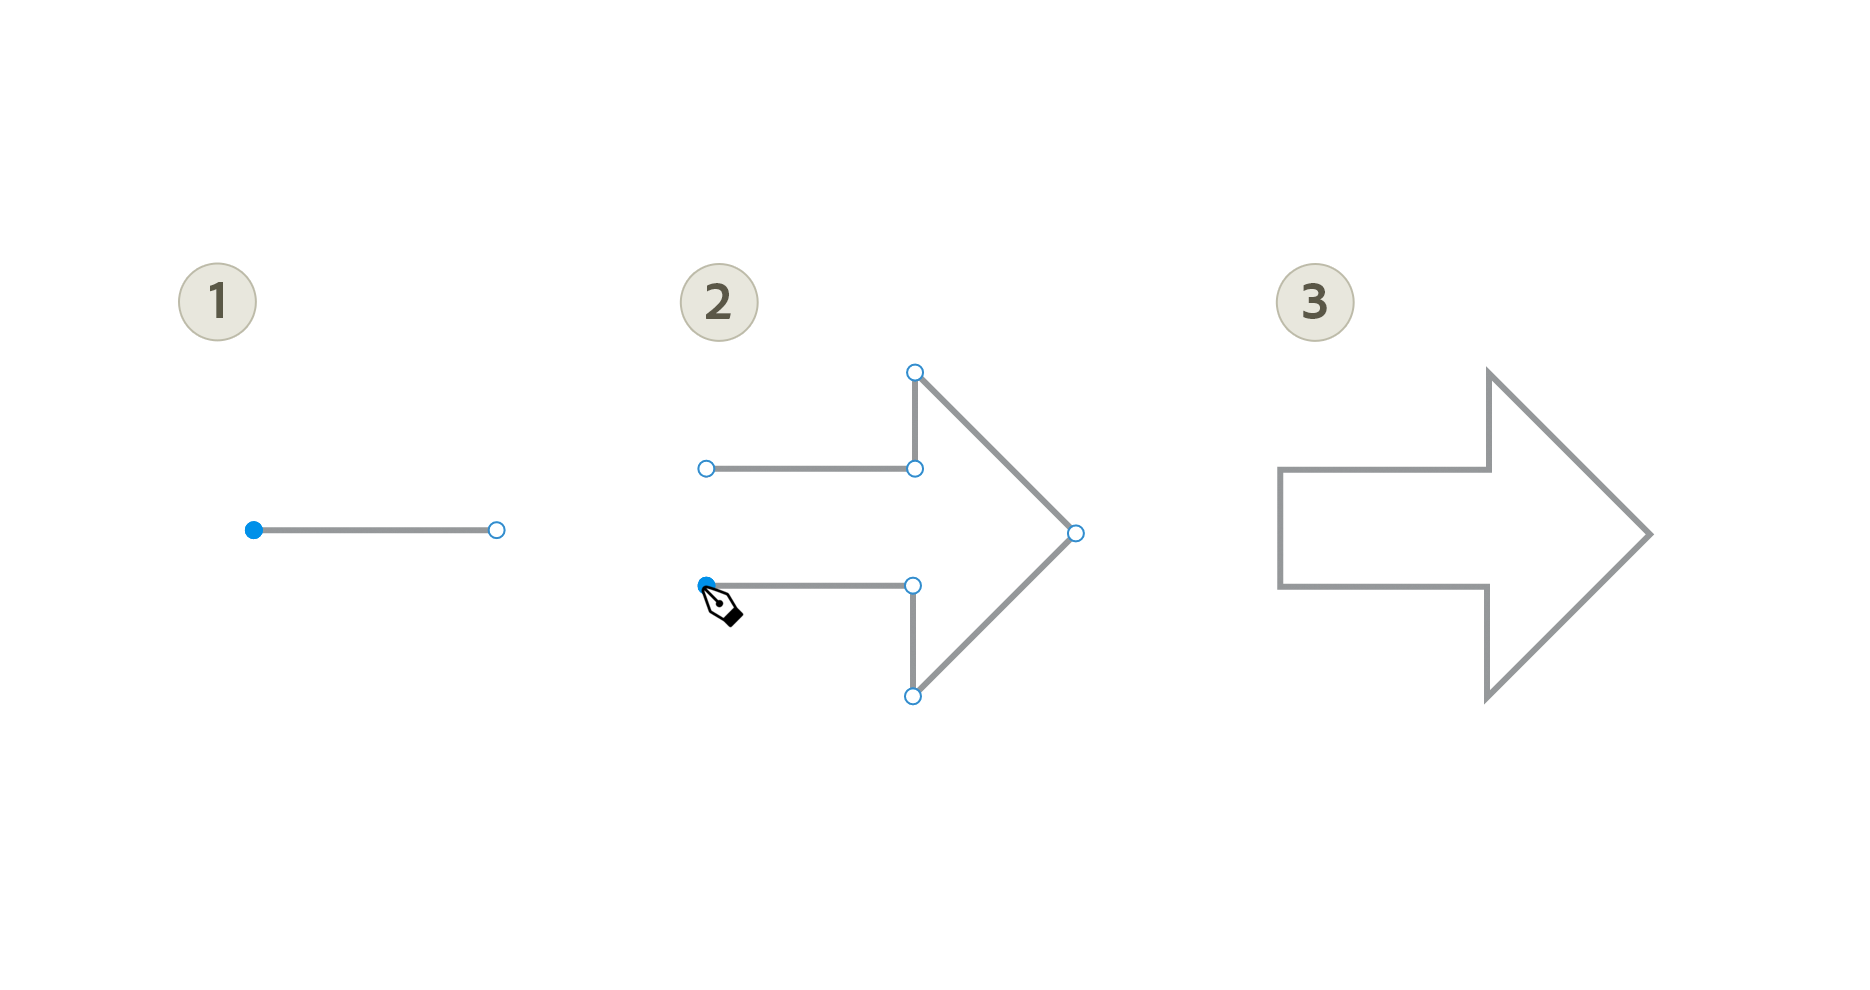
The simplest path you can draw with the Pen tool is a straight line, made by clicking the Pen tool to create two anchor points. By continuing to click, you create a path made of straight-line segments connected by corner points.
-
Select the Pen tool
 .
. -
Position the Pen tool where you want the straight segment to begin, and click to define the first anchor point.
-
Click again where you want the segment to end (Shift-click to constrain the angle of the segment to a multiple of 45°).
-
Continue clicking to set anchor points for more straight segments.
 To convert an anchor point from straight to curved and the opposite way, double-click the anchor point.
The last anchor point you add always appears as a solid circle, indicating that it is selected. Previously defined anchor points become hollow, and deselected, as you add more anchor points.
-
Complete the path by doing one of the following:
- To leave the path open, click Esc.
- To close the path, position the Pen tool over the first (hollow) anchor point. Click or drag to close the path.
- To select and drag the start point without closing the path, hold down the Cmd/Ctrl key.

Draw straight lines using the pen tool. 
Draw straight lines using the pen tool.
Draw curves
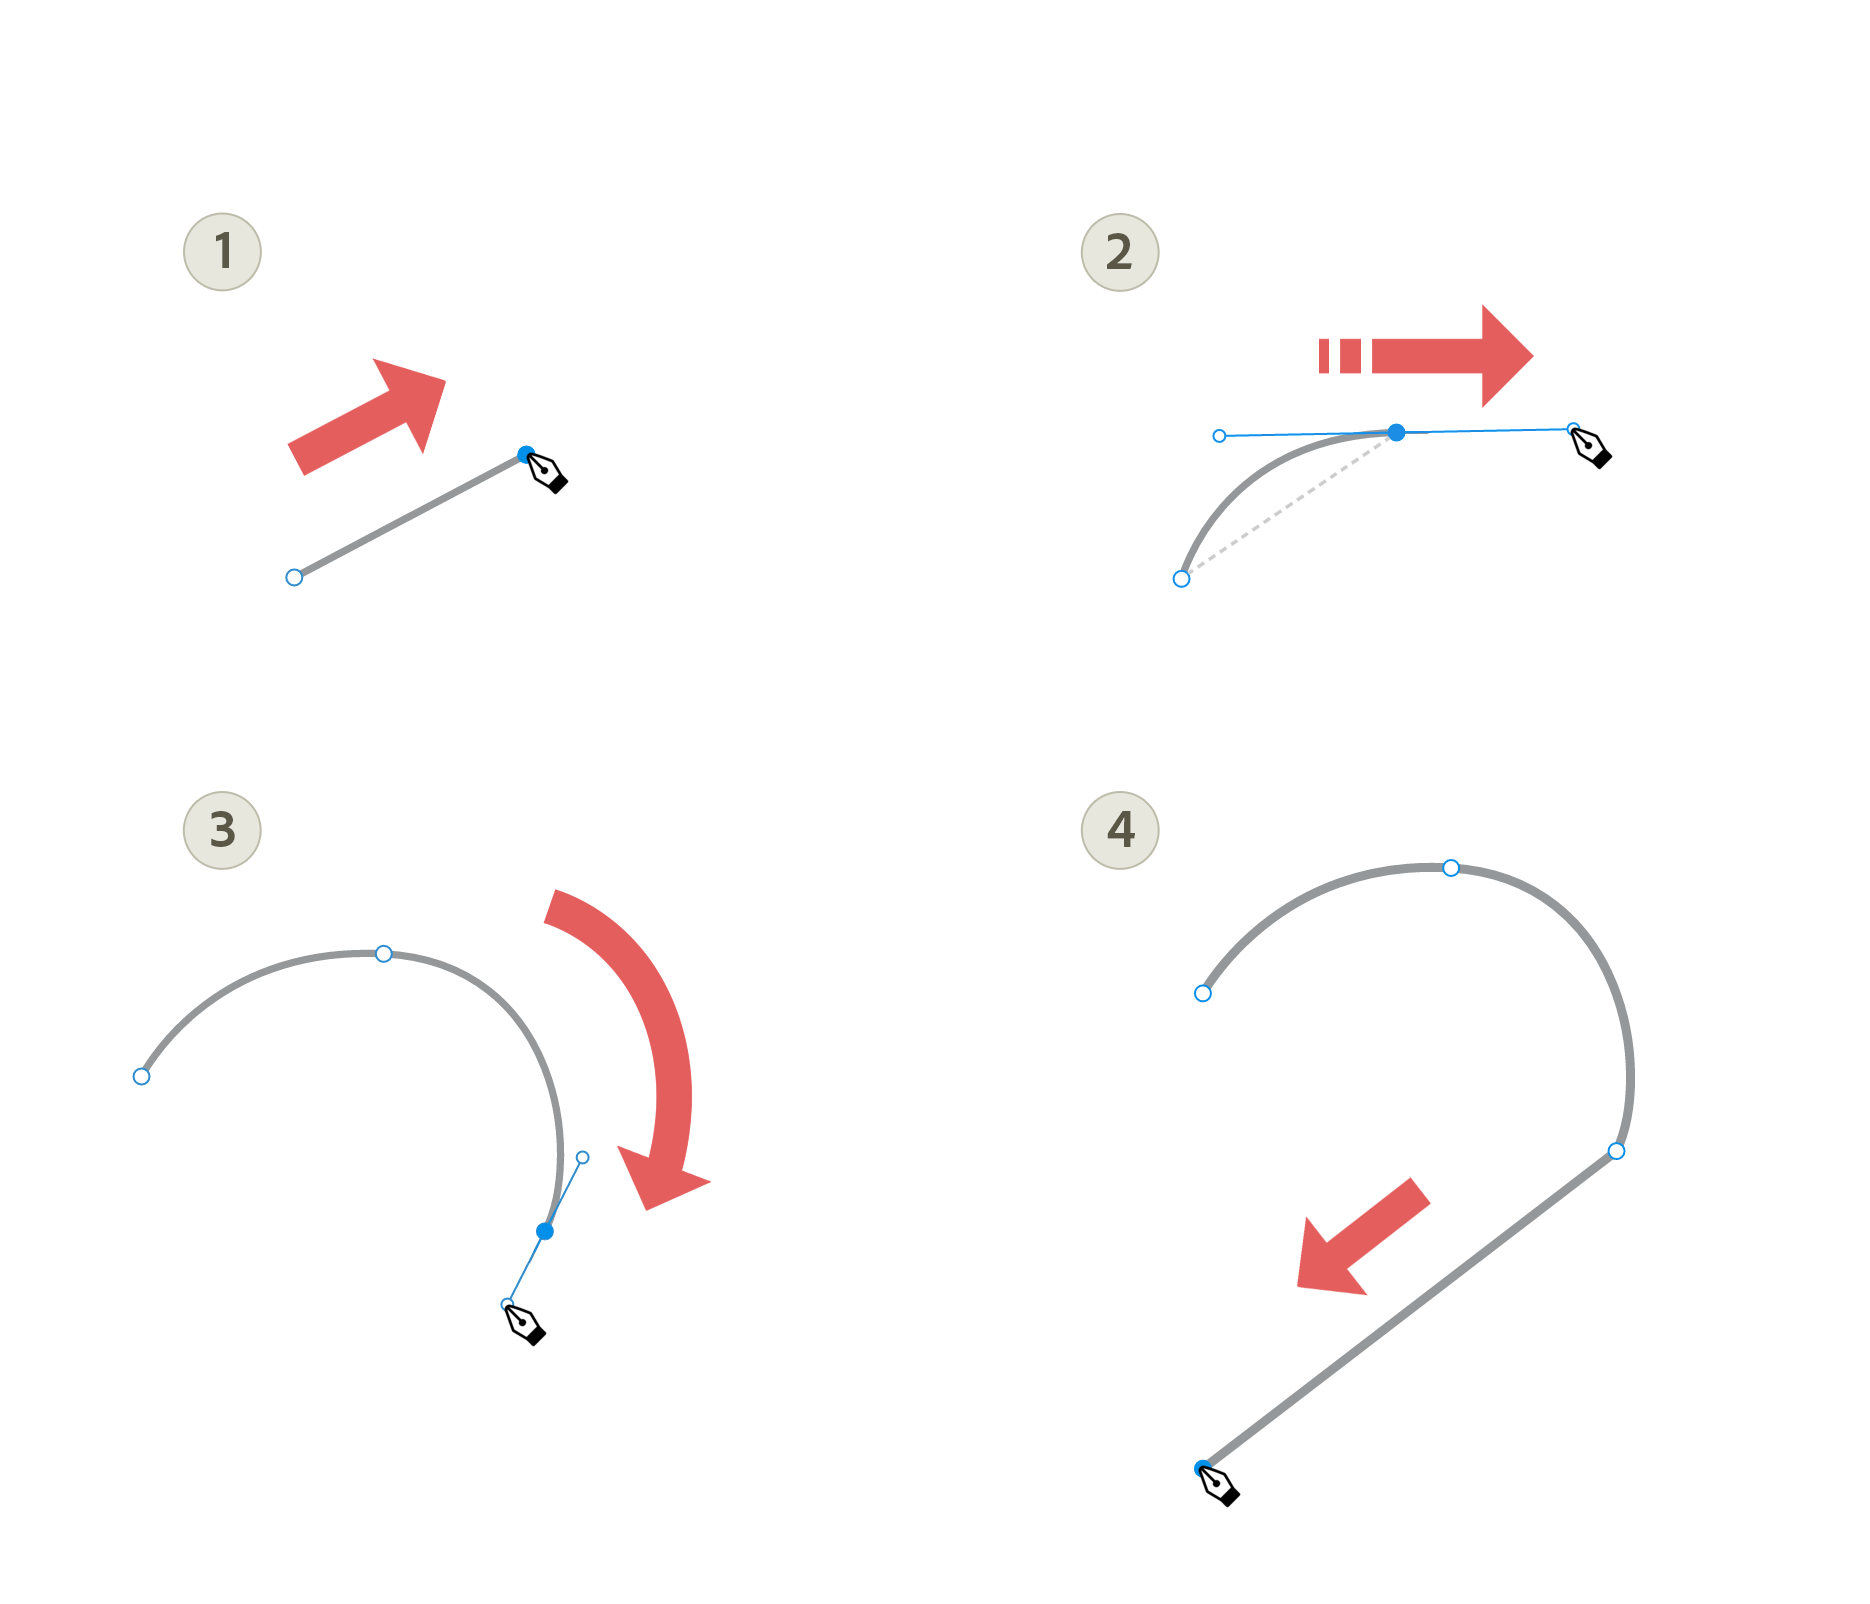
You create a curve by adding an anchor point where a curve changes direction, and dragging the direction lines that shape the curve. The length and slope of the direction lines determine the shape of the curve.
Curves are easier to edit and your system can display and print them faster if you draw them using as few anchor points as possible. Using too many points can also introduce unwanted bumps in a curve. Instead, draw widely spaced anchor points, and practice shaping curves by adjusting the length and angles of the direction lines.
-
Select the Pen tool
 .
. -
Position the Pen tool where you want the curve to begin, and hold down the mouse button.
-
Drag to set the slope of the curve segment you’re creating, and then release the mouse button.
 Hold down the Shift key while dragging to constrain the tool to multiples of 15°.
 -
Position the Pen tool where you want the curve segment to end, and do one of the following:
- To create a C‑shaped curve, drag in a direction opposite to the previous direction line. Then release the mouse button.
- To create an S‑shaped curve, drag in the same direction as the previous direction line. Then release the mouse button.

Draw curves using the Pen tool 
Draw curves using the Pen tool -
To create a series of smooth curves, continue dragging the Pen tool from different locations.
 You can also drag direction lines to break out the direction lines of an anchor point.
 -
Complete the path by doing one of the following:
- To close the path, position the Pen tool over the first (hollow) anchor point. Click or drag to close the path.
- To leave the path open, press Esc.
Draw straight lines followed by curves
-
Using the Pen tool (
 ), click corner points in two locations to create a straight segment.
 -
Position the Pen tool over the selected endpoint. To set the slope of the curved segment you create next, click the anchor point, and drag the direction line that appears.
-
Position the pen where you want the next anchor point; then click (and drag, if desired) the new anchor point to complete the curve.
Draw curves followed by straight lines
-
Using the Pen tool (
 ), drag to create the first smooth point of the curved segment, and release the mouse button.
 -
Reposition the Pen tool where you want the curved segment to end, drag to complete the curve, and release the mouse button.
-
Position the Pen tool over the selected endpoint.
-
Reposition the Pen tool where you want the straight segment to end, and click to complete the straight segment.

Draw curves followed by straight lines 
Draw curves followed by straight lines
Draw two curved segments connected by a corner
-
Using the Pen tool (
 ), drag to create the first smooth point of a curved segment.
 -
To create a curve with a second smooth point, reposition the Pen tool and drag.
-
Reposition the Pen tool where you want the second curved segment to end, and drag a new smooth point to complete the second curved segment.
Drawing versus editing mode
To toggle between drawing mode and edit mode, press the Esc key.
You can also enter the 'path edit mode' by double-clicking the shape or path. In this mode, anchor points of the shape are visible, but moving the mouse does not draw anything. You can manipulate existing anchor/control points or insert new anchor points on existing segments on path.
When drawing with the pen tool, you can perform all the edits described above in addition to drawing new segments.
Extend existing paths
When you select the pen tool, all paths on the artboard under the mouse display handles over their start and end point. To continue drawing the path from that point, click one of the handles .
Extending a closed path reopens the path and then puts the pen tool in drawing mode for that path.
Select anchor points
Double-click the drawing to view the anchor points. You can then click an anchor point to select it. To select multiple anchor points, hold Shift and select the anchor points, or marquee select the anchor points using the Selection tool.
Nudge the selected anchor points using your keyboard, drag them using mouse, or edit their properties (x and y-coordinates) in the Property Inspector.
Disable anchor point snapping
While placing a new anchor point or dragging an existing anchor point, snap lines appear when an anchor is vertically or horizontally near another anchor point. Hold down the Cmd /Ctrl key to disable anchor point snapping.
Add and edit anchor points
Double-click the drawing to select it and view the existing anchor points. Click the path to add new anchor points at the cursor location.
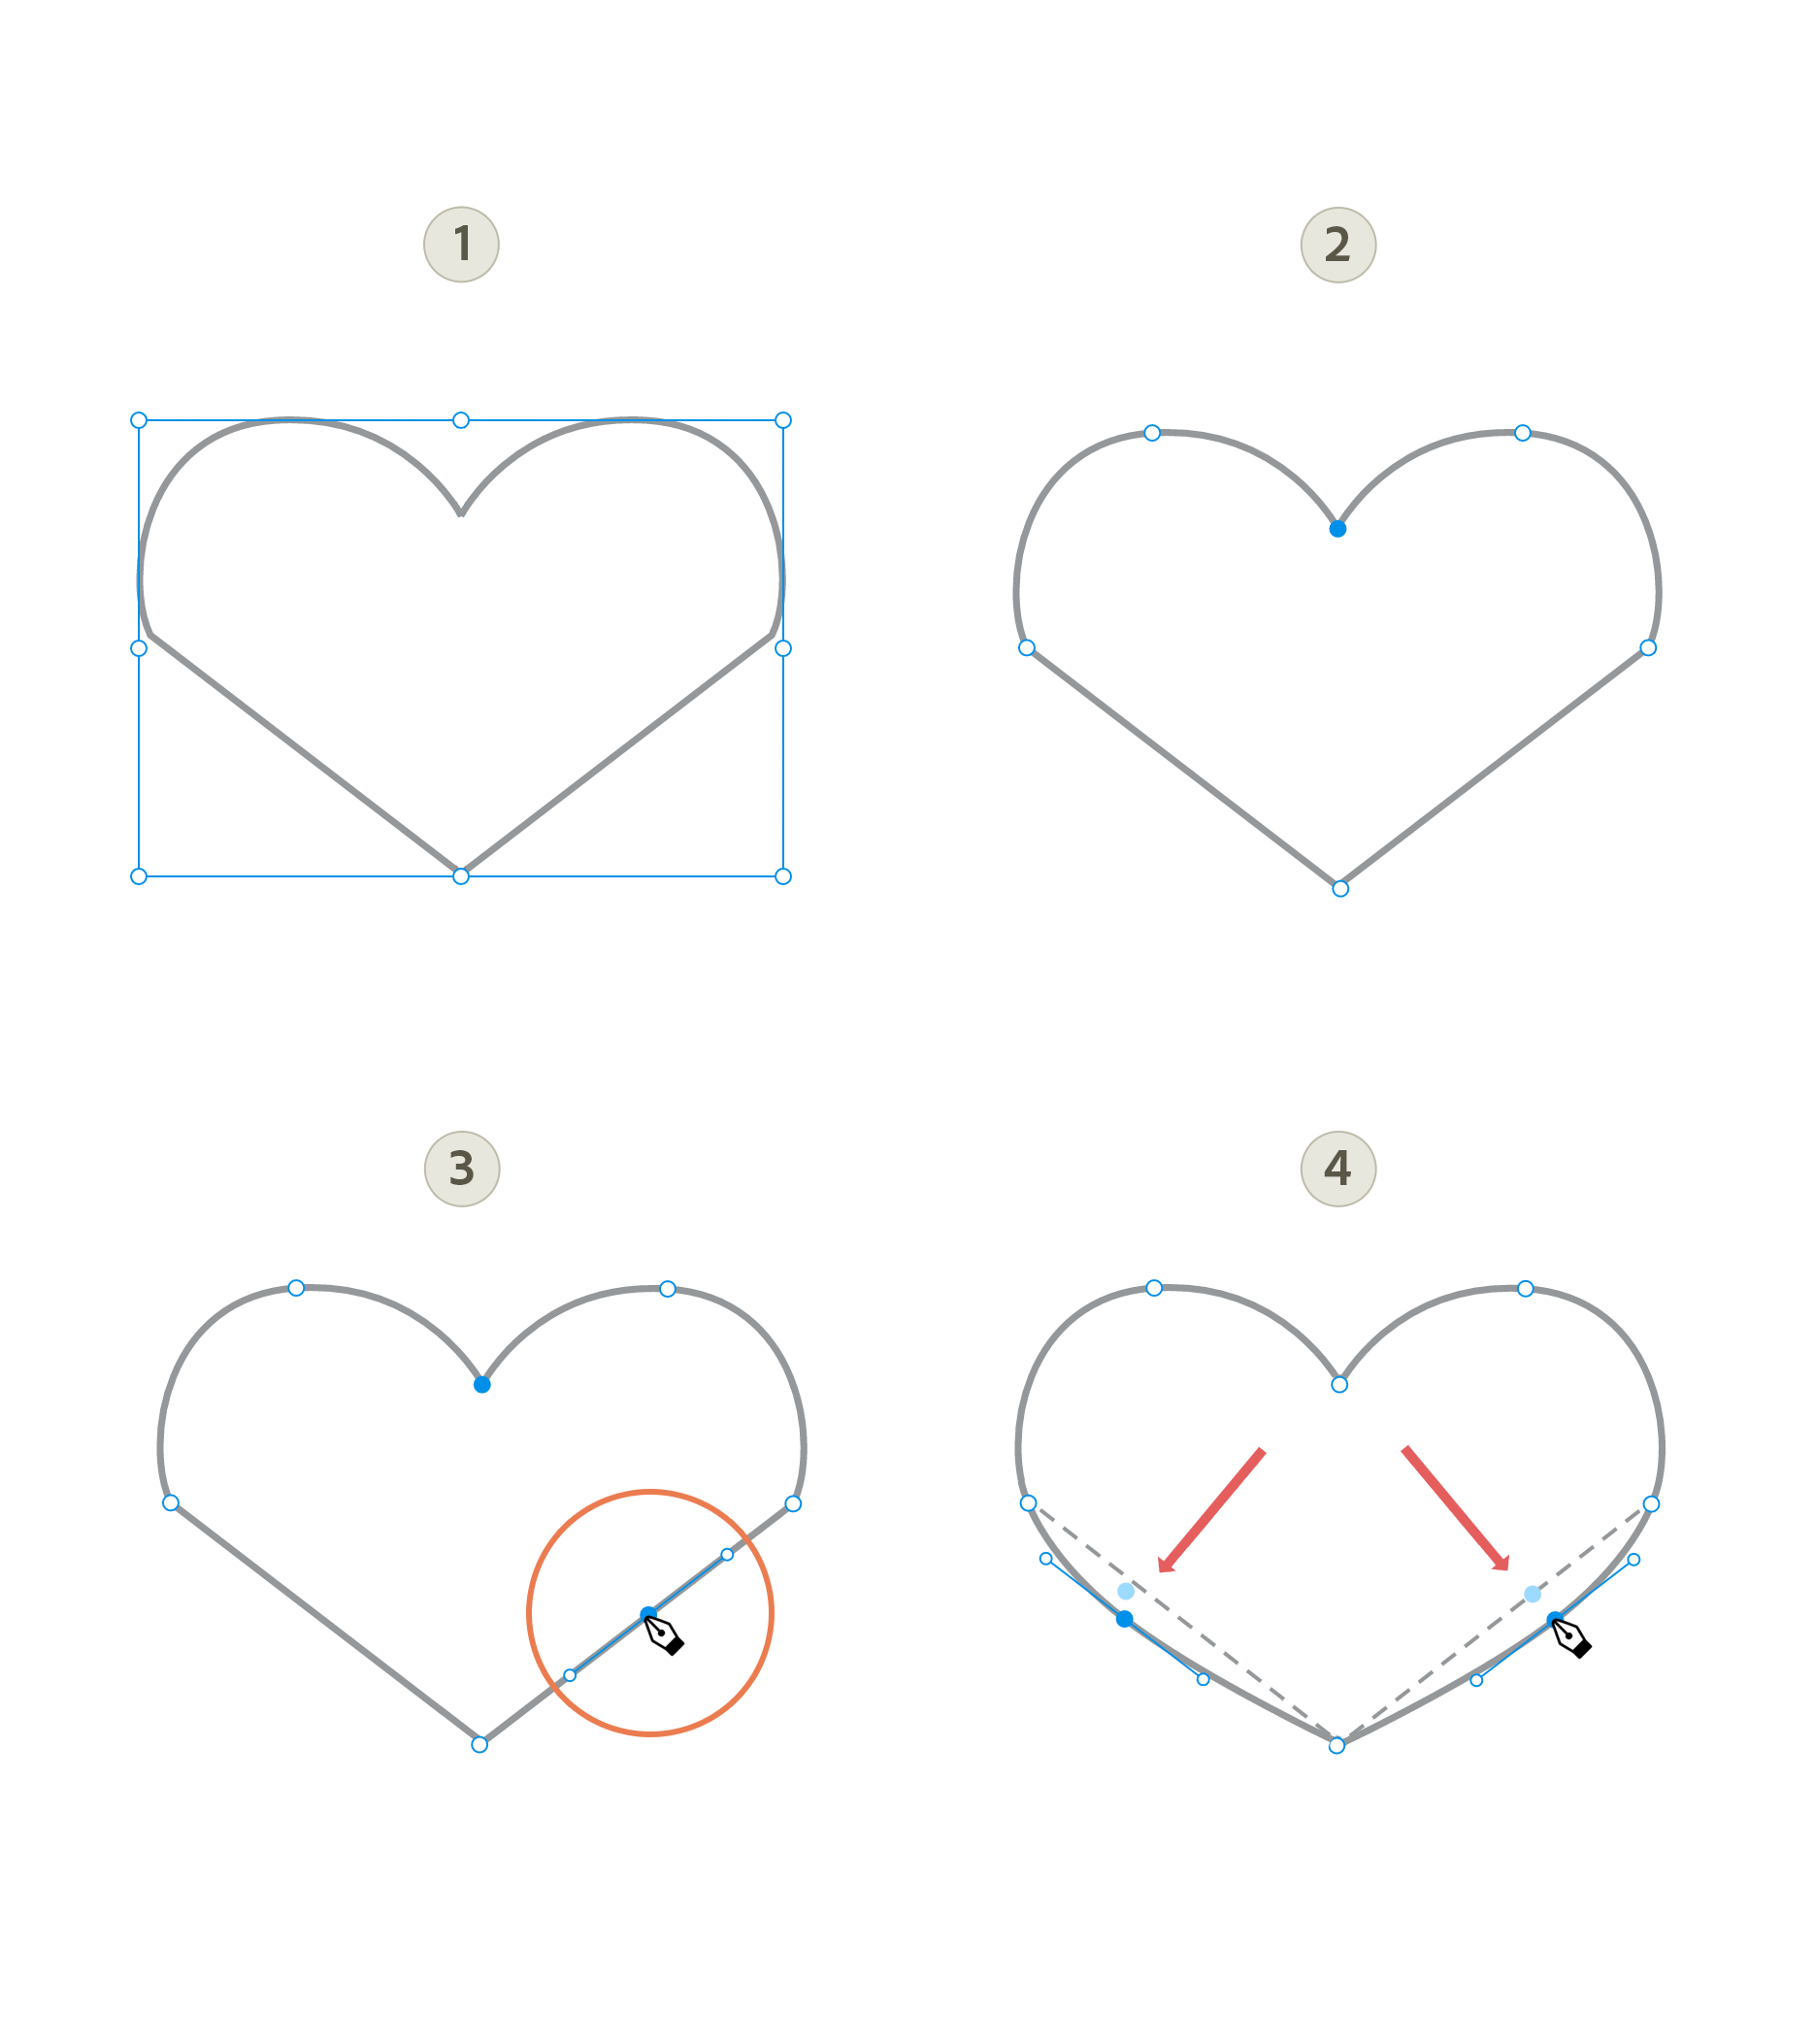

Delete anchor points
Select the anchor points and then press Delete.
Drawing shortcuts
|
Drawing tool |
Keyboard shortcut on MacOS |
Keyboard shortcut on Windows |
|---|---|---|
|
Select |
V |
V |
|
Rectangle |
R |
R |
|
Ellipse |
E |
E |
|
Polygon |
Y |
Y |
|
Line |
L |
L |
|
Pen |
P |
P |
|
Zoom |
Enter zoom in mode: Z
To temporarily activate zoom in and zoom out:
|
Enter zoom in mode: Z
To temporarily activate zoom in:
|
|
Zoom to Selection |
⌘3 |
Ctrl + 3 |
Measure distances
Measure distances between an object and the artboard, or an object and other surrounding objects by clicking the object and pressing the Option key on Mac, or the Alt key on Windows.
![]() If the selected object is not a square or a rectangle, then XD draws a bounding box around the object. It then displays the measurements from the boundaries of the bounding box.
If the selected object is not a square or a rectangle, then XD draws a bounding box around the object. It then displays the measurements from the boundaries of the bounding box.
To measure an object's distance from the edges of the artboard:
Simply click the object and press the Option key (on Mac), or Alt key (on Windows).
Adobe XD measures the distances and displays the measurements for as long as you press the Option or Alt key.


To measure an object's distance from other objects in the artboard:
Click the object, press the Option (on Mac) or Alt (on Windows) key, and hover the mouse over other objects.
Adobe XD measures the distances between the closest boundaries of both the objects and displays the measurements as long as you press the Option or Alt key.


Text tools
Enter text at a point
Click the text tool and click at the location where you want the text to begin. Type the text and press Esc to commit your text changes, or Return to go to the next line.
When you type text by selecting a point on your canvas, you get a horizontal line of text that begins where you click and expands as you enter characters. Each line of text is independent—the line expands or shrinks as you edit it, but doesn’t wrap to the next line. Entering text this way is useful for adding a few words to your artwork.
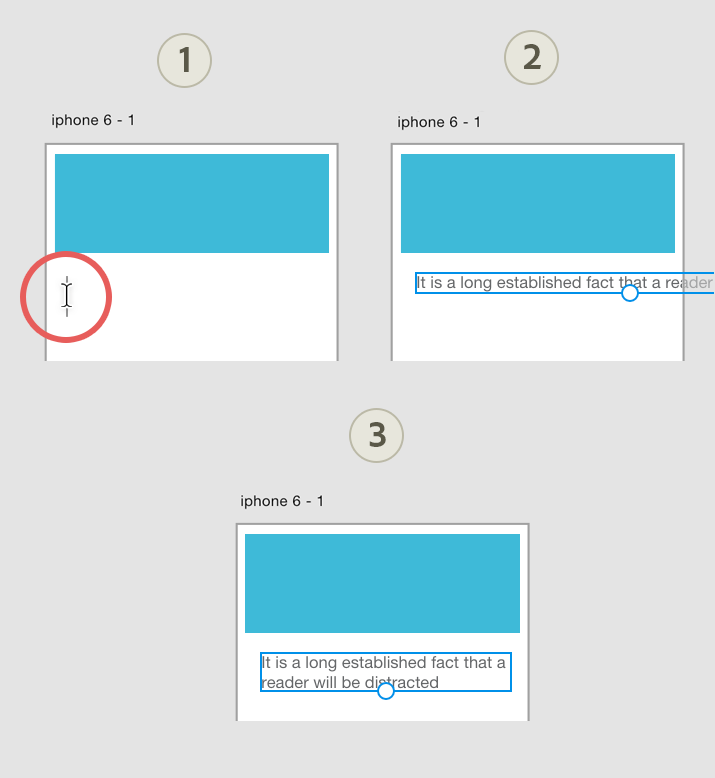

You can type text over other objects and arrange the text to appear in the front using the Object > Arrange options.
Enter text in an area
Click the Text tool, click at the location you want the text on the canvas and drag to define the text area. Then, click inside the area to begin typing text.
When you define a text area, the boundaries of an object control the flow of characters, either horizontally or vertically. When the text reaches a boundary, it automatically wraps to fit inside the defined area. Entering text this way is useful when you want to create one or more paragraphs, such as for a brochure.
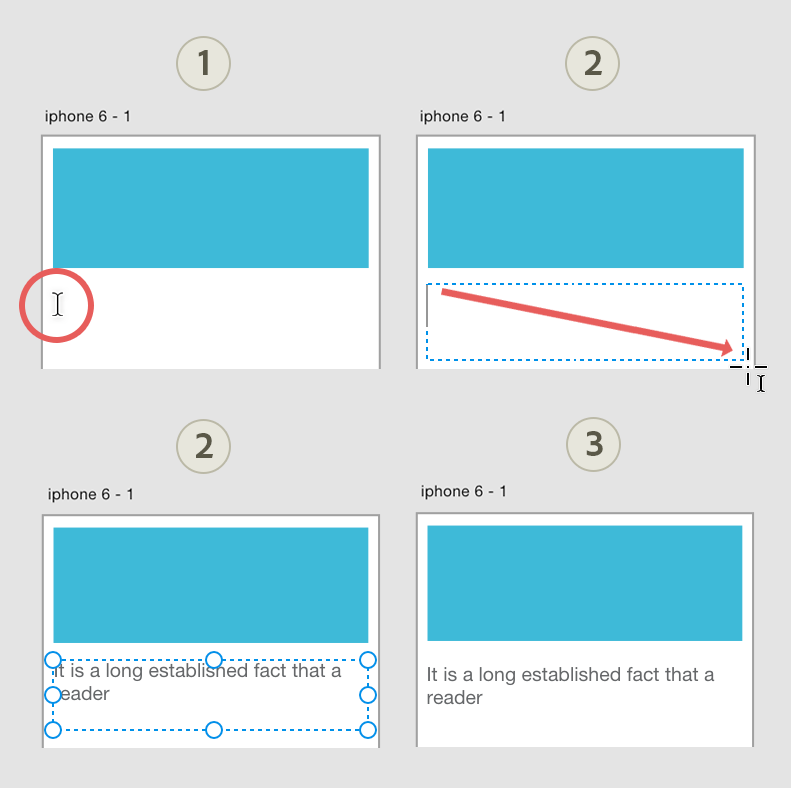

Spell check
From the Edit menu, select Turn Spellcheck On. The spell check feature works only on the incorrect text in the text container. Misspelled words are underlined in red and auto-corrected words are underlined in blue. Grammatical errors are highlighted with a green underline.


Right-click the misspelled word and select the contextually accurate spelling from the suggested list.


To revert the auto-corrected spellings to the word you initially entered, press Cmd + Z on Mac OS and Ctrl + Z on Windows OS.


Import text from text files
You can easily include pre-written text to your artboard using one of the following methods:
- Drag a text file on to the artboard.
You can easily include pre-written text in your design by simply dragging a plain text file to your artboard. This action creates an area text on the artboard with the contents of the text file.
- Drag a text file on to a repeating grid.
You can also drag a text file (with new lines) on to and drag that file over a text component on a repeating grid. All of the text elements are populated with the text from that file.
For more information, see Drag a return-separated text file to your text object in a Repeat Grid.
- Copy and paste text on to the artboard.
You can also copy and paste text on to the artboard, creating an area text element that you can easily move and edit in Adobe XD.
Text resize options
XD provides you with three text resizing options that lets you expand the width of the text box to fit content within a single line, dynamically adjust the height of the text box, and control the width and height of the text area.
Based on your design need, select a text object and choose between the Auto Width, Auto Height, and Fixed Size options in the Property Inspector.


Auto Width
When adding text within frames, images, and objects, you can expand the width of the text box to the maximum extent and fit your text within a single line.
To enable Auto Width, select the  icon in the Property Inspector.


Auto Height
When designing an application having large amount of text or while creating responsive designs in combination with stacks, you can dynamically adjust the height of the area text without changing its width.
Auto Height text enables the area text to adjust its height automatically to fit the content. When you draw an area text, this option is enabled by default.


To manually enable auto height text, you can either double-click the south resize handle or select the  icon in the Property Inspector.
Fixed Size
When adding text within your designs such as brochures, websites, you may want to add one or paragraphs and control the width and height of your text area. Fixed Size lets you wrap the text to fit inside the text box and crop automatically when it exceeds the height.
To enable Fixed Size, select the  icon in the Property Inspector. Click and drag the resize handles on all sides to resize an area text. When the text inside a text area does not fit, XD indicates this with a red bottom resize handle.
Double-click the bottom resize handle of the text box to quickly resize the text area to fit the content.
.gif)
.gif)
Format text
Click the text and then specify the type, font size, and text alignment for the text using the Property Inspector.
You can also select individual words or characters in a block of text and format those sections alone.


Change character, line, and para spacing
To change character spacing, click the text object and specify the character spacing using the Character Spacing option in the Property Inspector.
To change the character spacing in a subset of text, select the text and modify the character spacing in milli-ems using the Property Inspector.


To change the line spacing, click the text area, and then specify the line spacing using the Line Spacing option in the Property Inspector.
To reset the line height to the default, enter 0 in the Line Spacing option in the Property Inspector.
Similar to Photoshop and InDesign, Adobe XD allows you to change the space before and after paragraphs within the same text element.
To change the paragraph spacing, select a paragraph and click the paragraph icon in the Formatting panel. Change the spacing value as per requirement.
Text transformations
To apply any of the text transformations, select the text that you want to change. From the Property Inspector, select any of the following options:
- Uppercase icon (TT) to set the text to uppercase.
- Lowercase icon (tt) to set the text to lowercase.
- Title case icon (Tt) to set the text to title case.
- Text superscript icon to set the text to superscript.
- Text subscript icon to set the text to subscript.


Underline text
To underline text, click the text area, and then click the Underline icon in the Property Inspector. XD draws a smooth underline that breaks around the descenders in text (creating a more aesthetic line).
Text strikethrough
To strikethrough text, select the text area, from the Property Inspector, click the Strikethrough icon. A smooth line is drawn right in the center of the text, making it appear like it has been struck over.
Global style changes
To make global style changes easily, apply text transformation or strikethrough to Character Styles.
In the Assets Panel, save a style that you use across the document as a character style. Then, right-click on the character style and select Edit option from the drop-down menu. Choose one of the uppercase, lowercase, title case or strikethrough options and the text using that character style will change across the document.
Create precision designs with math calculations
Use the math calculation to create designs with greater precision or move objects to a new location or modify the width and height.
Select one or more objects. In the Property Inspector, perform simple math in any box that accepts numeric values. Adobe XD supports +, -./, * math operations to calculate the changes.
For example, if you want to move selected object 3 units to the right using the current measurement units, enter +3 after the current value.
In the Property Inspector text box that accepts numerical values, do one of the following:
- To replace the entire current value with a mathematical expression, select the entire current value.
- To use the current value as part of a mathematical expression, click before or after the current value.
![]() Adobe XD can only perform one operation at a time. That is, it can handle “4in+2p”, but it cannot handle “4in+2p-1p” because they are construed as two different operations.
Adobe XD can only perform one operation at a time. That is, it can handle “4in+2p”, but it cannot handle “4in+2p-1p” because they are construed as two different operations.
Video: How do I work with auto height text?
"The auto-height text container automatically adjusts in height based on the amount of text you have inside. It also works beautifully with content-aware layout features like stacks and padding"- Dani Beaumont, Principal Product Manager, Adobe XD.
Watch this video to learn how to work with auto height text.
Viewing time: 3 minutes.
