- Photoshop User Guide
- Introduction to Photoshop
- Photoshop and other Adobe products and services
- Photoshop on mobile (not available in mainland China)
- Photoshop on the iPad (not available in mainland China)
- Photoshop on the iPad | Common questions
- Get to know the workspace
- System requirements | Photoshop on the iPad
- Create, open, and export documents
- Add photos
- Work with layers
- Draw and paint with brushes
- Make selections and add masks
- Retouch your composites
- Work with adjustment layers
- Adjust the tonality of your composite with Curves
- Apply transform operations
- Crop and rotate your composites
- Rotate, pan, zoom, and reset the canvas
- Work with Type layers
- Work with Photoshop and Lightroom
- Get missing fonts in Photoshop on the iPad
- Japanese Text in Photoshop on the iPad
- Manage app settings
- Touch shortcuts and gestures
- Keyboard shortcuts
- Edit your image size
- Livestream as you create in Photoshop on the iPad
- Correct imperfections with the Healing Brush
- Create brushes in Capture and use them in Photoshop on the iPad
- Work with Camera Raw files
- Create and work with Smart Objects
- Adjust exposure in your images with Dodge and Burn
- Auto adjustment commands in Photoshop on the iPad
- Smudge areas in your images with Photoshop on the iPad
- Saturate or desaturate your images using Sponge tool
- Content aware fill for iPad
- Photoshop on the web (not available in mainland China)
- Photoshop (beta) (not available in mainland China)
- Generative AI (not available in mainland China)
- Common questions on generative AI in Photoshop
- Generative Fill in Photoshop on the desktop
- Generate Image with descriptive text prompts
- Generative Expand in Photoshop on the desktop
- Replace background with Generate background
- Get new variations with Generate Similar
- Select an AI model for generative control
- Generative Fill in Photoshop on the iPad
- Generative Expand in Photoshop on the iPad
- Generative AI features in Photoshop on the web
- Content authenticity (not available in mainland China)
- Cloud documents (not available in mainland China)
- Photoshop cloud documents | Common questions
- Photoshop cloud documents | Workflow questions
- Manage and work with cloud documents in Photoshop
- Upgrade cloud storage for Photoshop
- Unable to create or save a cloud document
- Solve Photoshop cloud document errors
- Collect cloud document sync logs
- Invite others to edit your cloud documents
- Share documents for review
- Workspace
- Workspace basics
- Preferences
- Learn faster with the Photoshop Discover Panel
- Create documents
- Place files
- Default keyboard shortcuts
- Customize keyboard shortcuts
- Tool galleries
- Performance preferences
- Contextual Task Bar
- Use tools
- Presets
- Grid and guides
- Touch gestures
- Use the Touch Bar with Photoshop
- Touch capabilities and customizable workspaces
- Technology previews
- Metadata and notes
- Place Photoshop images in other applications
- Rulers
- Show or hide non-printing Extras
- Specify columns for an image
- Undo and history
- Panels and menus
- Position elements with snapping
- Position with the Ruler tool
- Organize, share, and collaborate with Projects
- Refine Adobe Firefly generations
- Image and color basics
- How to resize images
- Work with raster and vector images
- Image size and resolution
- Acquire images from cameras and scanners
- Create, open, and import images
- View images
- Invalid JPEG Marker error | Opening images
- Viewing multiple images
- Customize color pickers and swatches
- High dynamic range images
- Match colors in your image
- Convert between color modes
- Color modes
- Erase parts of an image
- Blending modes
- Choose colors
- Customize indexed color tables
- Image information
- Distort filters are unavailable
- About color
- Color and monochrome adjustments using channels
- Choose colors in the Color and Swatches panels
- Sample
- Color mode or Image mode
- Color cast
- Add a conditional mode change to an action
- Add swatches from HTML CSS and SVG
- Bit depth and preferences
- Layers
- Layer basics
- Nondestructive editing
- Create and manage layers and groups
- Select, group, and link layers
- Place images into frames
- Layer opacity and blending
- Mask layers
- Apply Smart Filters
- Layer comps
- Move, stack, and lock layers
- Mask layers with vector masks
- Manage layers and groups
- Layer effects and styles
- Edit layer masks
- Extract assets
- Reveal layers with clipping masks
- Generate image assets from layers
- Work with Smart Objects
- Blending modes
- Combine multiple images into a group portrait
- Combine images with Auto-Blend Layers
- Align and distribute layers
- Copy CSS from layers
- Load selections from a layer or layer mask's boundaries
- Knockout to reveal content from other layers
- Selections
- Get started with selections
- Make selections in your composite
- Select and Mask workspace
- Select with the marquee tools
- Select with the lasso tools
- Adjust pixel selections
- Move, copy, and delete selected pixels
- Create a temporary quick mask
- Select a color range in an image
- Convert between paths and selection borders
- Channel basics
- Save selections and alpha channel masks
- Select the image areas in focus
- Duplicate, split, and merge channels
- Channel calculations
- Get started with selections
- Image adjustments
- Replace object colors
- Perspective warp
- Reduce camera shake blurring
- Healing brush examples
- Export color lookup tables
- Adjust image sharpness and blur
- Understand color adjustments
- Apply a Brightness/Contrast adjustment
- Adjust shadow and highlight detail
- Levels adjustment
- Adjust hue and saturation
- Adjust vibrance
- Adjust color saturation in image areas
- Make quick tonal adjustments
- Apply special color effects to images
- Enhance your image with color balance adjustments
- High dynamic range images
- View histograms and pixel values
- Match colors in your image
- Crop and straighten photos
- Convert a color image to black and white
- Adjustment and fill layers
- Curves adjustment
- Blending modes
- Target images for press
- Adjust color and tone with Levels and Curves eyedroppers
- Adjust HDR exposure and toning
- Dodge or burn image areas
- Make selective color adjustments
- Image repair and restoration
- Image enhancement and transformation
- Drawing and painting
- Paint symmetrical patterns
- Draw rectangles and modify stroke options
- About drawing
- Draw and edit shapes
- Create star or any other pointed shape
- Painting tools
- Create and modify brushes
- Blending modes
- Add color to paths
- Edit paths
- Paint with the Mixer Brush
- Brush presets
- Gradients
- Gradient interpolation
- Fill and stroke selections, layers, and paths
- Draw with the Pen tools
- Create patterns
- Generate a pattern using the Pattern Maker
- Manage paths
- Manage pattern libraries and presets
- Draw or paint with a graphics tablet
- Create textured brushes
- Add dynamic elements to brushes
- Gradient
- Paint stylized strokes with the Art History Brush
- Paint with a pattern
- Sync presets on multiple devices
- Migrate presets, actions, and settings
- Text
- Filters and effects
- Saving and exporting
- Color Management
- Web, screen, and app design
- Video and animation
- Printing
- Automation
- Troubleshooting
Liquify filter overview
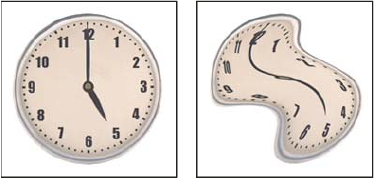
The Liquify filter lets you push, pull, rotate, reflect, pucker, and bloat any area of an image. The distortions you create can be subtle or drastic, which makes the Liquify command a powerful tool for retouching images as well as creating artistic effects. The Liquify filter can be applied to 8‑bits per-channel or 16‑bits per-channel images.

Tools, options, and an image preview for the Liquify filter are available in the Liquify dialog box. To display the dialog box, choose Filter > Liquify. Select Advanced Mode to access more options.
Magnify or reduce the preview image
Select the Zoom tool in the Liquify dialog box, and click or drag in the preview image to zoom in; hold down Alt (Windows) or Option (Mac), and click or drag in the preview image to zoom out. Alternatively, you can specify a magnification level in the Zoom text box at the bottom of the dialog box.
Navigate in the preview image
Select the Hand tool in the Liquify dialog box, and drag in the preview image. Alternatively, hold down the spacebar with any tool selected, and drag in the preview image.
Liquify filter enhancements (Creative Cloud only)
In the Creative Cloud version of Photoshop, the Liquify filter is significantly faster than previous versions. The Liquify filter now supports Smart Objects, including Smart Object video layers, and is applied as a smart filter.
Another enhancement to the Liquify filter is an added behavior for the Reconstruct tool. If you hold down the alt (Windows) or Option (Mac OS) key while dragging the tool across a warp, the Reconstruct tool smooths a warp rather than scaling back or removing it.
Applying Liquify as a smart filter (Creative Cloud only)
The Liquify filter supports Smart Objects, including Smart Object video layers, and is applied as a smart filter. When applying the Liquify filter to a Smart Object, meshes are now automatically saved into your document. Meshes applied to Smart Objects are compressed and re-editable when reapplying the Liquify filter. Keep in mind that the embedded meshes, even compressed ones, increase the file size.
To apply the Liquify filter as a smart filter:
-
In the Layers panel, select a Smart Object layer.
-
Choose Filter > Liquify.
Face-Aware Liquify
Introduced in Photoshop CC 2015.5 release
The Liquify filter features advanced face-aware functionality that automatically identifies eyes, noses, mouths, and other facial features, making it easy for you to adjust them. Face-Aware Liquify is great for retouching portrait photos, creating caricatures, and doing much more.
You can use Face-Aware Liquify as a smart filter for non-destructive editing. See ![]() Apply smart filters in Photoshop to understand how.
Apply smart filters in Photoshop to understand how.
Prerequisite: Enable the graphics processor
As a prerequisite to using Face-aware Liquify functionality, ensure that the graphics processor is enabled in your Photoshop preferences.
- Choose Edit > Preferences > Performance.
- In the Graphics Processor Settings area, select Use Graphics Processor.
- Click Advanced Settings. Ensure that Use Graphics Processor To Accelerate Computation is selected.
- Click OK.
These settings are enabled by default when you launch Photoshop for the first time. If you have questions regarding GPU usage in Photoshop, consult ![]() this document.
this document.
Adjust facial features using on-screen handles
- In Photoshop, open an image with one or more faces.
- Select Filter > Liquify. Photoshop opens the Liquify filter dialog.
- In the Tools panel, select
 (Face tool; keyboard shortcut: A). The faces in the photo are automatically identified.
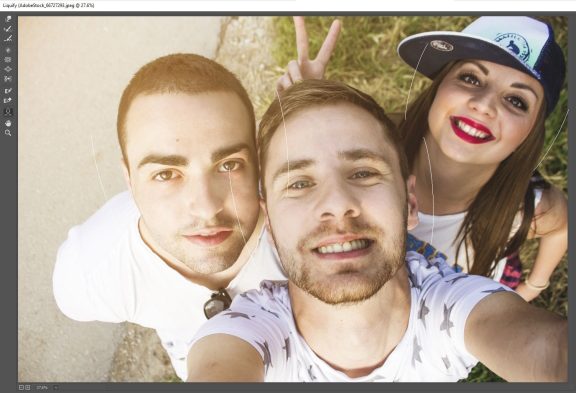

- When you hover the pointer over the faces, Photoshop displays intuitive on-screen controls around them. Adjust the controls to make adjustments to the faces. For example, you can increase the eye size or decrease the face width.
- When you're satisfied with the changes, click OK.
Adjust facial features using sliding controls
- In Photoshop, open an image with one or more faces.
- Select Filter > Liquify. Photoshop opens the Liquify filter dialog.
- In the Tools panel, select
 (Face tool; keyboard shortcut: A).
The faces in the photo are automatically identified and one of the faces selected. The identified faces are also listed in the Select Face pop-up menu in the Face-Aware Liquify area of the Properties panel. You can select a different face by clicking it on the canvas or selecting it from the pop-up menu.
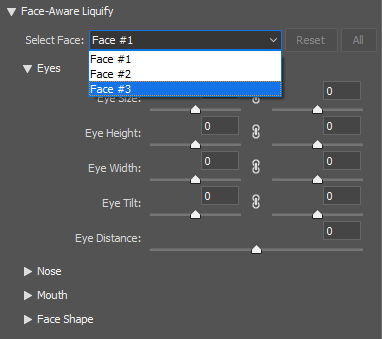

- Adjust the sliders in the Face-Aware Liquify area to make appropriate changes to the facial features.
Move the slider options for the left and right eyes to apply independent/asymmetrical effects to the eyes.


Click the link icon ![]() to lock the settings for the left and right eyes together. This option helps apply symmetrical effects to the eyes.
to lock the settings for the left and right eyes together. This option helps apply symmetrical effects to the eyes.
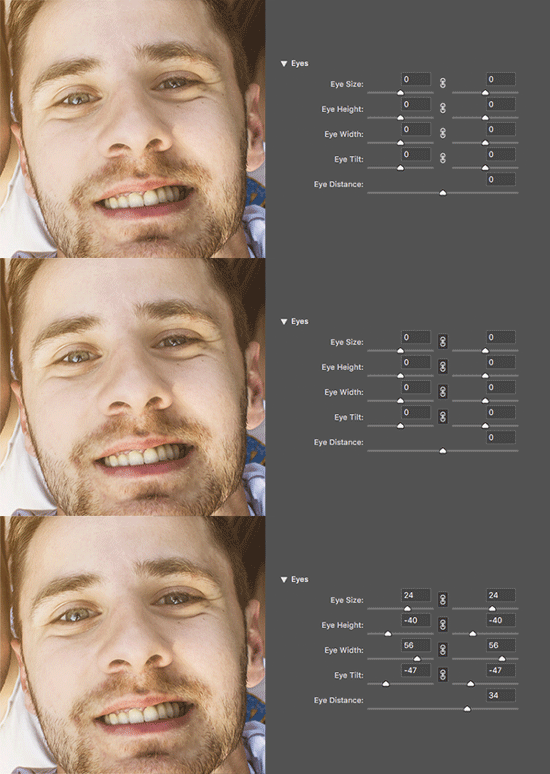

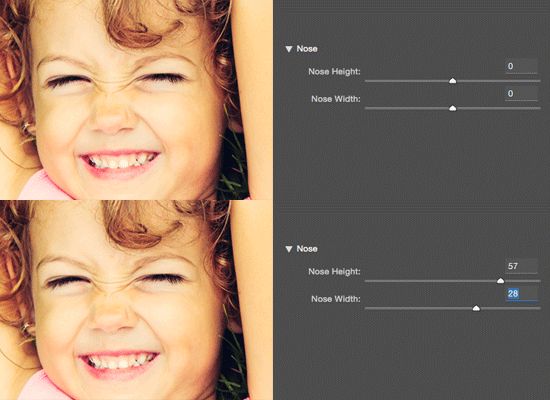

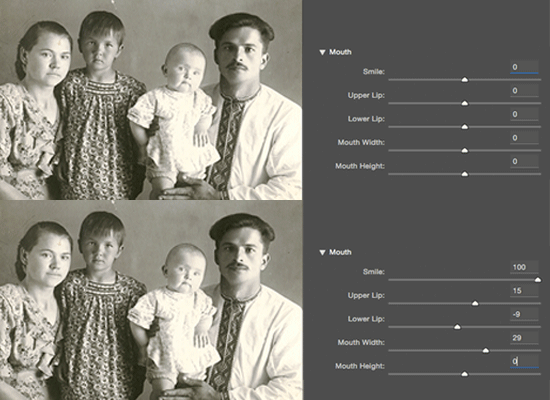


- When you're satisfied with the changes, click OK.
You can use a combination of on-screen handles and sliding controls for better control over Face-Aware Liquify changes.
Useful considerations
- Face-Aware Liquify functionality works best on facial features facing the camera. For best results, rotate any titled faces before applying the settings.
- The Reconstruct and Restore All options don't apply to Face-Aware Liquify changes. Use Reset and All options in the Face-Aware Liquify area to reset the changes applied to a selected face and all faces, respectively.
Distortion tools
Several tools in the Liquify dialog box distort the brush area when you hold down the mouse button or drag. The distortion is concentrated at the center of the brush area, and the effect intensifies as you hold down the mouse button or repeatedly drag over an area.
Forward Warp tool
![]()
Pushes pixels forward as you drag.
Shift-click with the Warp tool, the Push Left tool, or the Mirror tool to create the effect of dragging in a straight line from the previous point you clicked.
Reconstruct tool
Reverses the distortion you’ve already added, as you hold down the mouse button and drag.
Twirl Clockwise tool
Rotates pixels clockwise as you hold down the mouse button or drag. To twirl pixels counterclockwise, hold down Alt (Windows) or Option (Mac OS) as you hold down the mouse button or drag.
Pucker tool
Moves pixels toward the center of the brush area as you hold down the mouse button or drag.
Bloat tool
Moves pixels away from the center of the brush area as you hold down the mouse button or drag.
Push Left tool
Moves pixels to the left when you drag the tool straight up (pixels move to the right if you drag down). You can also drag clockwise around an object to increase its size, or drag counterclockwise to decrease its size. To push pixels right when you drag straight up (or to move pixels left when you drag down), hold down Alt (Windows) or Option (Mac OS) as you drag.
Distortion tool options
In the tool options area of the dialog box, set the following options:
Brush Size
Sets the width of the brush you’ll use to distort the image.
Brush Density
Controls how a brush feathers at the edge. An effect is strongest in the center of the brush and lighter at the edge.
Brush Pressure
Sets the speed at which distortions are made when you drag a tool in the preview image. Using a low brush pressure makes changes occur more slowly, so it’s easier to stop them at exactly the right moment.
Brush Rate
Sets the speed at which distortions are applied when you keep a tool (such as the Twirl tool) stationary in the preview image. The higher the setting, the greater the speed at which distortions are applied.
Stylus Pressure
Uses pressure readings from a stylus tablet. (This option is available only when you are working with a stylus tablet.) When selected, the brush pressure for the tools is the stylus pressure multiplied by the Brush Pressure value.
Distort an image
If a type layer or a shape layer is selected, you must rasterize the layer before proceeding, making the type or shape editable by the Liquify filter. To distort type without rasterizing the type layer, use the Warp options for the Type tool.
-
Select the layer you want to distort. To change only part of the current layer, select that area.
-
Choose Filter > Liquify.
-
Freeze areas of the image that you don’t want to alter.
-
Choose any of the liquify tools to distort the preview image. Drag in the preview image to distort the image.
-
After distorting the preview image, you can:
Use the Reconstruct tool
 or
Reconstruct Options to fully or partially reverse the changes.
or
Reconstruct Options to fully or partially reverse the changes.Use other tools to change the image in new ways.
-
Do one of the following:
Click OK to close the Liquify dialog box and apply the changes to the active layer.
Click Cancel to close the Liquify dialog box without applying changes to the layer.
Hold down Alt (Windows) or Option (Mac OS) and click Reset to revert all distortions to the preview image and reset all options to their defaults.
NoteYou can use the Edit > Fade command to create additional effects.
Freeze and thaw areas
You can freeze areas that you don’t want to modify or thaw frozen areas to make them editable again. You can also invert both frozen and thawed areas.
Freeze areas
By freezing areas of the preview
image, you protect those areas from changes. Frozen areas are covered
by a mask that you paint using the Freeze Mask tool ![]() . You
can also use an existing mask, selection, or transparency to freeze areas.
You can view the mask in the preview image to help you apply distortions.
. You
can also use an existing mask, selection, or transparency to freeze areas.
You can view the mask in the preview image to help you apply distortions.
Using the Freeze Mask tool
Select
the Freeze Mask tool ![]() and
drag over the area you want to protect. Shift-click to freeze in
a straight line between the current point and the previously clicked
point.
and
drag over the area you want to protect. Shift-click to freeze in
a straight line between the current point and the previously clicked
point.
Using an existing selection, mask, or transparency channel
If you’re applying the Liquify filter to a layer with a selection, layer mask, transparency, or alpha channel, choose Selection, Layer Mask, Transparency, or Quick Mask from any of the five icons’ pop‑up menu in the Mask Options area of the dialog box. This determines how areas of the preview image are frozen or masked.
Freezing all thawed areas
Click Mask All in the Mask Options area of the dialog box.
Inverting thawed and frozen areas
Click Invert All in the Mask Options area of the dialog box.
Showing or hiding frozen areas
Select or deselect Show Mask in the View Options area of the dialog box.
Changing the color of frozen areas
Choose a color from the Mask Color pop‑up menu in the View Options area of the dialog box.
Mask options with the Liquify filter
When you have an existing selection, transparency, or mask in an image, that information is retained when the Liquify dialog box opens. You can choose one of the following mask options:
Replace Selection
Shows the selection, mask, or transparency in the original image.
Add To Selection
Shows the mask in the original image, so that you can add to the selection using the Freeze Mask tool. Adds selected pixels in channel to the current frozen area.
Subtract From Selection
Subtracts pixels in channel from the current frozen area.
Intersect With Selection
Uses only pixels that are selected and currently frozen.
Invert Selection
Uses selected pixels to invert the current frozen area.
If a selection exists, the filter limits the preview and processing to the rectangular area containing that selection. (For rectangular marquee selections, the selected area and preview are identical, so choosing Selection from the mask option menus above has no effect.)
Thaw areas
Select the Thaw Mask tool
 , and
drag over the area. Shift-click to thaw in a straight line between
the current point and the previously clicked point.
, and
drag over the area. Shift-click to thaw in a straight line between
the current point and the previously clicked point.To thaw all frozen areas, click the None button in the Mask Options area of the dialog box.
To invert frozen and thawed areas, click Invert All in the Mask Options area of the dialog box.
Work with meshes
Using a mesh helps you see and keep track of distortions. You can choose the size and color of a mesh, and save the mesh from one image and apply it to other images.
To show a mesh, select Show Mesh in the View Options area of the dialog box, and choose a mesh size and mesh color.
To only show a mesh, select Show Mesh and then deselect Show Image.
To save a distortion mesh, after distorting the preview image, click Save Mesh. Specify a name and location for the mesh file, and click Save.
To apply a saved distortion mesh, click Load Mesh, select the mesh file you want to apply, and click Open. If the image and distortion mesh aren’t the same size, the mesh is scaled to fit the image.
To apply the last saved distortion mesh, click Load Last Mesh.
(Creative Cloud) Meshes are automatically saved in your document. Meshes applied to Smart Objects are compressed and re-editable.
(Creative Cloud) Embedded meshes, even compressed ones, increase file size.
Work with backdrops
You can choose to show only the active layer in the preview image, or you can show additional layers in the preview image as a backdrop. Using the Mode options, you can position the backdrop in front of or behind the active layer to keep track of your changes, or to line up a distortion with another distortion made in a different layer.
Only the active layer is distorted, even if other layers are displayed.
Showing the backdrop
Select Show Backdrop, and then choose Background from the Use menu and an option from the Mode menu.
Showing changes to the target layer without showing the backdrop
Select All Layers from the Use menu. Setting the Opacity to 0 shows only the target layer with the full effects of the Liquify filter. Setting the Opacity to a higher value shows less of the Liquify filter’s effect on the target layer.
Changing the blending between the target layer and the backdrop
Specify a Opacity value.
Determining how the target layer and the backdrop are combined in the image preview
Choose an option from the Mode menu.
Hiding the backdrop
Deselect Show Backdrop in the View Options area of the dialog box.
Reconstruct distortions
After you distort the preview image, you can use a variety of controls and reconstruction modes to reverse changes or redo the changes in new ways. Reconstructions can be applied two ways. You can apply a reconstruction to the entire image, smoothing out the distortion in unfrozen areas, or you can use the reconstruction tool to reconstruct specific areas. If you want to prevent reconstruction of distorted areas, you can use the Freeze Mask tool.
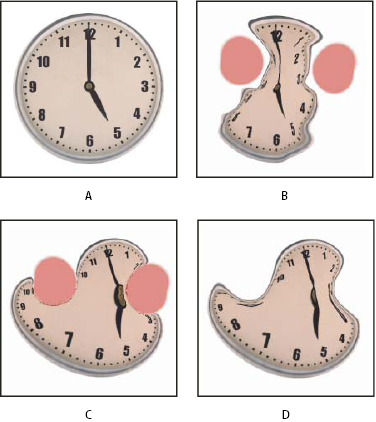
A. Original image B. Distorted with frozen areas C. Reconstructed in Rigid mode (using button) D. Thawed, edges reconstructed in Smooth mode (using tool)

Reconstruct an entire image
Click Reconstruct in the Reconstruct Options area of the dialog box. Then, in the Revert Reconstruction dialog box, specify an amount and click OK.
Remove all distortions
Reconstruct part of a distorted image
-
Freeze areas you want to keep distorted.
-
Select the Reconstruct tool
 and
specify brush options in the Tool Options area of the dialog box.
-
Drag over the area you want to reconstruct. Pixels move more quickly at the brush center. Shift-click to reconstruct in a straight line between the current point and the previously clicked point.