- InDesign User Guide
- Get to know InDesign
- Introduction to InDesign
- Workspace
- Generative AI (Not available in mainland China)
- Introduction to InDesign
- Create and layout documents
- Documents and pages
- Create documents
- Work with parent pages
- Work with document pages
- Set page size, margins, and bleed
- Work with files and templates
- Convert PDFs to InDesign Documents
- Create book files
- Add basic page numbering
- Number pages, chapters, and sections
- Convert QuarkXPress and PageMaker documents
- Share content
- Understand a basic managed-file workflow
- Save documents
- Grids
- Flex Layout
- Layout aids
- Documents and pages
- Add content
- Text
- Add text to frames
- Threading text
- South-East Asian Scripts
- Arabic and Hebrew features in InDesign
- Create type on a path
- Bullets and numbering
- Create math expressions
- Glyphs and special characters
- Text composition
- Composing CJK characters
- Text variables
- Generate QR codes
- Edit text
- Align text
- Wrap text around objects
- Anchored objects
- Linked content
- Format paragraphs
- Format characters
- Typography
- Format text
- Review text
- Spell check and language dictionaries
- Add references
- Styles
- Tables
- Interactivity
- Graphics
- Color and transparency
- Text
- Find and replace
- Share
- Export, import, and publish
- Place, export, and publish
- Publish online
- Publish online dashboard
- Place Firefly assets
- Copy, insert graphics
- Export to Adobe Express
- Export content for EPUB
- Accessibility enhancements for Indexes
- Adjust text resizing options
- Create accessible glossaries
- ARIA role and label support
- Adobe PDF options
- Export to HTML5
- Export content to HTML (Legacy)
- Export to Adobe PDF
- Export to JPEG or PNG format
- Import SVG files
- Supported File Formats
- Export and import User Settings
- Printing
- Place, export, and publish
- Extend InDesign
- Automation
- Troubleshooting
Glyphs panel overview
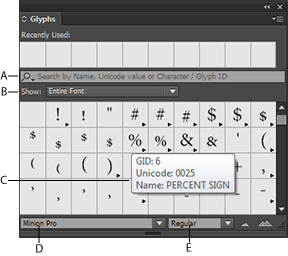
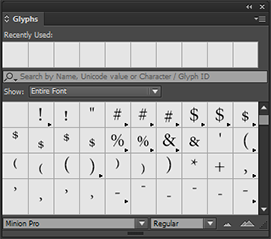
Enter glyphs by way of the Glyphs panel. The panel initially shows glyphs in the font where the cursor is located, but you can view a different font, view a type style in the font (for example, Light, Regular, or Bold), and make the panel display a subset of glyphs in the font (for example, math symbols, numbers, or punctuation symbols).

A. Show subset of glyphs B. Search box C. Tool tip displaying glyph ID, Unicode, and Name D. Font list E. Font style

By moving the pointer over a glyph, you can read its CID/GID value, Unicode value, and name in a tool tip.
Open the Glyphs panel
-
Choose Type > Glyphs or Window > Type & Tables > Glyphs.
Change the Glyphs panel view
- Click the cycle widget (it’s located to the left of the word “Glyphs” on the Glyphs panel) to change views of the panel. Clicking the widget presents these views in succession: the collapsed panel, the entire panel, and the panel without recently used glyphs.
- Click the Zoom In or Zoom Out buttons in the lower-right corner of the Glyphs panel.
- Resize the Glyphs panel by dragging the lower-right corner.
Filter the glyphs that appear
-
Do one of the following on the Show list to determine which glyphs appear on the Glyphs panel:
Choose Entire Font to display all glyphs available in the font.
Choose an option below Entire Font to narrow the list to a subset of glyphs. For example, Punctuation displays only punctuation glyphs; Math Symbols narrows the choices to mathematical symbols.
Sort glyphs in the Glyphs panel
-
Choose By CID / GID or By Unicode to determine how glyphs are sorted in the Glyphs panel.
Search for glyphs in the Glyphs panel
-
In the Glyph panel, click inside the Search box and enter the search query.


By default, InDesign uses a generic search to search based on the glyph name, Unicode, or glyph ID.
-
You can however, specify the search parameter to further filter the search results.
To do this, click the drop-down arrow on the left of the Search box and choose the required search parameter.
Insert glyphs and special characters
A glyph is a specific form of a character. For example, in certain fonts, the capital letter A is available in several forms, such as swash and small cap. You can use the Glyphs panel to locate any glyph in a font.
OpenType fonts such as Adobe Caslon™ Pro provide multiple glyphs for many standard characters. Use the Glyphs panel when you want to insert these alternate glyphs in your document. You can also use the Glyphs panel to view and insert OpenType attributes such as ornaments, swashes, fractions, and ligatures.
Access special font properties of OpenType fonts for greater typographic control! Here's a quick tutorial: Work with glyphs more easily.
Insert special characters
You can insert common characters such as em dashes and en dashes, registered trademark symbols, and ellipses.
-
Using the Type tool, position the insertion point where you want to insert a character.
-
Choose Type > Insert Special Character, and then select an option from any of the categories in the menu.
If special characters that you use repeatedly do not appear on the list of special characters, add them to a glyph set that you create.
Insert a glyph from a specified font
-
Using the Type tool, click to place the insertion point where you want to enter a character.
-
Choose Type > Glyphs to display the Glyphs panel.
-
To display a different set of characters in the Glyphs panel, do any of the following:
Select a different font and type style, if available. From the Show menu, choose Entire Font. Or, if you selected an OpenType font, choose from a number of OpenType categories.
Choose a custom glyph set from the Show menu. (See Create and edit custom glyph sets.)
-
Scroll through the display of characters until you see the glyph you want to insert. If you selected an OpenType font, you can display a pop‑up menu of alternate glyphs by clicking and holding the glyph box.
-
Double-click the character you want to insert. The character appears at the text insertion point.
Insert a recently used glyph
InDesign tracks the previous 35 distinct glyphs you inserted and makes them available under Recently Used in the first row of the Glyphs panel (you have to expand the panel to see all 35 glyphs on the first row).
-
Do one of the following:
Double-click a glyph under Recently Used.
Choose Recent Glyphs on the Show list to display all recently used glyphs in the main body of the Glyphs panel, and then double-click a glyph.
Clear recently used glyphs
- To clear a selected glyph from the Recently Used section, right-click (Windows®) or Control-click (Mac OS) a glyph in the Recently Used section, and then choose Delete Glyph From Recently Used.
- To clear all recently used glyphs, choose Clear All Recently Used.
Replace a character with an alternate glyph
If you select a character in an InDesign document and the character has at least one alternate glyph, InDesign displays an on-context menu containing the available alternates.


If you select a word, a blue underline appears under the character. If you hover the mouse over the blue underline, then the on-context menu is displayed.
-
To replace the selected character in the document, click the glyph in the on-context menu.
InDesign displays up to a maximum of 5 alternate glyphs for a selected character.
If the selected character has more than 5 alternates, a forward arrow is displayed on the right end of the on-context menu.
-
If the glyph you require is not in the on-context menu, click the right arrow.
The Glyph panel is displayed containing all the alternate glyphs.
-
Do one of the following to replace the selected character in the document:
Double-click a glyph in the Glyphs panel.
Select a glyph on the menu.
Display OpenType glyph attributes in the Glyphs panel
For easy selection, the Glyphs panel allows you to display characters for only the selected OpenType attributes. You can select various options from the Show menu in the Glyphs panel.
Do not confuse these options with those that appear on the Glyphs panel menu, which let you apply forms to selected text. (See Apply OpenType font attributes.)


-
In the Glyphs panel, choose an OpenType font from the font list.
-
Choose an option from the Show menu.
The options displayed vary depending on which font is selected. For information on applying OpenType font attributes, see Apply OpenType font attributes. For more information on OpenType fonts, see www.adobe.com/go/opentype.
Highlight alternate glyphs in the text
-
Choose Edit > Preferences > Composition (Windows) or InDesign > Preferences > Composition (Mac OS).
-
Select Substituted Glyphs, and then click OK. Substituted glyphs in the text are highlighted in nonprinting yellow.
Create and edit custom glyph sets
A glyph set is a named collection of glyphs from one or more fonts. Saving commonly used glyphs in a glyph set prevents you from having to look for them each time you need to use them. Glyph sets are not attached to any particular document; they are stored with other InDesign preferences in a separate file that can be shared.
You can determine whether the font is remembered with the added glyph. Remembering fonts is useful, for example, when you are working with dingbat characters that may not appear in other fonts. If a glyph’s font is remembered, but the font is missing, the font’s square appears in pink in the Glyphs panel and the Edit Glyph Set dialog box. If a font is not remembered with an added glyph, a “u” appears next to the glyph, indicating that the font’s unicode value determines the appearance of the glyph.
Create a custom glyph set
-
Choose Type > Glyphs.
-
Do one of the following:
From the Glyphs panel menu, choose New Glyph Set.
Open the context menu on the Glyphs panel and choose New Glyph Set.
-
Type the name of the glyph set.
-
Choose the insert order in which glyphs will be added to the glyph set, and click OK:
Insert At Front
Each new glyph is listed first in the set.
Append At End
Each new glyph is listed last in the set.
Unicode Order
All glyphs are listed by the order of their unicode values.
-
To add glyphs to the custom set, select the font containing the glyph at the bottom of the Glyphs panel, click the glyph to select it, and then choose the name of the custom glyph set from the Add To Glyph Set menu on the Glyphs panel menu.
View a custom glyph set
-
Do one of the following on the Glyphs panel:
Choose the glyph set on the Show list.
On the Glyphs panel menu, choose View Glyph Set, and then the name of the glyph set.
Edit custom glyph sets
-
Choose Edit Glyph Set from the Glyph panel menu, and then choose the custom glyph set.
-
Select the glyph you want to edit, do any of the following, and then click OK:
To bind the glyph to its font, select Remember Font With Glyph. A glyph that remembers its font ignores the font applied to the selected text in the document when the glyph is inserted into that text. It also ignores the font specified in the Glyph panel itself. If you deselect this option, the Unicode value of the current font is used.
To view additional glyphs, choose a different font or style. If the glyph is not defined with a font, you cannot select a different font.
To remove a glyph from the custom glyph set, choose Delete From Set.
To change the order in which glyphs are added to the set, choose an Insert Order option. Unicode Order is not available if Insert At Front or Append At End was selected when the glyph set was created.
Delete glyphs from custom glyph sets
-
In the Glyphs panel, choose the Custom Glyph Set from the Show menu.
-
Right-click (Windows) or Control-click (Mac OS) a glyph, and then choose Delete Glyph From Set.
Delete custom glyph sets
-
Do one of the following:
From the Glyphs panel menu, choose Delete Glyph Set.
From the context menu, choose Delete Glyph Set.
-
Click the name of a custom glyph set.
-
Click Yes to confirm.
Save and load glyph sets
Custom glyph sets are stored in files kept in the Glyph Sets folder, a subfolder of the Presets folder. You can copy glyph set files to other computers and in so doing make custom glyph sets available to others. Copy glyph set files to and from these folders to share them with others:
Mac OS
Users\[username]\Library\Preferences\Adobe InDesign\[Version]\[Language]\Glyph Sets
Windows XP
Documents and Settings\[username]\Application Data\Adobe\InDesign\[Version]\[Language]\Glyph Sets
Windows Vista and Windows 7
Users\[username]\AppData\Roaming\Adobe\InDesign\[Version]\[Language]\Glyph Sets
Use quotation marks
You can specify different quotation marks for different languages. These quotation mark characters appear automatically during typing if the Use Typographer’s Quotes option is selected in the Type section of the Preferences dialog box.
Specify which quotation marks to use
-
Choose Edit > Preferences > Dictionary (Windows) or InDesign > Preferences > Dictionary (Mac OS).
-
Choose a language from the Language menu.
-
Do any of the following, and then click OK:
For Double Quotes, select a pair of quotation marks, or type the pair of characters you want to use.
For Single Quotes, select a pair of quotation marks, or type the pair of characters you want to use.
Insert straight quotation marks
-
Do one of the following:
Choose Type > Insert Special Character > Quotation Marks > Straight Double Quotation Marks or Straight Single Quotation Mark (Apostrophe).
Deselect the Use Typographer’s Quotes option in the Type section of the Preferences dialog box, and then type the quotation mark or apostrophe.
Press Shift+Ctrl+Alt+' (Windows) or Shift+Command+Option+' (Mac OS) to switch between turning on and off the Use Typographer’s Quotes preferences option.
The character frequently used to indicate feet, arcminutes, or minutes of time is the prime mark. It looks like a slanted apostrophe. The character frequently used to indicate inches, arcseconds, or seconds of time is the double prime mark. These symbols are different from apostrophes and double quotation marks. Some fonts include the prime and double prime marks. Use the Glyphs panel to insert these marks. If the font doesn’t have a prime or double prime mark, insert the straight quotation mark, and italicize it.
Insert white space characters
A white space character is a blank space that appears between characters. You can use white-space characters for many different purposes, such as preventing two words from being broken at the end of a line.
-
Using the Type tool, position the insertion point where you want to insert a certain amount of white space.
-
Choose Type > Insert White Space, and then select one of the spacing options (such as Em Space) in the context menu.
Representative symbols of the white-space characters appear when you choose Type > Show Hidden Characters.
White space options
The following options appear on the Type > Insert White Space menu:
Ideographic Space
This is a space that is based on a full-width character in Asian languages. It wraps to the next line as with other full-width characters.
Em Space
Equal in width to the size of the type. In 12‑point type, an em space is 12 points wide.
En Space
One‑half the width of an em space.
Nonbreaking Space
The same flexible width as pressing the spacebar, but it prevents the line from being broken at the space character.
Nonbreaking Space (Fixed Width)
A fixed width space prevents the line from being broken at the space character, but does not expand or compress in justified text. The fixed width space is identical to the Nonbreaking Space character inserted in InDesign CS2.
Third Space
One‑third the width of an em space.
Quarter Space
One‑fourth the width of an em space.
Sixth Space
One‑sixth the width of an em space.
Flush Space
Adds a variable amount of space to the last line of a fully justified paragraph, useful for justifying text in the last line. (See Change Justification settings.)
Hair Space
One‑twenty‑fourth the width of an em space.
Thin Space
One‑eighth the width of an em space. You may want to use a thin space on either side of an em dash or en dash.
Figure Space
Same width as a number in the typeface. Use a figure space to help align numbers in financial tables.
Punctuation Space
Same width as an exclamation point, period, or colon in the typeface.
About Adobe SING Glyphlet Manager
The Adobe SING Glyphlet Manager is a utility for installing and searching for glyphlets. It is not included in Adobe Creative Suite 5 and later versions.
