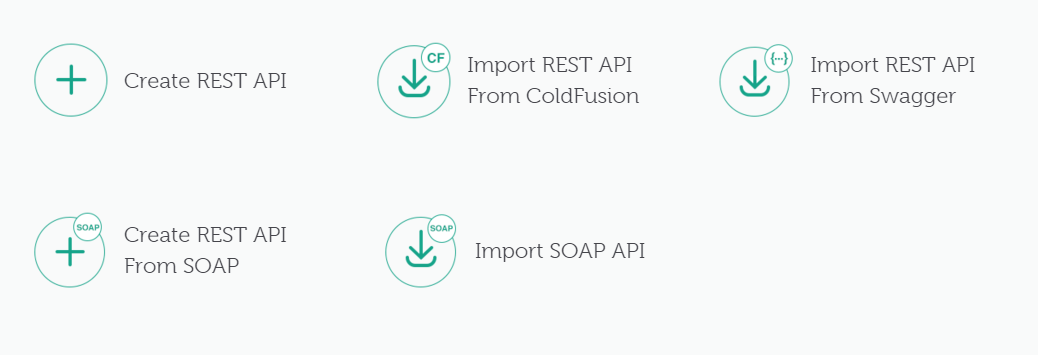
Click Create REST API. The Basic Settings page displays.
Overview
As a publisher, you can create and publish an API for consumption by any service or application. Subscribers can consume the APIs and use the APIs in their applications. Using the portal, you can design APIs and manage the APIs throughout their lifecycle interactively. You can collaborate with consumers, engage developers, and gather important information and insights necessary to get your API up and running.
When you log in to the API Manager portal as a publisher, you can see the following options:

Switching between roles
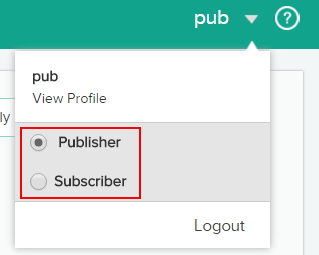
When the API Manager administrator assigns more than one role (for example, publisher and subscriber) to you, you can switch between the roles and log in as publisher or subscriber.

Creating a REST API
Follow these steps to create a REST API in API Manager.
-


-
Enter the following details in the Basic Settings section.
Field
Description
API Name
Name of the new API. Once you create an API, you cannot change its name.
Context
Defines a context for a service request. Resources are viewed hierarchically via their URI names, offering consumers a friendly, easily understood hierarchy of resources to leverage in their applications.
Description
The description of the API.
Visibility
Visibility settings prevent certain roles from viewing and modifying APIs from another user. Select Public, Intranet, or Partner modes of publishing an API. In Public mode, all levels of users can see an API.
Version
The version of the API. An API can have multiple versions. The version must always begin with v or V followed by a whole number or decimal. The version can also begin without v or V. For example,
Make Default
Select this check-box if you want your API version to be the default. If you have multiple versions of the same API, you can choose the one to be the default.
Lifecycle
Stages of progression of an API. Select from Draft, Published, Deprecated, or Retired.
-
Define the API endpoints. An endpoint defines the address to a web service. You can expose both REST and SOAP services to consumers through APIs. Enter the following details in the Endpoints section.
-
To choose the type of endpoint- HTTP URL or Load Balancer, click Endpoints.


-
If you select Load Balancer, choose the load balancing algorithm.


There are two load balancing algorithms that the API Manager uses:
- Round robin: In this method, the load is balanced sequentially across the API endpoints. All the endpoints are assigned similar load. The endpoints also similar performance. Click Add Another Endpoint to add the endpoint URLs for load distribution.


- Weighted Round Robin: In this method, the load is balanced across the endpoints according to a “weightage” factor that you can assign to each endpoint. The load is divided in terms of the weights assigned. If the weights assigned to the three endpoints are 100, 50, and 50 respectively, the first endpoint handles twice as many requests as the second third endpoints. In the following example:
- The first endpoint handles the first two requests.
- The second endpoint handles the third request.
- The third endpoint handles the fourth request.


-
To enable caching of your newly created REST API, click Caching. The benefits of caching an API are speed and reduced load on server. Select the Enable Caching check-box and enter the caching timeout in seconds.
To enable caching at resource level, select the Apply to all resources check-box. Caching at resource level prevents a separate back-end call to check the authorization type and throttling level of a resource, every time a request to the API comes.


-
To enable Cross-Origin Resource Sharing (CORS) of the API, click CORS. CORS allows restricted resources in the API to be accessed from another domain. CORS is a standard mechanism that allows JavaScript calls executed in a web page to interact with resources originating from an external domain. All known browsers enforce this policy.
To know more about CORS, refer to CORS.


Adding resources to the API
In the Resources section, you can separate your API into resources. You can access or manipulate these resources using HTTP requests where each method, GET, PUT, or POST, and so forth, performs to its specifications.
A resource is typically defined as an object with a type and the methods that operate on it.
Resources can be grouped into collections. There are also singleton resources that exist outside a collection.
To add a resource to the new API:
-
Enter the name of the resource in the Endpoint Path field. For example, if your endpoint URL represents an online store, you can define the following resources:
- /products. For example, http://endpointurl/products
- /orders. For example, http://endpointurl/orders
- Nested orders, {orderId}/status. For example, http://endpointurl/{orderId}/status
-
Enter a description of the API in the Nickname field. A nickname is a one word description of the API. The resource uses the nickname as an identifier. For example, the nickname /checkPhone can be assigned to the resource /CheckPhoneNumber.
-
Select an HTTP method in the URL to make a request.
-
To add the new resource, click Add Resource. The resource with an HTTP method displays along with the mapped name (the name given to the resource).
-
Click the HTTP method to change the return type, authentication type, rate limits, and scope of the API.
You can also change the scope of the API resources.
-
Add the query parameters to the API path and modify the properties.
-
To define the output format or response, click Manage Models. You can add or modify a response format and create a return type for a resource.


Adding compression methods to request and response
Compression is the act of removing redundant information, representing what you want in as little possible space. It is incredibly helpful for sending information across the World Wide Web, because the speed at which people get information from a web application is almost always dependent on how much information you are trying to send.
Subscribers then can send compressed request and endpoints can also send compressed response back.
While publishing the API resources, specify whether the resource supports compression and the compression method. You can use either gzip or deflate compression method.
To add a compression method:
-
Navigate to the properties of a resource in the Edit mode.
-
Choose an appropriate compression type from the Request Encoding and the Response Encoding drop-down lists.


-
Click Save.
-
To try out the API, click Test this API. In the tryout mode, update the headers and invoke the API.
A subscriber while making the API calls will have to pass these encoding headers. For passing encoded parameters, the subscriber needs to pass 'Content-encoding' header where he/she specifies the type of encoding. This is one of the 'Request encoding' values.
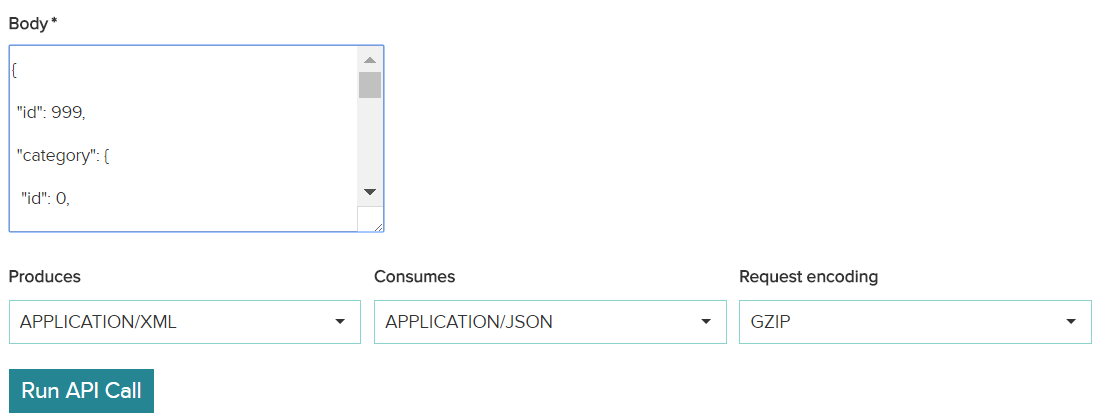

You can see the content-encoding as the selected compression method, as shown below:


Response compression
If the server has to send compressed response, it needs to set the content-encoding header and use its own ways of compressing the data. For this, select the Enable Response Compression check-box.


Save and test the API.
The request header contains Accept-encoding header which will be set of encoding value.


Request and response logging
Log all requests and responses made by your API to a file apimanager-trace.log located in /ColdFusion_2016_install_directory/logs.
Use the API request/response logging feature to trace request and response packets from the API Manager to a backend service.
Log all requests and responses made by your API to a file apimanager-trace.log located in /ColdFusion_2016_install_directory/logs.
You can enable logging both at the API level and the resources level.
The following screenshot displays enabling/disabling of logging at an API level:


The following screenshot displays enabling/disabling of logging at a resource level:
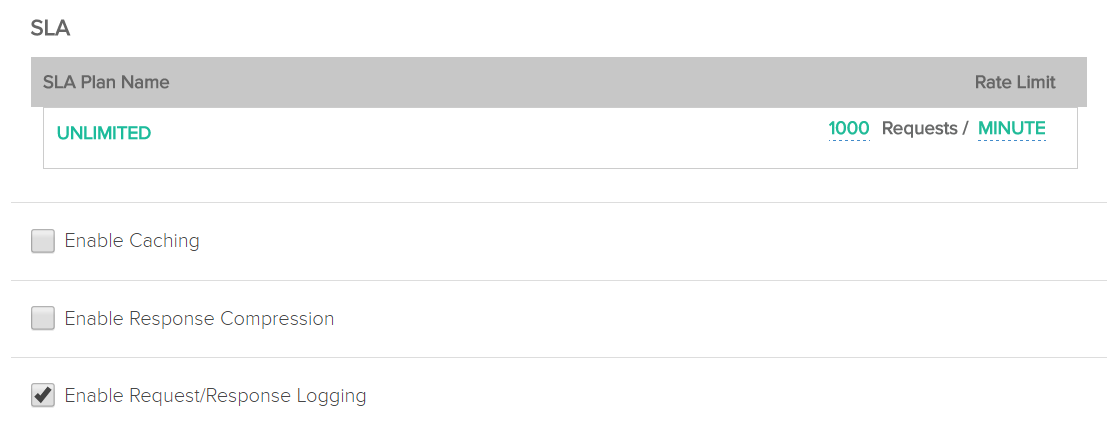

You need not restart the API Manager after changing this setting, which makes it production-friendly.
To enable logging on the server level, enable the option Dispatcher in Log in the Administrator portal.
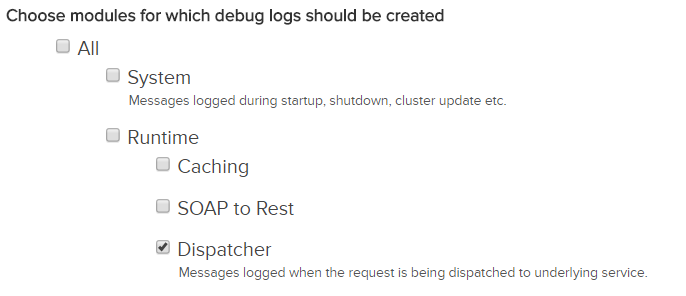

You can also change the log settings in log4j2.xml in <API Manager install directory>/conf. Change the policy interval and size in the section of the xml.
<RollingRandomAccessFile name="requesttrace-log" fileName="${log-path}/apimanager-trace.log"
                     filePattern="${log-path}/apimanager-trace-%d{yyyy-MM-dd}-%i.log">
            <PatternLayout>
                <pattern>[%-5level] %d{yyyy-MM-dd HH:mm:ss.SSS} [%t] - %msg%n</pattern>
            </PatternLayout>
            <Policies>
                <TimeBasedTriggeringPolicy interval="1" modulate="true"/>
                <SizeBasedTriggeringPolicy size="10 MB"/>
            </Policies>
 </RollingRandomAccessFile>
Swagger schema to example JSON
Each API's request and response can be defined with the help of models so that subscribers can understand the API in a more detailed way. Each model consists of its name, type, and schema.
In this release of API Manager, you can generate the sample data from the schema provided.
There is a new text area that contains the sample data. For example,
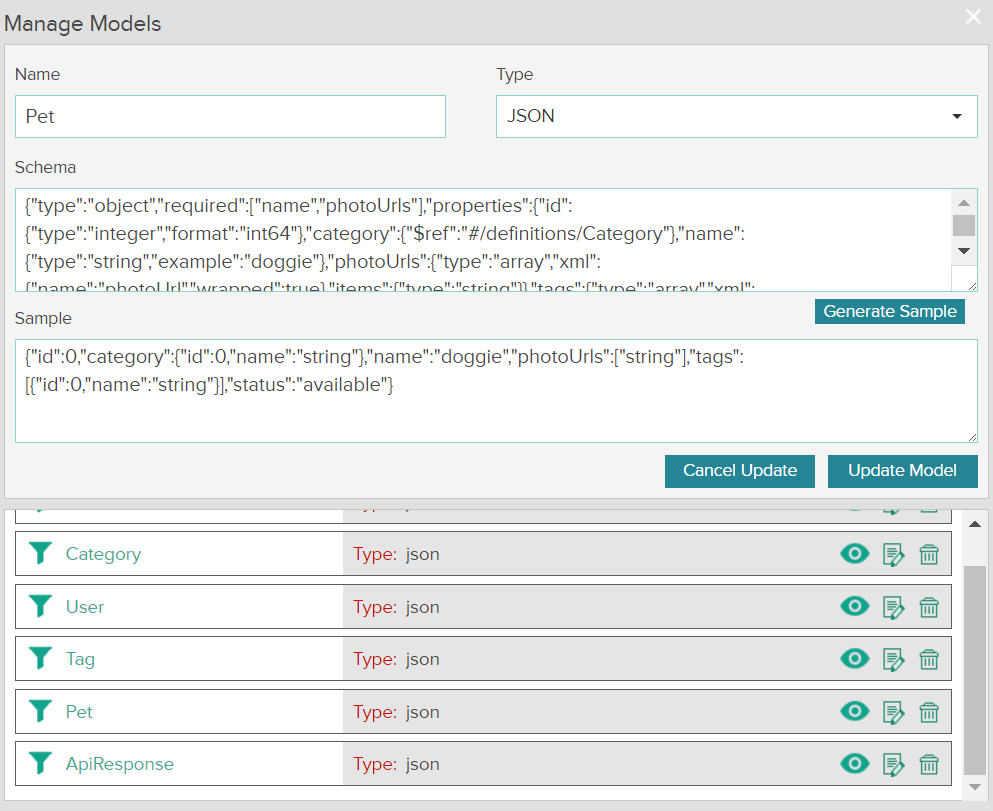

For importing APIs from Swagger, ColdFusion, and so on, this sample data will be automatically generated from the schemas provided.
A publisher can also modify the schema and re-generate the sample by clicking the 'Generate Sample' button.
Trying out an API
After creating an API, you can test the API to see the response and other details. Click Test this API on the left pane.
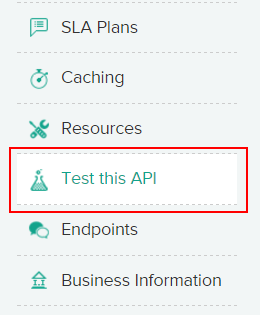

Enter the value of the parameter and select the output format. Click Run API Call. You can see the response details, as shown below:
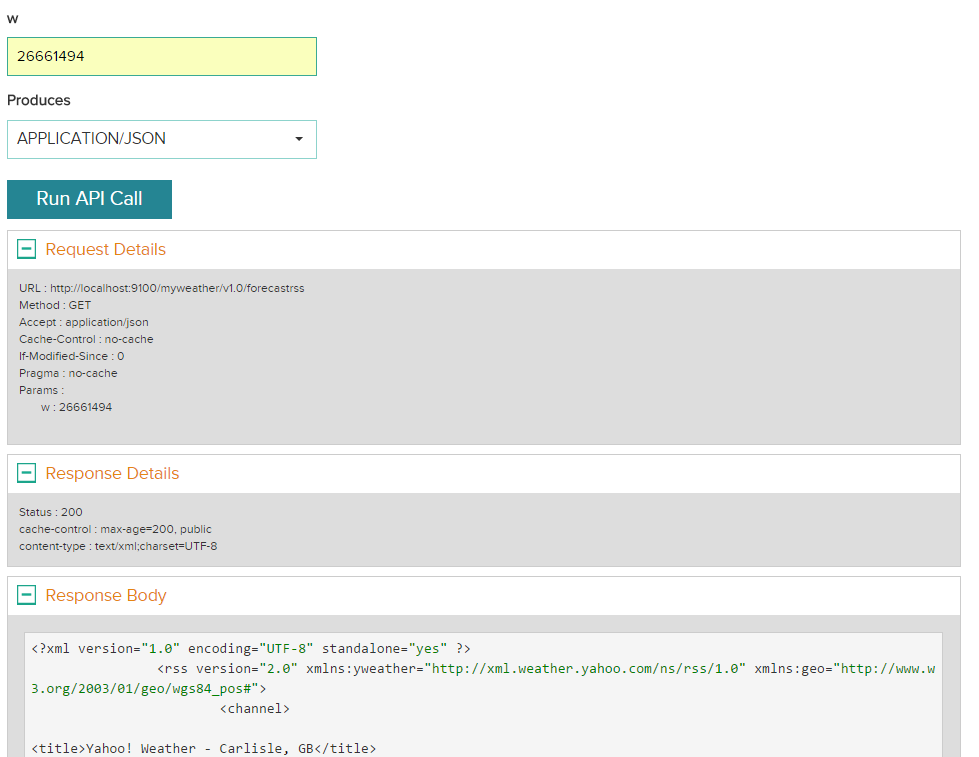

While testing your API, if see the following message,
“Please go to your profile and generate your try-out key before trying out APIs.”
Go to the profile and click Regenerate tryout key to get try-out key and then you can test your API.
Viewing all APIs
In this page, you can view all APIs you have:
- Published
- Created as draft
- Deprecated
- Retired
Also, you can filter the list of APIs according to API visibilit. For example:
- Public
- Partner
- Intranet
API Catalog
In this page, you can filter all APIs according to the visibility and time (newest or oldest).
Changing the header logo and title
You can change the logo and title on the header area of the administrator portal.
Navigate to the <API Manager Installation Directory>/wwwroot/portal/conf folder and open the fileconfig.json. Modify the following properties:
{
"headerTitle": "API Manager Portal",
"adminHeaderTitle": "API Manager Administrator",
"headerLogoPath": "images/CF-Logo.png"
}
Cross-Origin Resource Sharing (CORS)
CORS allows restricted resources in the API to be accessed from another domain. CORS is a standard mechanism that allows JavaScript calls executed in a web page to interact with resources originating from an external domain. All known browsers enforce this policy.
Allowed HTTP Methods - A list of HTTP methods that are allowed, for example, GET, PUT, POST, and so forth.
Allowed Origins - Represents the origin of a request or *. For a request to be allowed cross-domain, add the header specified in Allowed Origins to the request. For example, if the server responds with allowed origin as http://examplerest.com, then only requests from http://examplerest.com are allowed.
Note: The Access-Control-Allow Origin Header should contain the list of origins that can use this API from the browser. The header also allows a wildcard value * adding it would allow any website can invoke this API and retrieve the response. The wild card value can be abused in some cases like where an external website part of internet can be able to consume the API which is part of Intranet zone.
Allowed HTTP Headers - A list of allowable custom request headers, for example, Origin, Content-Type, and so forth.
Allowed Expose Headers - Specify the headers you want to grant explicit permissions so that the client can read those headers. Doing so ensures that the client triggers a cross-origin request.
Preflight Max Age - Specify the amount of time (in seconds) for the browser to cache the response to a request.
Example
For example, you want to GET data from http://api.examplerest.com/user from http://examplerest.com. There is an access token, xyz123, that you can pass in the Authorization header to authenticate the request.
The browser sends an OPTIONS request to the server with the following header:
OPTIONS /user
Origin: http://www.examplerest.com
Access-Control-Request-Method: GET
Access-Control-Request-Headers: Authorization
Since you want to allow the request, you respond to the request with the header:
Allowed-Origin: http://www.examplerest.com
Allowed HTTP Headers: AUTHORIZATION
Allowed HTTP Methods: GET
The browser now sends the GET request to your server where the API is hosted.
Caching
To enable caching of your newly created REST API, click Caching. The benefits of caching an API are speed and reduced load on server. Select the Enable Caching check-box and enter the caching timeout in seconds.
Converting SOAP endpoints to REST endpoints
To convert a ColdFusion SOAP service into a REST service, click Create REST API from SOAP.
-
In the General Information section, enter the new API information, such as:
- API Name
- Context
- Visibility
- Version
- Description
- WSDL URL


-
In the WSDL URL field, enter a SOAP CFC URL.
The example WSDL URL has a single port type. A WSDL <portType> element defines a web service, the operations that can be performed, and the messages that are involved.


This WSDL has a single binding. WSDL bindings define the message format and protocol details for a web service. In this case, axis1.cfcSoapBinding is the binding.
The soap:binding element has two attributes - style and transport. The style attribute can be either rpc or document.
The transport attribute provides a namespace for a SOAP transportation protocol.
For example, transport="http://schemas.xmlsoap.org/soap/http" represents SOAP over HTTP.


-
Click Fetch. You can see the WSDL resources mapped to REST resources. Choose the port type.


-
On the WSDL Mapping Wizard, you can view the list of all the operations of the Axis1 port type.


Expand a method from the list. The REST path of the method displays along with the MIME-type and the method type (GET, PUT, POST, and so forth).


For operations with method type POST or PUT, select the type of parameter for an argument associated with the operation.


- PATHPARAM describes a path parameter in the URL. For example, in the method GET /directory/{directoryName}, {directoryName} is the PATHPARAM.
- QUERYPARAM describes a parameter of the query string. For example, /search?q=johndoe.
- FORMPARAM inserts web form parameters into a REST service.
-
To generate the REST resources, click Generate REST Endpoints. Once you publish, you cannot change the name of the API.
The REST endpoint displays after the conversion. The new URL is:


The REST endpoint displays after the conversion. The new URL is:


You can use the URL in the following ways:
To view the swagger resource listing document, enter the following in the address bar of a browser:


You can see the following:


To view the root resource path document, enter the following in the address bar:


You can see the following:


-
In the SLA Plans section, select a plan or plans for the API.


-
In the Resources section, there is also a list of all SOAP operations that are converted to REST. You can see the methods with each operation.


-
Click Publish to make the REST API available to subscribers.
The SOAP to REST feature does not support the WS-* SOAP specifications, for example:
- WS-Addressing
- WS-Policy
- WS-ResourceProperties
- WS-Security
- WS-Transactions
- WS-ReliableMessaging
- WS-ResourceLifetime
For some SOAP services, resources that do not get converted to REST out of the box, write your own mechanism to convert to REST.
Importing REST API from ColdFusion
Before you import a REST API from ColdFusion server, set up the server. For more information, see CF Discovery setup.
Set up a CF service that returns the date. In the cfc, use the method GET and a REST path, for example, /GetCurrentDate. Create a folder in the web root of your ColdFusion server and save the cfc.
-
On the Create API screen, click Import REST API from ColdFusion.
-
View the list of CF services and click Import for the service you want to import from CF server.


-
Once you generate the resources defined in the cfc, set up the SLA plans and the authentication method for the API. To publish the API, click Publish.
Importing REST API from Swagger
Swagger is a specification and a framework to build API documentation and sandboxes, and to generate the code of an API client.
In ColdFusion API Manager, you can import REST resources based on Swagger specifications and publish them.
-
On the Create API screen, click Import REST API from Swagger.
There are three ways by which you can include a Swagger specification:
- Using the Swagger link
- Using the Swagger text
- Importing the Swagger specification from your computer. After uploading a file, you can edit the file and save it. The changes you make do not reflect in your original file.
-
Enter a Swagger API. In this example, use a Petstore server. Click Import.

Swagger import 
Swagger import -
Enter the API information and set the visibility.


-
Set the authentication type for the API.


-
To view existing Petstore resources or add a resource, click Resources on the left pane on the screen.


-
To publish the API, click Publish.
Importing a SOAP API
You can pass a SOAP API through proxy in API Manager. You can:
- Apply security authentication to SOAP web services
- Apply rate limiting
- Apply throttling
- Collect metrics and logging information
As a publisher, you enter the WSDL URL to a proxy WSDL URL, where the subscriber gets the modified URL with proxy SOAP endpoints and location of the XSD.
An example of proxy WSDL is http://service.adobe.com/<API name>/<version>/?wsdl
If you host a SOAP proxy behind a web server or a particular IP, modify the domain URL through the Administrator portal. The SOAP endpoint is on the domain that the administrator defines in the Domain URL field.
The subscriber sends request via proxy endpoint and the request is mapped to the actual endpoint.
-
In the API Manager, click Import SOAP API.


-
Enter the details on the screen. Set the API visibility to Public. Enter a WSDL URL in the WSDL URL field. For example, enter the WSDL URL http://www.thomas-bayer.com/axis2/services/BLZService?wsdl.
This WSDL generates request and response for a web service using which you can fetch Bank Sort Codes (called Bank BLZ codes) for banks in Germany.
-
Click Fetch. You can see both the actual and proxy WSDLs. You can also see the WSDL ports along with their bindings, and actual and proxy SOAP endpoints. For example,


-
Choose the type of authentication for the API from the Type drop-down list.


-
Choose an SLA plan or create a plan. To make the plan subject to approval, select the Approval check-box.


When you make an SLA plan ssubject to approval, an API subscriber cannot use the API unless you grant the subscriber approval to use the API under that SLA plan. For example, if you grant a subscriber GOLD plan subject to approval, the subscriber can only subscribe to GOLD if you approve the subscription request.
For more information, see Approving subscriptions.
-
To publish the API and make it available to subscribers, click Publish.
Once you publish the API, a subscriber can try out the API and use the API in different applications.
To see how a subscriber can try out the API, see Try-out SOAP API.
Authenticating an API
In the API Manager, you can use API keys to authenticate your APIs and applications. The API Manager generates the API keys and enable you to add API key-based authentication to your APIs.
Validation using API keys is a type of security you can enforce while creating an API. Applications use the API key and the API Manager checks to see if the API key is in an approved state for a resource.
The API Manager uses three API authentication types:
- apiKey
- basicAuth
- OAuth2
Authentication types
apiKey
An API Key is an opaque token, which is a simple form of authentication to consume an API. To acquire an API Key, create an application as a subscriber.
Consuming an API protected using API Key
In a request, you can pass an API Key to the API Manager in a request in one of the following ways:
- Header: The api_key header can be used to pass the API Key to the API runtime.
- Query Parameter: The api_key query parameter can be used to pass the API Key.
- Form Parameter: The api_key form parameter can be used to pass the API Key.
To know more about authentication using API Key, see API Key.
basicauth
Basic authentication is the simplest form of authenticating a user by passing the username and password in the request to consume an API. The API Manager allows protecting an API using the Basic authentication scheme.
A publisher can configure the user store to be used for the authentication. Also, if the API resource is protected with a scope configured with roles, then the API Manager also authorizes the role during the consumption of the API call.
In basic authentication, you can enforce authentication according to user stores.
- From the User Store drop-down list, select a user store. The API administrator creates a user store.
- Create a scope. A scope defines a role defined in a user store. Enter the name of the scope and select a role.
- To add the newly created scope, click Add Scope.
To know more about basicauth authentication, see Basic authentication.
OAuth2
OAuth2 is a standard for delegating authorization to an application on behalf of the user without providing the password. Instead of the user password, an access token having limited lifetime with the limited access (using scopes) will be provided to the application. Depending on the type of application, obtaining an access token varies and are called grant types.
In the API Manager,
- The application requests authorization to access resources in an API you create.
- If you approve the request, the application receives an authorization.
- The application requests an access token after it presents authentication of its identity.
- The API issues an access token to the application.
To set up OAuth2,
- Select an Oauth type, USERSTORE or SAML. If you select USERSTORE, select a user store defined in LDAP or database connection.
- Add a scope.
The subscriber creates an application. After you approve the request, the subscriber uses the client secret key to make the API requests.
To know more about OAuth2 authentication, see OAuth2 authentication.
Adding tiers to an API
You can enforce limits on each resource consumption and assign multiple consumption levels. You can change the API-throttling level of a plan and add new plans. Throttling in API Manager imposes limits on the maximum rate at which the API Manager can make requests.
The administrator configures an API Service Level Agreement (SLA) by selecting one of the two algorithms. The administrator then adds an SLA by specifying its rate and throttle limits.
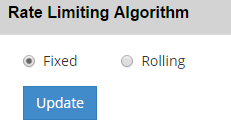

As a publisher, you can create a subscription plan and assign throttling limits to an API. To modify an existing tier:
-
Select any plan created by the administrator.


-
Click the name of the plan and change its properties.
-
Modify the API rate limit. You can only limit an API request rate to number of requests per second, minute, or hour.


-
Modify the API throttle limit. You can only limit an API throttle rate to number of requests per day, week, or month.


-
Select the type of limit for the API requests.
There are two options:
- Hard: If you select this option, the number of API requests cannot exceed the throttle limit.
- Soft: If you select this option, you can set the API request limit exceed a percentage. For example, if you set the Exceed Limit to 90%, the number of API requests can exceed 90% of the prescribed limit.


-
To approve an API request plan, select the Approval check-box.
-
To add the new SLA plan, click Add Plan.
Adding rate limits to API resources
You can add rate limits to the resources of the API for the SLA plans which the API subscribe. Once the API exceeds the rate limit, the subscriber sees Status 429 in the response header. There is also a try-out rate limit for the subscriber. You do not have any limit to try out your APIs.
To add rate limits to the API resources:
-
Enter the number of requests for an SLA plan.
-
Save the information. The API resources get new rate limits.
Specifying endpoints
An endpoint defines the address to a web service. You can expose both REST and SOAP services to consumers through APIs. Enter the following details in the Endpoints section.
Choose the type of enpdpoint.
HTTP URL: If you choose this option, enter a primary URL or URLs that contains the resources. You can also enter a test endpoint URL to test your APIs in a sandboxed environment.
Load Balancer: If you choose Load Balancer, choose the load balancing algorithm. There are two load balancing algorithms:
- Round Robin: In this method, the load is balanced sequentially across the API endpoints. All the endpoints are assigned similar load and have similar performance. Click Add Another Endpoint to add the endpoint URLs for load distribution.
- Weighted Round Robin: In this method, the load is balanced across the endpoints according to a "weightage" factor that you can assign to each endpoint. The load is divided in terms of the weights assigned. If the weights assigned to the three endpoints are 100, 50, and 50 respectively, the first endpoint handles twice as many requests as the second and third endpoints.
Authentication Type: Choose the type of authentication to the endpoint. The types are:
- Client Authentication: Choose the key store and the key pair you have created.
- Shared Secret: Generate a secret token.
Chunked encoding: Select this check-box to send request data to API endpoints as chunked encoding (byte stream). When disabled, the request data is sent as a string, encoded with the specified charset in the content-type header. The encoding defaults to the operating system defaults. Enable this option when double byte characters are sent in the request data.
API Policies
In ColdFusion API Manager, policies allow you to change the behavior of an API by making certain configuration changes. Policies are a collection of commands that are executed sequentially at the request or response of an API.
In API Manager, there are two main categories of policies:
- Data transformation policies
- Threat protection policies
- Policies added at the API level are inherited at the resource and sub-resource level.
- Inherited policies cannot be deleted. The policies can only be disabled.
Content Type Restriction
In API Manager, you can specify the list of MIME types to be accepted or rejected when the input type is Consumes or Produces. Validating the content types at the request level helps in mitigating vulnerabilities such as JSON Cross-Site Request Forgery (CSRF).
In Content Type Restriction, the API Manager validates the content type if it matches the specified content-type header or Accept header.
You can also reject requests that do not have a content type header or an Accept header.
|
Policy Name |
The name of the content type restriction policy. |
|
Allow |
The content type to allow. |
|
Deny |
The content type to restrict. |
|
Honor API Operation Content Type |
Allows you to override the policy made globally and allow the policy at the API level. For example, if ‘application/postscript’ content type is denied at the global policy level and is allowed at the API level, the setting made at the API level will take precedence. |
|
Detect Content Type by Inspecting the Payload |
Determine the content type by inspecting the header. |
XML Threat Protection
Malicious attacks on XML applications typically involve large, recursive payloads, XPath/XSLT or SQL injections. Using the XML Threat Protection policy, you can limit the size of things, such as maximum node depth and text node length, in your XML code to thwart malicious attacks.
Policy Name |
The name of the XML threat protection policy. |
Disallow Doctype Declaration |
Select this check-box to set the parameters for XML threat protection. |
Load External DTDs |
Select this check box if you want the doctype declaration to load an external DTD. For example, <?xml version="1.0" standalone="no" ?> <!DOCTYPE document SYSTEM "//path//to//DTD"> |
Entity Expansion Limit |
Denotes the maximum allowable entity expansions. In other words, this is the upper limit on how many entity substitutions the XML parser allows in a document. The default value is 64,000. To prevent XML Entity Expansion (XXE) attacks, set the limit to XML entity expansions. The XML Entity expansion attack exploits a capability in XML DTDs that allows the creation entities, that can be used throughout a document. By recursively defining a set of custom entities at the top of a document, an attacker can overwhelm parsers that attempt to completely resolve the entities by forcing them to iterate almost indefinitely on these recursive definitions. The malicious XML message is used to force recursive entity expansion (or other repeated processing) that completely uses up available server resources. The most common example of this type of attack is the "many laughs" attack (sometimes called the 'billion laughs' attack). For example, <?xml version="1.0"?> <!DOCTYPE lolz [ <!ENTITY lol "lol"> <!ELEMENT lolz (#PCDATA)> <!ENTITY lol1 "&lol;&lol;&lol;&lol;&lol;&lol;&lol;&lol;&lol;&lol;"> <!ENTITY lol2 "&lol1;&lol1;&lol1;&lol1;&lol1;&lol1;&lol1;&lol1;&lol1;&lol1;"> <!ENTITY lol3 "&lol2;&lol2;&lol2;&lol2;&lol2;&lol2;&lol2;&lol2;&lol2;&lol2;"> <!ENTITY lol4 "&lol3;&lol3;&lol3;&lol3;&lol3;&lol3;&lol3;&lol3;&lol3;&lol3;"> <!ENTITY lol5 "&lol4;&lol4;&lol4;&lol4;&lol4;&lol4;&lol4;&lol4;&lol4;&lol4;"> <!ENTITY lol6 "&lol5;&lol5;&lol5;&lol5;&lol5;&lol5;&lol5;&lol5;&lol5;&lol5;"> <!ENTITY lol7 "&lol6;&lol6;&lol6;&lol6;&lol6;&lol6;&lol6;&lol6;&lol6;&lol6;"> <!ENTITY lol8 "&lol7;&lol7;&lol7;&lol7;&lol7;&lol7;&lol7;&lol7;&lol7;&lol7;"> <!ENTITY lol9 "&lol8;&lol8;&lol8;&lol8;&lol8;&lol8;&lol8;&lol8;&lol8;&lol8;"> ]> <lolz>&lol9;</lolz> |
General Entity Size Limit |
The maximum size of any entity. It is recommended that you set the limit to the smallest possible number so that malformed xml files can be caught quickly |
Parameter Entity Size Limit |
The maximum size of any parameter entity, including the result of nesting multiple parameter entities. |
Element Depth Limit |
The maximum element depth for an xml element from root . For example, in the XML below,
<company> <staff> <firstname>John</firstname> <lastname>Doe</lastname> <salary>100000</salary> <age>29</age> <staff> </company>
The maximum depth is 3. Any value greater than 3 enforces XML protection policy. |
Max Attributes Per Element |
The number of attributes an element can have. This prevents an XML Attribute Blowup attack. For example, the XML below has a limit of 1000 attributes:
<?xml version="1.0"?> <foo a1="" a2="" ... a1000=""/> |
Attribute Name Size |
The maximum number of characters allowed in an element attribute. |
Allowed Protocols |
Allowed list of protocol schemes.
|
Allowed XXE Domains |
A whitelist of domain names/IP addresses from which API Manager allows retrieving the XSD schema definitions. For example,
<?xml version="1.0" encoding="ISO-8859-1"?> <!DOCTYPE foo [ <!ELEMENT foo ANY > <!ENTITY xxe SYSTEM "file:///dev/random" >]><foo>&xxe;</foo> |
JSON Structure Limits Policies
APIs that support JSON are vulnerable to attacks. JSON attacks typically use structures that overload JSON parsers and kick off a chain of DoS attacks. A JSON threat protection policy validates and enforces constraints on the structure of JSON documents.
When the structure of an incoming JSON document exceeds a specified constraint, the API Manager rejects the JSON request and restricts further processing of the policy.
|
Max Depth |
Specifies the maximum allowed nested container within a JSON document. For example, the following JSON document has one JSON object in another JSON object, which shows a nesting level of two: {"label":{"label1":"value"}} Example 2: In the JSON below, the container depth of address is two. { "message" : "Hello World", "names" : ["John","Paul","George"], "address" : { "street" : "Bleecker street", "housenumber" : 50 } } |
|
Max Entries per Object |
Maximum number of entries in a single object. In example 2 above, the maximum entry is three, message, names, and address. |
|
Max Entries per Array |
Maximum number of elements in an array. In example 2 above, the JSON document has a value of maximum entries per array as 3. Any array with a length of 4 leads to the rejection of the entire JSON document. |
|
Max Key Length |
Specifies the maximum length of a string for a property name within an object. In example 2, the key housenumber has a length of 11. Any key length less than 11 rejects the JSON document. |
|
Max Value Length |
Specifies the maximum length allowed for a string. In example 2, the longest value length is Bleecker street. Any value less than 15 rejects the JSON document. |
IP Access Control Protection
This policy allows you to restrict or allow access to an API based on the IP address. You can add a list of IP addresses as well as wildcard-based address, addresses based on regex, or a range of IP addresses. IP access policy supports both IPv4 and IPV6 addresses.
|
Whitelist IP addresses |
The list of IP addresses that are allowed access to an API. |
|
Blacklist IP addresses |
The list of IP addresses that are denied access to an API. |
HTTP Message Limits
Sometimes you need to filter messages based not only on the content of the message, but on external characteristics of the message. You can configure API Manager to reject messages that are greater than a specified size for the request/response message/payload.
|
Max Number of Parameters |
The maximum number of query and form parameters that are permitted in a request. If a client sends more than the specified value, the connection will be rejected. This limit is necessary to protect against hash-based denial of service attacks. The default value is 1000. |
|
Total Payload Size Limit (bytes) |
Maximum size assigned to a request payload. If the size of the entity is larger than this limit, there is an exception when reading the request. |
|
Max Number of Headers |
The maximum number of headers that are permitted in a request. If a client sends more than this limit, API Manager terminates the connection. This limit is necessary to protect against hash-based DoS attacks. |
|
Total Header Size Limit (bytes) |
The maximum size of a HTTP header block, in bytes. |
XML to JSON Transformation
APIs typically support multiple representations of a resource. ColdFusion APIs, for example, supports both XML and JSON representations for request and response payloads.
But there are APIs that do not support multiple representations. For example, an API can only support an XML payload, but a web application might need the response in a JSON format.
In such cases, you need a data transformation mechanism. ColdFusion API Manager converts the request into a JSON format or an XML format that is understood by an application.
|
Policy Name |
The name of the XML to JSON transformation policy. |
|
|
JSON Attribute Prefix |
The string to use for the attribute prefix in JSON. For example, in the XML, <name id="John"/>, the transformed JSON is: { "apim_attrib_id" ":"John" } |
Default-apim_attrib_ |
|
Text Element Key |
The string to denote the name of a text node in the output JSON. For example, if the text element key is set to default ($text), then the XML, <title xml:lang="en-us">The Catcher In The Rye</title> gets transformed into the following JSON: { "apim_attrib_xml:lang":"en-us", "apim_key":"The Catcher In The Rye" } |
Default-apim_key |
|
Start Element |
The root of the output JSON. For example,: <name>Joe</name> <age>22</age> If the Start Element is "person", the output becomes: { "person": { "name": "Joe", "age": "22" } } |
Default- apim_root |
|
Array Elements |
Values that need to be represented as an arry in the JSON document. For example, consider the following XML: <locations> <location>San Francisco</location> <location>London</location> <location>Tokyo</location> </locations> If you enter location in the Array Elements field and the Smart Arrays option is enabled, the serialized JSON document becomes: { "locations": { "location": ["San Francisco","London","Tokyo"] } } If the XML has an empty node, <locations> <location/> </locations> The output JSON generates an empty array, for example, { "locations": { "location": [] } } |
|
|
Smart Arrays |
Select this check-box to create arrays intelligently based on the structure of the XML document. Consider the XML below: <locations> <location>San Francisco</location> <location>London</location> <location>Tokyo</location> </locations> For example, if you do not enable this check-box, the output JSON becomes: { "locations" : { "location":"San Francisco", "location":"London", "location":"Tokyo" } } If you enable this check-box, the output is: { "locations": { "location": ["San Francisco","London","Tokyo"] } } |
|
|
Interpret Datatypes |
Specify the datatypes attempted to be auto-determined are Numbers and Boolean. If enabled, the values in output JSON has the datatype as specified in the XML. If disabled, all values in the JSON become string values. For example, in the XML below: <person> <name>Joe</name> <age>22</age> <membership>true</membership> </person> When you enable Interpret Datatypes, the JSON output is: { "person": { "name": "Joe", "age": 22, "membership": true } } When you disable Interpret Datatypes, the JSON output is: { "person": { "name": "Joe", "age": "22", "membership": "true" } } |
Default-Enabled |
|
Interpret Processing Instructions |
Specify the processing instruction to be used (<?multiple_pi location?>) with an example. For example, the transformer uses the PI <?xml-stylesheet href="mystyle.css" type="text/css"?> defined in the XML. |
Default-Disabled |
In XML to JSON transformation, quotes get encoded as ". For example,
<locations id="1">
<location>
<name>Chicago</name>
<description>Jason's in Chicago, also known as "Windy City".</description>
</location>
</locations>
The resultant JSON becomes:
{
"locations": {
"location": {
"name": "Chicago",
"description": "Jason's in Chicago, also known as \"Windy City\""
}
"@id": 1
}
}
JSON to XML Transformation
|
Policy Name |
The name of the JSON to XML transformation policy. |
|
|
Root Element |
Adds a root node to the resultant XML. For example, if the Root Element is student, { "name":"Jason" } The output XML is: <student> <name>Jason</name> </student> |
Default-apim_root |
|
Normalize JSON Keys |
An object name in a JSON document might not be valid for an XML node. For example, spaces are valid object names in JSON, but in XML, spaces are invalid. If you select this check-box, the transformed XML has valid element names. Spaces and special characters such as @ or $ are invalid characters. |
Default-enabled |
|
Create Processing Instructions |
Creates XML processing instructions when JSON array elements are encountered. |
Default-disabled |
In case of quotes in the JSON payload, for example,
{
"locations": {
"location": {
"name": "Chicago",
"description": "Jason's in Chicago, also known as \"Windy City\""
}
"@id": 1
}
}
The resultant XML becomes:
<DocumentRoot>
<locations id="1">
<location>
<name>Chicago</name>
<description>Jason's in Chicago, also known as the "Windy City"</description>
</location>
</locations>
</DocumentRoot>
Error codes for policies
|
Policy |
Error code(s) |
|---|---|
|
XML threat protection |
403, if any field exceeds the set limits. |
|
HTTP message limits |
|
|
IP access control |
403, if an incoming IP address xxx.xxx.xxx.xxx is not allowed to access the API. |
|
Content type restriction |
403, if an incoming Content Type is not allowed to access the API. |
|
|
|
Key Stores
A Key Store is a repository of security certificates – either authorization certificates or public key certificates – plus corresponding private keys, used for instance in SSL encryption.
You can use a key store in one of the following ways:
- The keystore contains private keys and certificates used by SSL servers to authenticate themselves to SSL clients. By convention, such files are referred to as keystores .
- When used as a truststore , the file contains certificates of trusted SSL servers, or of Certificate Authorities trusted to identify servers. There are no private keys in the truststore .
|
To create a key store: |
To import a key store: |
|---|---|
|
1. Click Create Key Store. 2. Set a name and password for the key store. 3. Click Create. 4. Click Import Certificate. 5. Enter the alias for the certificate and choose the certificate file that you had created using keytool command line or GUI. 6. Click Import Certificate. |
1. Click Import Key Store. 2. Enter the following details: a. Name of the key store b. Password of the key store c. Choose the certificate you had created previously d. Choose the type of key store – JKS or PKCS e. (Optional) Enter an alias for the certificate 3. Click Create. |
Adding the API business details
Enter the details of your business in the Business Info section.
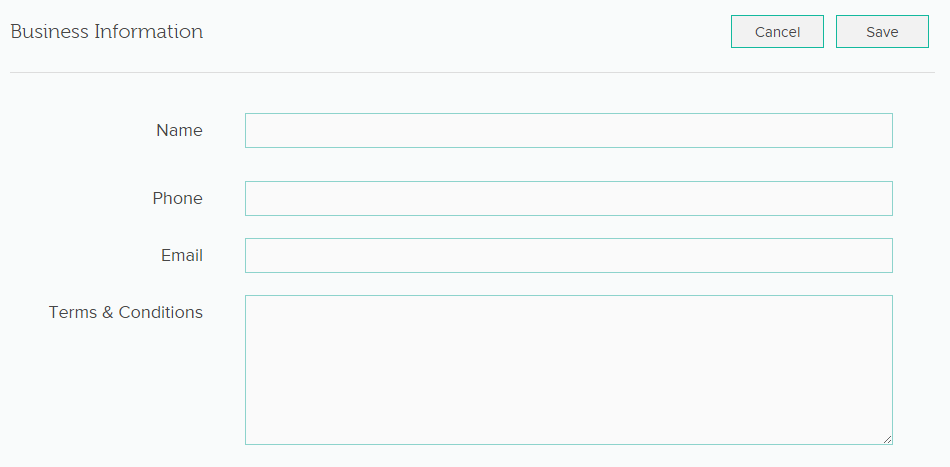

Approving subscriptions to an API
You can approve or reject subsccriptions to an API. Click Subscriptions and view the list all subscription requests.


Deleting a subscriber
You can delete a subscribed user in the Subscribed Users page. Click the trash button under Actions to delete a subscriber.


Viewing subscribed users
View a list of all subscribed users. You can see the following for each user:
- User name
- First and last name
- Email id
- Phone
- Action
Viewing notifications
On the Publisher portal, you can check for notifications for scenarios, such as:
- Request to approve API subscription
- Approved API subscription
- Termination or deprecation of an API
- Errors in API endpoints
- An SLA reaches its limits
When a subscriber subscribes to an application, you get a corresponding notification.

When you click Notifications, you can view all subscriber messages and take appropriate action.


Publishing the API
Click Publish to publish the API.
Viewing the analytics dashboard
The analytics dashboard for a Publisher consists visualizations for API metrics, successful and failed requests, number of API requests, and so on. Click Analytics to launch the Publisher analytics page.


There are five types of dashboards in the Publisher portal:
- Home
- APIs
- APIs and Versions
- Developers
- Errors
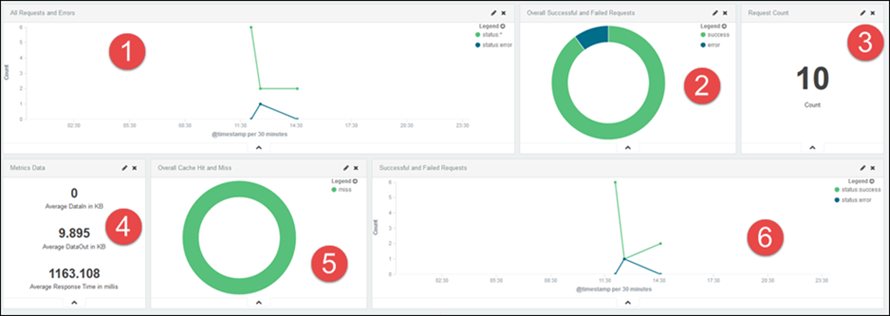
Home: On the Home dashboard panel, you can see the following visualizations:

|
1 |
The number of API requests within a time range with total requests and erroneous requests. |
|
2 |
A donut-chart representation of API success and errors. |
|
3 |
The metrics data like average response time, number of API requests for APIs, and so forth. |
|
4 |
The average response time of an API in milliseconds. |
|
5 |
Cache hit or miss. |
|
6 |
Line chart of successful and unsuccessful API requests. |
APIs: On the APIs dashboard panel, you can see the following visualizations:
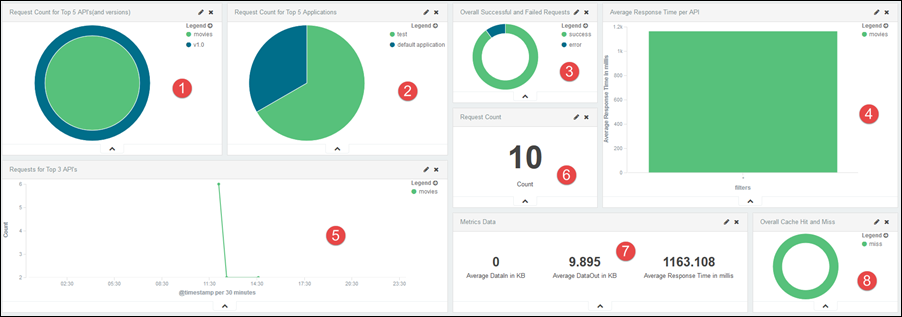

|
1 |
The number of requests for the top five APIs and the versions. |
|
2 |
Donut-chart for the number of API requests by the top five applications. |
|
3 |
Donut-chart for the percentage of successful and unsuccessful API requests with comparison of the versions of an API. |
|
4 |
Bar-chart for the average response time for an API. |
|
5 |
Line-chart for the number of requests by the top three APIs. |
|
6 |
The number of API requests. |
|
7 |
Donut-chart of the API metrics data, for example, average response time |
|
8 |
Representation for cache hit or miss. |
APIs and Versions: On the APIs and Versions dashboard panel, you can see the following visualizations:
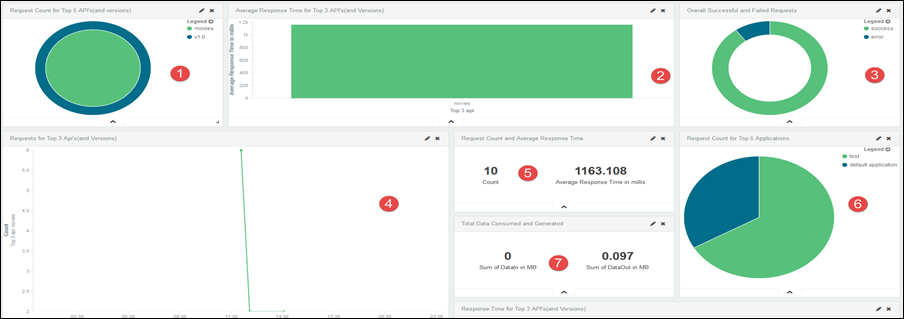

|
1 |
The number of requests for the top five APIs and their versions. |
|
2 |
Bar-chart for the average response times for the top five APIs. |
|
3 |
Donut-chart for the percentage of successful and unsuccessful API requests. |
|
4 |
Line-chart for the top three API requests with comparisons of different API versions. |
|
5 |
The number of API requests and the average response time for the APIs. |
|
6 |
The number of API requests for the top five applications. |
|
7 |
API data consumption in MB. |
Developers: On the Developers dashboard panel, you can see the following visualizations:
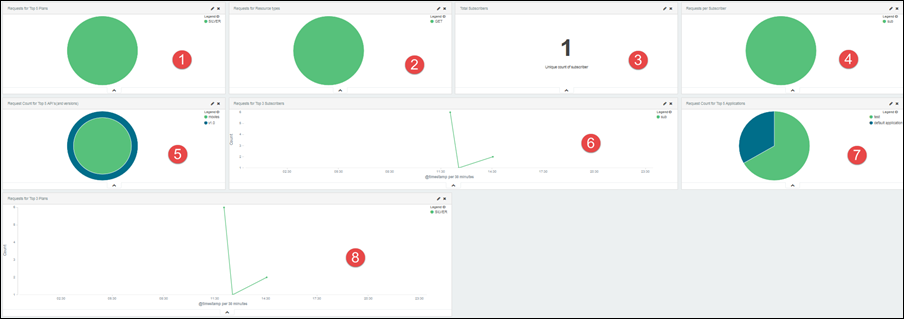

|
1 |
Pie-chart for the top five plan usage. |
|
2 |
The number of API requests for the method types. |
|
3 |
The number of subscribers of an API. |
|
4 |
Pie-chart for the number of requests for a subscriber. |
|
5 |
The number of requests for the top five APIs. |
|
6 |
Line-chart for the requests from the top three subscribers. |
|
7 |
Pie-chart for the number of requests for top five applications. |
|
8 |
Line-chart for requests from top three SLA plans. |
Errors: On the Errors dashboard panel, you can see the following visualizations:
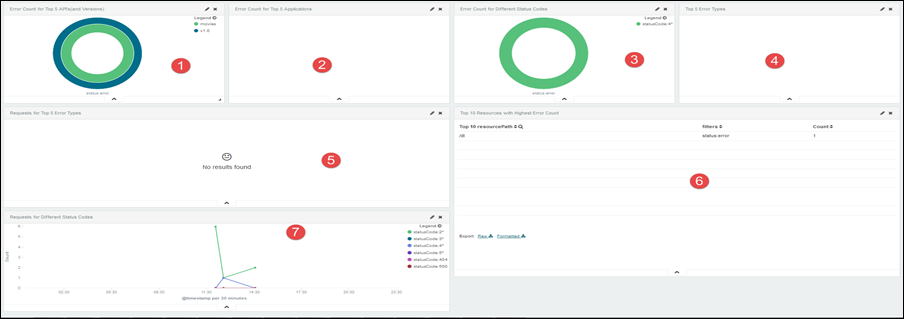

|
1 |
The number of errors from the top five APIs. |
|
2 |
The number of errors from the top five applications. |
|
3 |
Donut-chart for the number of errors from all status codes. |
|
4 |
Pie-chart for the top five error types. |
|
5 |
Line-chart for requests for the top five error types. |
|
6 |
Line-chart for requests for all status codes. |
|
7 |
List of top ten resources with the maximum number of errors. |
Filtering data according to time range
In the Analytics page, you can filter the results according to a time range. There are three ways options:
- Quick
- Relative
- Absolute
-
Click the time filter as shown below:


-
Select any time range from the list, as shown below:


If you select Today, you can see the analytics of all APIs for the last 24 hours.
-
Click Relative. You can filter the data from a specified date and time to the current date and time.


-
Click Absolute. You can filter the results according to dates.


Creating a visualization
You can create your custom visualizations and save it for further analysis. Follow the steps below to create a visualization:
-
To create a visualization, click the Visualize tab.


-
You can create visualizations in the form of area charts, data table, pie charts, and so on, from API information. As an example, create a pie chart from the API analytics. Click Pie chart from the list.


-
Select from the following:


-
Create a visualization from a new search. Select From a new search. You can see a pie-chart representaion of the number of new APIs by a publisher.


-
Select the type of pie-chart from the following:
- Split Slices
- Split Chart


-
Select Split Slices and select Date Histogram from the Aggregation drop-down list.


-
Click Apply. A split pie-chart displays according to the parameters, which in this case is timestamp.


Field-based filtering
For a better perspective of the usage of your API, you can filter the dashboard according to fields. The fields can be api, version, resourcePath, and so on. When you apply the filter, the dashboard changes accordingly and you can view the graphical results.
To filter dashboard information according to fields:
-
Click any dashboard type:
- Home
- APIs
- API and Versions
- Developers
- Errors
-
Choose any dashboard and hover your mouse on the graph to view the fields and the values. The snapshot below displays the field values for the top five API request count dashboard:


You can see a table that lists all the field values for a particular API and the number of times the API is called.
-
Click the graph. You can see the field-level filters on top of the dashboard.


-
Select or clear a filter and click Apply Now. You can see that all dashboards change according to the filters enabling you to have a granular view of an API. The snapshot below now represents the field values for the API usweather.

