- Bridge User Guide
- Introduction
- Work with assets
- Creative Cloud Libraries in Bridge
- Create PDF contact sheet in the Output workspace
- View and manage files in Adobe Bridge
- Work with metadata in Adobe Bridge
- Work with the Adobe Bridge cache
- Use keywords in Adobe Bridge
- Start Adobe Bridge
- Adjust Adobe Bridge Content panel display
- Preview images and edit capture time
- HEIC and HEIF image files support in Adobe Bridge (Windows)
- Use collections in Adobe Bridge
- Stack files in Adobe Bridge
- Automate tasks in Adobe Bridge
- Workflow Builder
- Preview dynamic media files in Adobe Bridge
- Create web galleries and PDFs
- Work with Bridge shared cache
- Manage media cache
- Quick Actions
- Content Credentials
- Bridge and other Adobe apps
- Export and publish
- Keyboard shortcuts
- Adobe Camera Raw
- Troubleshooting


You can preview images in Adobe Bridge in the Preview panel, in Full Screen Preview, and in Review mode. The Preview panel displays up to nine thumbnail images for quick comparisons. Full Screen Preview displays images full screen. Review mode displays images in a full-screen view that lets you navigate the images; refine your selection; label, rate, and rotate images; and open images in Camera Raw.
View images as a slideshow
The Slideshow command lets you view thumbnails as a slideshow that takes over the entire screen. This is an easy way to work with large versions of all the graphics files in a folder. You can pan and zoom images during a slideshow, and set options that control slideshow display, including transitions and captions.
- To view a slideshow, open a folder of images, or select the images you want to view in the slideshow, and choose View > Slideshow.
- To display commands for working with slideshows, press H while in Slideshow view.
- To specify slideshow options, press L while in Slideshow view or choose View > Slideshow Options.
Display options:
Choose to black out additional monitors, repeat the slideshow, or zoom back and forth.
Slide options:
Specify slide duration, captions, and slide scaling.
Transition options:
Specify transition styles and speed.
Preview images using the Preview panel
-
Select up to nine images from the Content panel and (if necessary) choose Window > Preview Panel.
Preview images using the Full Screen Preview
- Select one or more images and choose View > Full Screen Preview, or press the spacebar.
- Press the plus sign (+) or minus sign (-) key to zoom in or out of the image, or click the image to zoom to that point. You can also use a mouse scroll wheel to increase and decrease magnification.
- To pan the image, zoom in and then drag.
- Press the Right Arrow and Left Arrow keys to go to the next and previous image in the folder.
Note: If you select multiple images before entering Full Screen Preview, pressing the Right Arrow and Left Arrow keys cycles through the selected images.
- Press the spacebar or Esc to exit Full Screen Preview.
Evaluate and select images using Review mode
Review mode is a dedicated full-screen view for browsing a selection of photos, refining the selection, and performing basic editing. Review mode displays the images in a rotating “carousel” that you can navigate interactively.


-
Open a folder of images or select the images you want to review and choose View > Review Mode.
-
Do any of the following:
Click the Left or Right Arrow buttons in the lower-left corner of the screen, or press the Left Arrow or Right Arrow key on your keyboard, to go to the previous or next image.
Drag the foreground image right or left to bring the previous or next image forward.
Click any image in the background to bring it to the front.
Drag any image off the bottom of the screen to remove it from the selection. Or click the Down Arrow button in the lower-left corner of the screen.
Right-click (Windows) or Control-click (Mac OS) any image to rate it, apply a label, rotate it, or open it.
Press ] to rotate the foreground image 90° clockwise. Press [ to rotate the image 90° counterclockwise.
To exit Review mode, press Esc or click the X button in the lower-right corner of the screen.
Click the New Collection button in the lower-right corner of the screen to create a collection from the selected images and exit Review mode.
NoteTo display keyboard shortcuts for working in Review mode, press H while in Review mode.
Use the Loupe tool
The Loupe tool lets you magnify a portion of an image. The Loupe tool is available in the Preview panel and on the frontmost or selected image in Review mode. By default, if the image is displayed at less than 100%, the Loupe tool magnifies to 100%. You can display one Loupe tool per image.
- To magnify an image with the Loupe tool, click it in the Preview panel or in Review mode. In Review mode, you can also click the Loupe tool button in the lower-right corner of the screen.
- To hide the Loupe tool, click the X in the lower-right corner of the tool, or click inside the magnified area of the tool. In Review mode, you can also click the Loupe tool button in the lower-right corner of the screen.
- Drag the Loupe tool in the image, or click a different area of the image, to change the magnified area.
- To zoom in and out with the Loupe tool, use the mouse scroll wheel, or press the plus sign (+) or minus sign (-) key.
- To display multiple Loupe tools in multiple images in the Preview panel, click the individual images.
- To synchronize multiple Loupe tools in the Preview panel, Ctrl-click or Ctrl-drag (Windows) or Command-click or Command-drag (Mac OS) one of the images.
Use software rendering for previews
Select this option if slideshows or images in the Preview panel, Full Screen Preview, or Review mode don’t display correctly. Using software rendering for previews displays previews correctly, but the display speed may become slow and there may be other limitations.
-
In Advanced preferences, select Use Software Rendering.
-
Restart Adobe Bridge.
Software rendering is automatically enabled on computers with less than 64 MB of VRAM and on dual-monitor systems with less than 128 MB of VRAM.
Edit the image capture time
You might need to change the capture time of your image files if you travel to a different time zone and do not change the date or time setting of your camera before start photographing. Bridge lets you change the capture time of the JPEG and RAW image files.
To change the capture time, select one or more image files and perform the following steps:
-
- Choose Edit > Edit Capture Time.
- Right-click the image thumbnail in the Content panel and choose Edit Capture Time.
- In the Metadata panel, in the Camera Data (Exit) section, click the edit icon next to the Date Time Original field, as shown below.
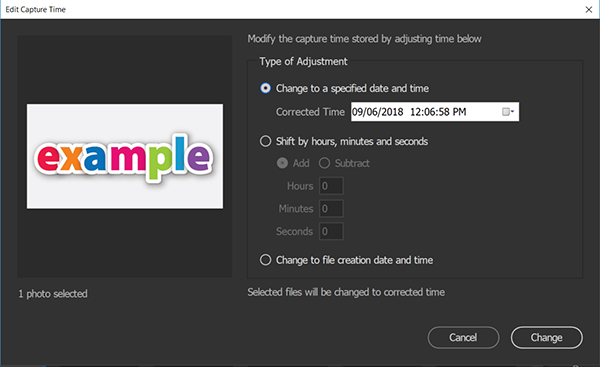
Edit button on the Metadata panel Edit button on the Metadata panel The Edit Capture Time dialog is displayed, as shown below:


-
In the Edit Capture Time dialog box, In the Type of Adjustment section, specify the following:
- Select the Change To A Specified Date And Time check box to change the capture date and time. Select a new date and time in the Corrected Time field.
- Select the Shift by hours, minutes, and seconds check box to shift the capture time by the specified number of hours, minutes, and seconds.
- Select Add if you want to add the specified hours, minutes, and seconds to the original capture time.
- Select Subtract if you want to subtract the specified hours, minutes, and seconds from the original capture time.
- Select the Change To File Creation Date And Time check box to set the capture time in the camera data to the file creation date.
- Select the Change To A Specified Date And Time check box to change the capture date and time. Select a new date and time in the Corrected Time field.
-
Click Change to apply the changes in the selected files.
Revert to original capture time
To change the capture time back to original, select the image and do one of the following:
- Choose Edit > Revert Capture Time To Original.
- Right-click the image and choose Revert Capture Time To Original.
