Perform the following steps to set up the MobileWorkspace project in Eclipse and provide a signing identity:
LiveCycle provides the complete source code of the Mobile Workspace app. The source contains all components to build a custom workspace application. The source code archive, adobe-lc-mobileworkspace-src.zip, is installed along with LiveCycle ES4. The default location of the adobe-lc-mobileworkspace-src.zip is [LiveCycle_root]\sdk\LC Mobile Workspace.
The following image displays the extracted contents of the adobe-lc-mobileworkspace-src.zip.


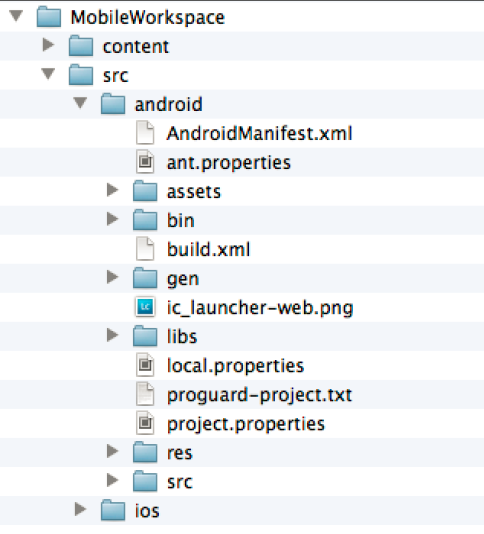
The following image displays the directory structure of the android folder in the src folder.


Build standard Mobile Workspace app
-
Log in to a machine that has Eclipse and ADT installed and configured.
-
Copy the adobe-lc-mobileworkspace-src.zip archive from [LiveCycle_root]/sdk/LC Mobile Workspace to:
For MAC users: [User_Home]/Projects
For Windows users: %HOMEPATH%\Projects
-
Extract the archive in the following directory:
For MAC users: [User_Home]/Projects/MobileWorkspace
For Windows users: %HOMEPATH%\Projects\MobileWorkspace
-
Launch Eclipse that comes with ADT bundle.
Default location:
For MAC users: Default location is Applications/ADT/eclipse/Eclipse. If the ADT is installed in any other location, update the local.properties file present in the [User_Home]/Projects/MobileWorkspace/src/android folder and point the sdk.dir variable to ADT SDK location on your desktop.
For Windows users: Update the local.properties file present in the %HOMEPATH%\Projects\MobileWorkspace\src\android folder and point the sdk.dir variable to ADT SDK location on your desktop.
-
On the File menu, choose the Import option.
The Import dialog is displayed.


-
In the Import dialog, choose Exixting Android Code into Workspace in the Android folder and click Next.
The Import Project dialog is displayed.


-
Enter or select the root directory of the project that you want to build in the Root Directory text box:
For Mac users: [User_Home]/Projects/MobileWorkspace/src/android
For Windows users: %HOMEPATH%\Projects\MobileWorkspace\src\android
-
Click Finish to build the MWSAndroid project.
The MWSAndroid project is available in the ADT Project Explorer.


-
In the ADT Project Explorer, select the project (MWSAndroid) and click the Project menu.
-
In the Project menu, choose Build Project.
The MWSAndriod.apk installer file is created in the bin directory.
After you have built the project, you can choose to install the app:
- Using Android Debug Bridge
- Using Eclipse
Using Android Debug Bridge
You can install the application on an Android device via the Android Debug Bridge with the following command:
For MAC users: adb install [User_Home]/Projects/MobileWorkspace/src/android/bin/MWSAndriod.apk
For Windows users: adb install %HOMEPATH%\Projects\MobileWorkspace\src\android\bin\MWSAndriod.apk
Using Eclipse
Alternatively, you can install the application on an Android device using Eclipse.
-
Connect the Android device to the computer on which you have built the project.
-
In the ADT Project Explorer, right-click on the project (MWSAndroid).


-
From the context menu, choose Run As -> Android Application.
The Android Device Chooser dialog is displayed.


-
In the Android Device Chooser dialog, select the Android device on which you need to install the app and click OK.