In Illustrator, from the Toolbox, click the Shaper tool ![]() (Shift+N).
(Shift+N).
- Illustrator User Guide
- Get to know Illustrator
- Introduction to Illustrator
- Workspace
- Workspace basics
- Create documents
- Learn faster with the Illustrator Discover panel
- Accelerate workflows using the Contextual Task Bar
- Toolbar
- Default keyboard shortcuts
- Customize keyboard shortcuts
- Introduction to artboards
- Manage artboards
- Customize the workspace
- Properties panel
- Set preferences
- Touch Workspace
- Microsoft Surface Dial support in Illustrator
- Undo edits and manage design history
- Rotate view
- Rulers, grids, and guides
- Accessibility in Illustrator
- View artwork
- Use the Touch Bar with Illustrator
- Files and templates
- Tools in Illustrator
- Tools at a glance
- Select tools
- Navigate tools
- Paint tools
- Text tools
- Draw tools
- Modify tools
- Generative AI (not available in mainland China)
- Quick actions
- Illustrator on the iPad
- Introduction to Illustrator on the iPad
- Workspace
- Documents
- Select and arrange objects
- Drawing
- Type
- Work with images
- Color
- Cloud documents
- Basics
- Troubleshooting
- Add and edit content
- Drawing
- Drawing basics
- Edit paths
- Draw pixel-perfect art
- Draw with the Pen, Curvature, or Pencil tool
- Draw simple lines and shapes
- Draw rectangular and polar grids
- Draw and edit flares
- Trace images
- Simplify a path
- Symbolism tools and symbol sets
- Adjust path segments
- Design a flower in 5 easy steps
- Create and edit a perspective grid
- Draw and modify objects on a perspective grid
- Use objects as symbols for repeat use
- Draw pixel-aligned paths for web workflows
- Measurement
- 3D objects and materials
- Color
- Painting
- Select and arrange objects
- Select objects
- Layers
- Expand, group, and ungroup objects
- Move, align, and distribute objects
- Align, arrange, and move objects on a path
- Snap objects to glyph
- Snap objects to Japanese glyph
- Stack objects
- Lock, hide, and delete objects
- Copy and duplicate objects
- Rotate and reflect objects
- Intertwine objects
- Create realistic mockups
- Reshape objects
- Crop images
- Transform objects
- Combine objects
- Cut, divide, and trim objects
- Puppet Warp
- Scale, shear, and distort objects
- Blend objects
- Reshape using envelopes
- Reshape objects with effects
- Build new shapes with Shaper and Shape Builder tools
- Work with Live Corners
- Enhanced reshape workflows with touch support
- Edit clipping masks
- Live shapes
- Create shapes using the Shape Builder tool
- Global editing
- Type
- Add text and work with type objects
- Add basic formatting to text
- FAQs on fonts in Illustrator
- Fonts and typography
- Create type on a path
- Create bulleted and numbered lists
- Manage text area
- Add advanced formatting to text
- Format paragraphs
- Character and paragraph styles
- Special characters
- Tabs
- Scale and rotate type
- Line and character spacing
- Hyphenation and line breaks
- Spelling and language dictionaries
- Format Asian characters
- Arabic and Hebrew type
- Composers for Asian scripts
- Reflow Viewer
- Preview, add, or replace missing fonts
- Import and export text
- Identify the fonts used in images and outlined text
- Creative typography designs
- Create text designs with blend objects
- Create a text poster using Image Trace
- Create special effects
- Web graphics
- Drawing
- Import, export, and save
- Import
- Creative Cloud Libraries in Illustrator
- Save and export
- Printing
- Prepare for printing
- Printing
- Automate tasks
- Troubleshooting
- Fixed issues
- Known issues
- Crash issues
- Recover files after crash
- Repair damaged documents
- Safe mode
- File issues
- Supported file formats
- GPU device driver issues
- GPU performance issues
- Wacom device issues
- DLL file issues
- Memory issues
- Preferences file issues
- Font issues
- Printer issues
- Media issues
- Missing plugin issues
- Share crash report with Adobe
- Unable to apply effects in Illustrator
- Improve Illustrator performance
- Fixed issues
Learn how to build shapes with Shaper and Shape Builder tools in Illustrator.
About the Shaper Tool
The Shaper ![]() tool helps you create complex and beautiful designs by drawing, stacking, and placing shapes together, and then simply combining, merging, deleting, or moving them. Use simple, visually-intuitive gestures to perform operations that previously may have taken multiple actions to achieve.
tool helps you create complex and beautiful designs by drawing, stacking, and placing shapes together, and then simply combining, merging, deleting, or moving them. Use simple, visually-intuitive gestures to perform operations that previously may have taken multiple actions to achieve.
Use the Shaper tool to turn natural gestures into vector shapes. Use a mouse or the ease of a touch device to create polygons, rectangles, or circles. The shapes drawn are live shapes. This feature is enabled in the traditional workspaces, the specialized Touch workspace, and on your mobile with Adobe Fresco.
Using the Shaper tool (drawing shapes)
-
-
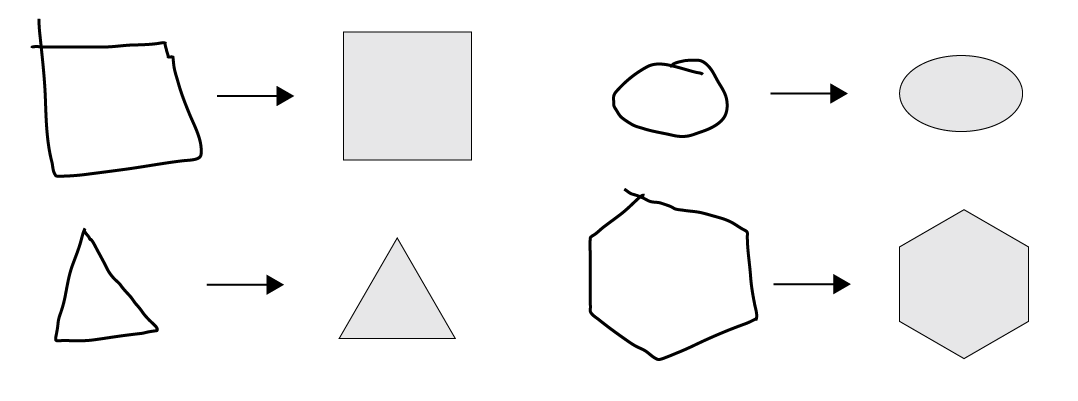
In the document, draw a shape. For example, draw a rough representation of a rectangle, circle, ellipse, or triangle or other polygon.
-
The shape you draw is converted into a crisp geometric shape. The shape created is Live, and is fully editable like any Live shape.

Convert free-hand gestures into crisp vector shapes 
Convert free-hand gestures into crisp vector shapes
Using the Shaper tool (creating shapes)
-
Do one of the following:
- Select a few overlapping shapes in your document
- Use a tool to draw shapes that are overlapping
- Use the Shaper tool (Shift + N) to quickly draw rectangles, circles, or polygons
-
If not already selected, select the Shaper tool (Shift + N).
-
Using your mouse (on a non-touch device) or your finger scribble on an area that you would either like to merge, delete, or punch out.
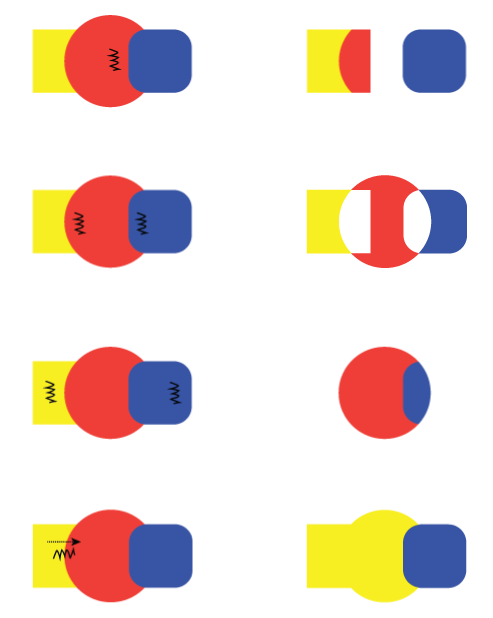
The following rules determine how portions of the shapes are punched out or merged, and what the color of a merged shape is:
- If the scribble is within one shape, the area is punched out.
- If the scribble is across intersecting areas of two or more shapes, the intersecting areas are punched out
- If scribble originates from the shape in the front:
- From a non-overlapping area to an overlapping area, the shape in the front is punched out
- From an overlapping area to a non-overlapping area, the shapes are merged, with the color of the merged area being that of the scribble origin point.
- If the scribble originates from the shape in the back:
- From a non-overlapping area to an overlapping area, the shapes are merged, with the color of the merged area being that of the scribble origin point.
- From a non-overlapping area to an overlapping area, the shapes are merged, with the color of the merged area being that of the scribble origin point.

(Left) Scribble action, and (Right) Resulting Shaper Groups 
(Left) Scribble action, and (Right) Resulting Shaper Groups
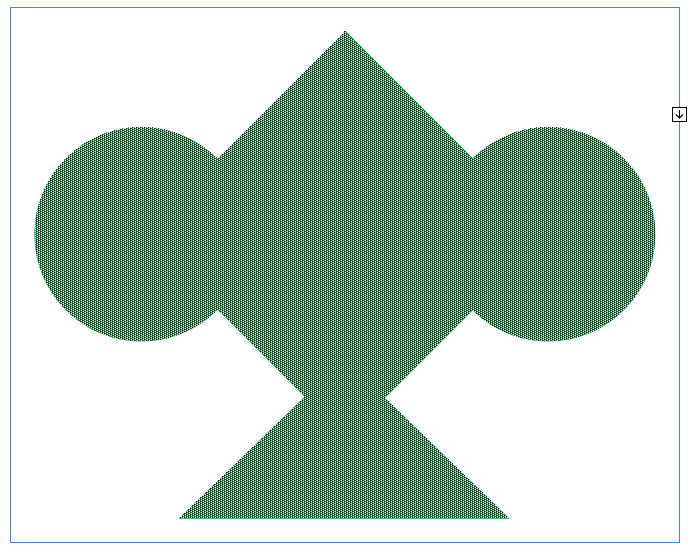
Selecting shapes in a Shaper Group
All shapes in a Shaper Group stay editable, even after portions of shapes may have been punched out or merged. The following actions allow you to select individual shapes or the group:
Face Selection mode
-
Select the Shaper Tool.
-
Tap or click on a Shaper Group. The Shaper Group is selected, and a bounding box appears with the Arrow widget
 .
.
-
Tap the shape again (or an individual shape, if individual shapes exist). You are now in Face Selection mode.
-
If the Shaper Group contains merged shapes, the face of the shape appears matted. You can change the Fill color of shapes.

Face Selection mode 
Face Selection mode
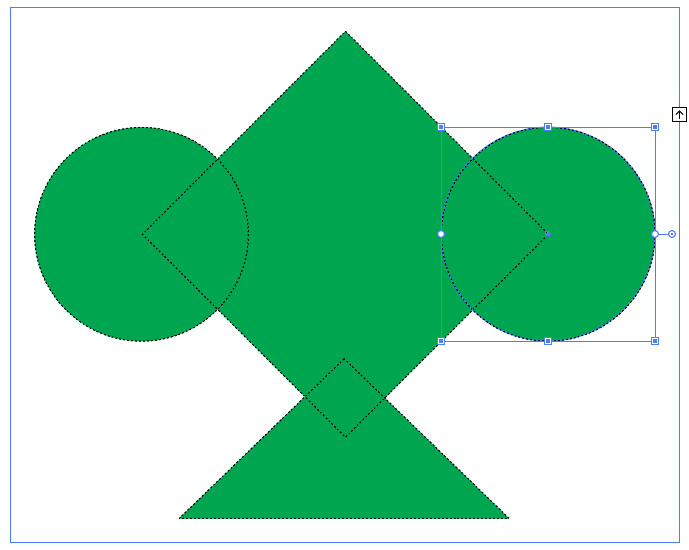
Construction Mode
-
With a Shaper Group selected, do one of the following:
- Tap or click the Arrow widget so that it appears pointing upwards
 .
. - Double-click a shape.
- Single-click a shape's stroke.
- Tap or click the Arrow widget so that it appears pointing upwards
-
With a single underlying object selected, you can modify any property or appearance of the object.

Construction mode 
Construction mode
Removing a shape from a Shaper Group
- Perform the steps required to get into Construction mode.
- Drag and drop a shape out of the bounding box.
About the Shape Builder Tool
The Shape Builder tool ![]() is an interactive tool for creating complex shapes by merging and erasing simpler shapes. It works on simple and compound paths.
is an interactive tool for creating complex shapes by merging and erasing simpler shapes. It works on simple and compound paths.
It intuitively highlights edges and regions of the selected art, which can be merged to form new shapes. An edge is defined as the section of a path, which does not intersect any other path of the selected objects. A region is a closed area bounded by edges.
By default, the tool is in merge mode where it allows you to combine paths or regions. You can also switch to the erase mode to delete any unwanted edges or regions by pressing Alt (Windows) or Option (Mac).
Setting the Shape Builder tool options
You can set up and customize various options such as gap detection, coloring source, and highlighting to get the required merging capability and better visual feedback.
Double-click the Shape Builder Tool icon in the Tools panel to set these options in the Shape Builder Tool Options dialog box.


Gap Detection
Set the gap length using the Gap Length drop-down list. The values available are Small (3 points), Medium (6 points), and Large (12 points).
Select the Custom check box if you want to provide an exact gap length.
When you select the gap length, Illustrator finds the gaps only close to the specified gap length value. Make sure that the gap length value is close (approximately) to the actual gap length of the art. You can check if the gaps are being detected by providing different gap length values until the gaps in the art are detected.
For example, if you set the gap length to 12 points, whereas the shape that you need to merge contains gaps at 3 points, Illustrator may not detect the gaps.


Consider Open Filled Paths as Closed
If this option is selected, an invisible edge is created for an open path to make a region. When you click inside the region, a shape is created.
In Merge Mode, Clicking the Stroke Splits the Path
Select the check box, In Merge Mode, Clicking Stroke Splits
the Path. This option allows you to split the parent path into two.
The first path is created from the edge on which you click and second
path is the remaining portion of the parent path excluding the first path.
If this option is selected, the pointer changes to ![]() , while
splitting the path.
, while
splitting the path.
Pick Color From
You can choose to color objects using the color swatches or the colors used in existing artwork. Use the Pick Color From drop-down list to select the Color Swatches or Artwork option.
If you select the Color Swatches option, you get the Cursor Swatch Preview option. You can select the Cursor Swatch Preview check box to preview and select colors. A Live Paint style cursor swatch is provided when you select this option. It allows iteration (using the arrow keys) and selecting colors from the swatches panel.
note: You can iterate using the arrow keys even if the Cursor Swatch Preview is disabled.
To change the color of the stroke, move the pointer over object edges to highlight and change the color of the stroke. This option works only if the option, In Merge Mode, Clicking Stroke Splits the Path is selected.
You can select the fill color of a region by pointing anywhere on the document.
note: The Cursor Swatch Preview is not displayed while merging, to ensure that the shapes are clearly visible.
If you select the Artwork option, Illustrator uses the same rules that are used for other art styles on merged objects. For more information, see step 6 in Creating shapes using Shape Builder Tool.
Fill
The Fill check box is selected by default. If this option is selected, the path or region that you can merge, is highlighted in gray, when you mouse over the selected path. If this option is not selected, the selected region or path appears as normal.
Highlight Stroke When Editable
If this option is selected, Illustrator highlights the strokes that you can edit. The editable stroke appears in the color that you choose from the Color drop-down list.
Related resources
Talk to us
We would love to hear from you. Share your thoughts with the Adobe Illustrator Community.


