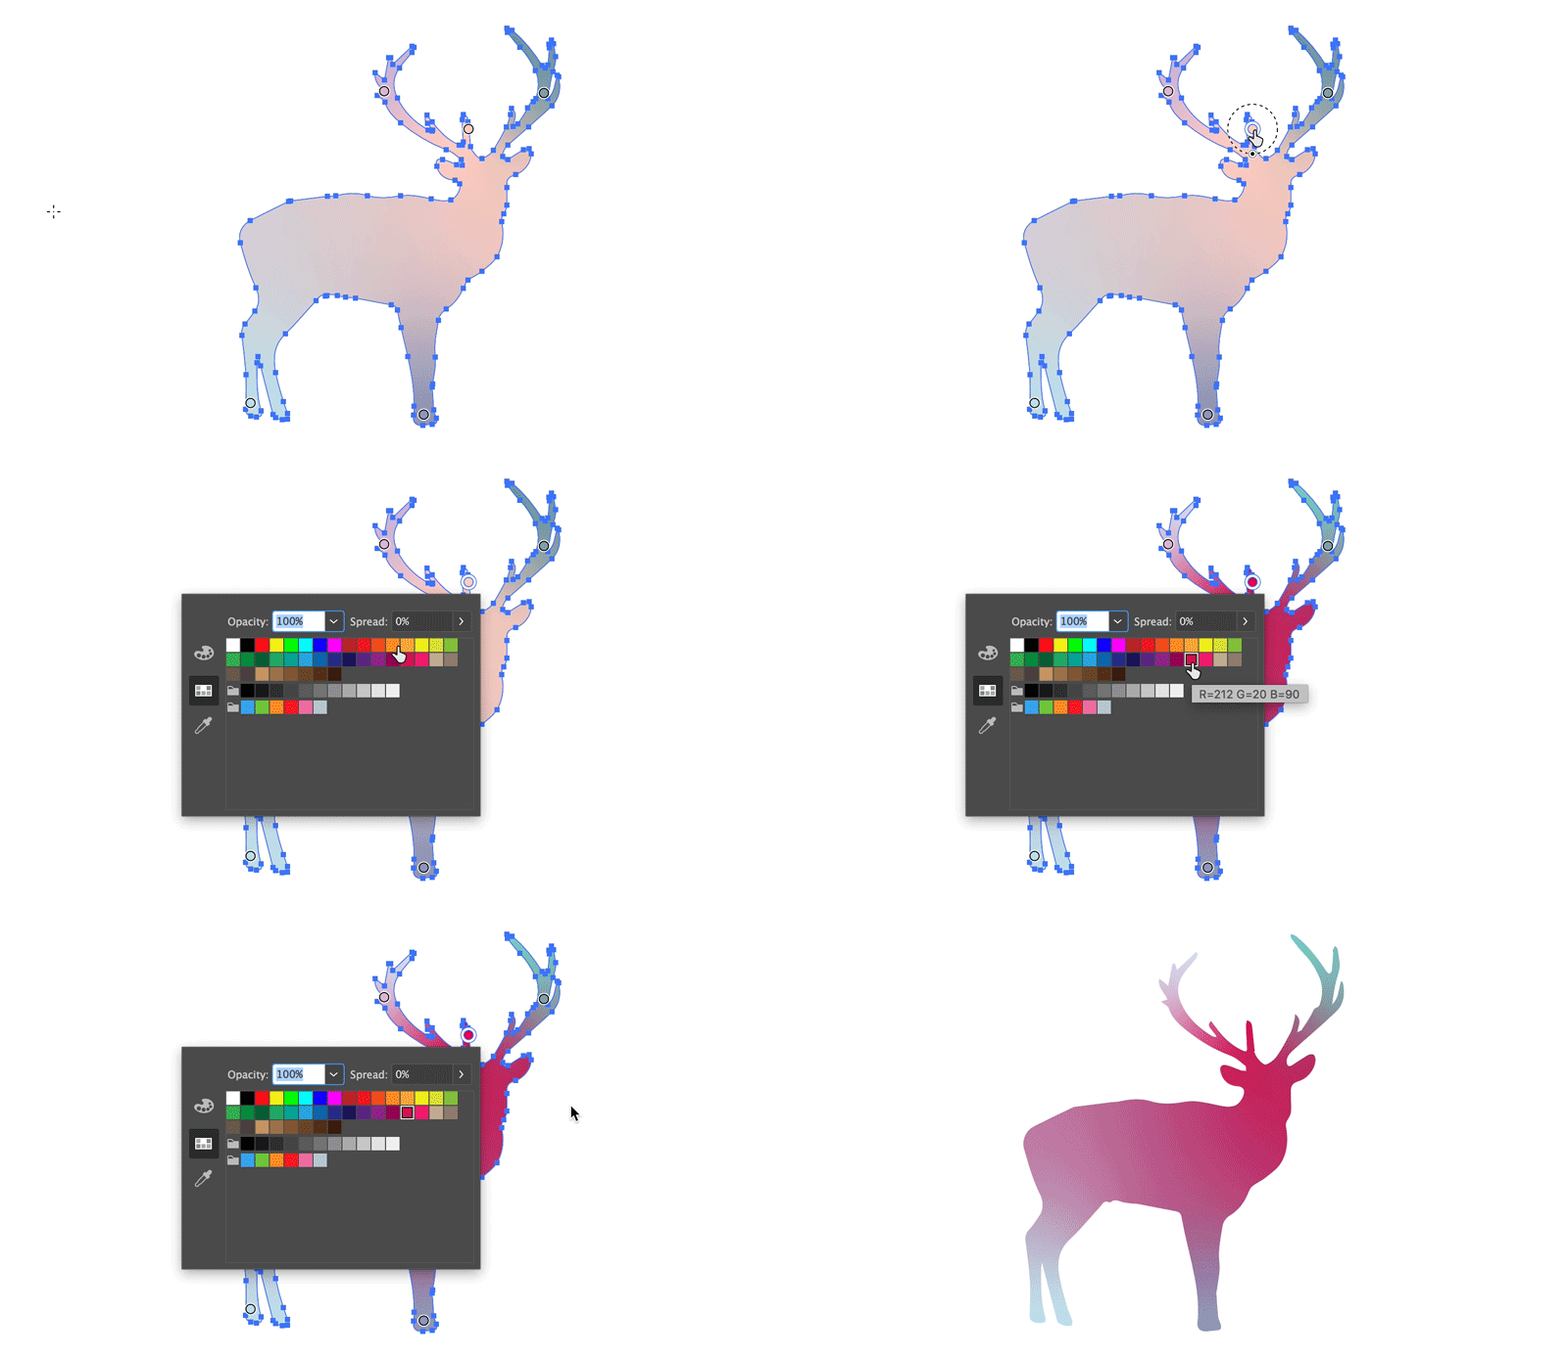
Select individual colors or color groups from the Swatches panel.
- Introduction to Illustrator
-
Workspace
- Workspace basics
- Create documents
- Learn faster with the Illustrator Discover panel
- Accelerate workflows using the Contextual Task Bar
- Toolbar
- Default keyboard shortcuts
- Customize keyboard shortcuts
- Introduction to artboards
- Manage artboards
- Customize the workspace
- Properties panel
- Set preferences
- Touch Workspace
- Microsoft Surface Dial support in Illustrator
- Undo edits and manage design history
- Rotate view
- Rulers, grids, and guides
- Accessibility in Illustrator
- View artwork
- Use the Touch Bar with Illustrator
- Files and templates
-
Tools in Illustrator
- Tools at a glance
- Select tools
- Navigate tools
- Paint tools
- Text tools
- Draw tools
- Modify tools
- Generative AI (not available in mainland China)
- Quick actions
- Introduction to Illustrator on the iPad
- Workspace
- Documents
- Select and arrange objects
- Drawing
- Type
- Work with images
- Color
- Basics
- Troubleshooting
-
Drawing
- Drawing basics
- Edit paths
- Draw pixel-perfect art
- Draw with the Pen, Curvature, or Pencil tool
- Draw simple lines and shapes
- Draw rectangular and polar grids
- Draw and edit flares
- Trace images
- Simplify a path
- Symbolism tools and symbol sets
- Adjust path segments
- Design a flower in 5 easy steps
- Create and edit a perspective grid
- Draw and modify objects on a perspective grid
- Use objects as symbols for repeat use
- Draw pixel-aligned paths for web workflows
- Measurement
- 3D objects and materials
- Color
-
Select and arrange objects
- Select objects
- Layers
- Expand, group, and ungroup objects
- Move, align, and distribute objects
- Align, arrange, and move objects on a path
- Snap objects to glyph
- Snap objects to Japanese glyph
- Stack objects
- Lock, hide, and delete objects
- Copy and duplicate objects
- Rotate and reflect objects
- Intertwine objects
- Create realistic mockups
-
Reshape objects
- Crop images
- Transform objects
- Combine objects
- Cut, divide, and trim objects
- Puppet Warp
- Scale, shear, and distort objects
- Blend objects
- Reshape using envelopes
- Reshape objects with effects
- Build new shapes with Shaper and Shape Builder tools
- Work with Live Corners
- Enhanced reshape workflows with touch support
- Edit clipping masks
- Live shapes
- Create shapes using the Shape Builder tool
- Global editing
-
Type
- Add text and work with type objects
- Reflow Viewer
- Create bulleted and numbered lists
- Manage text area
- Fonts and typography
- Identify the fonts used in images and outlined text
- Add basic formatting to text
- Add advanced formatting to text
- Import and export text
- Format paragraphs
- Special characters
- Create type on a path
- Character and paragraph styles
- Tabs
- Preview, add, or replace missing fonts
- Arabic and Hebrew type
- Fonts | FAQ and troubleshooting tips
- Creative typography designs
- Scale and rotate type
- Line and character spacing
- Hyphenation and line breaks
- Spelling and language dictionaries
- Format Asian characters
- Composers for Asian scripts
- Create text designs with blend objects
- Create a text poster using Image Trace
- Create special effects
- Web graphics
- Import
- Creative Cloud Libraries in Illustrator
- Save and export
- Prepare for printing
- Printing
- Illustrator User Guide
-
Get to know Illustrator
- Introduction to Illustrator
-
Workspace
- Workspace basics
- Create documents
- Learn faster with the Illustrator Discover panel
- Accelerate workflows using the Contextual Task Bar
- Toolbar
- Default keyboard shortcuts
- Customize keyboard shortcuts
- Introduction to artboards
- Manage artboards
- Customize the workspace
- Properties panel
- Set preferences
- Touch Workspace
- Microsoft Surface Dial support in Illustrator
- Undo edits and manage design history
- Rotate view
- Rulers, grids, and guides
- Accessibility in Illustrator
- View artwork
- Use the Touch Bar with Illustrator
- Files and templates
-
Tools in Illustrator
- Tools at a glance
- Select tools
- Navigate tools
- Paint tools
- Text tools
- Draw tools
- Modify tools
- Generative AI (not available in mainland China)
- Quick actions
-
Illustrator on the iPad
- Introduction to Illustrator on the iPad
- Workspace
- Documents
- Select and arrange objects
- Drawing
- Type
- Work with images
- Color
-
Cloud documents
- Basics
- Troubleshooting
-
Import, export, and save
- Import
- Creative Cloud Libraries in Illustrator
- Save and export
-
Printing
- Prepare for printing
- Printing
- Automate tasks
- Troubleshooting
Learn how to create gradients of different types in Illustrator.
A gradient is a graduated blend of two or more colors or tints of the same color. You can use gradients to create color blends, add volume to vector objects, and add a light and shadow effect to your artwork.


In Illustrator, you can create, apply, and modify a gradient using the Gradient panel, the Gradient tool, or the Control panel.
Gradient types
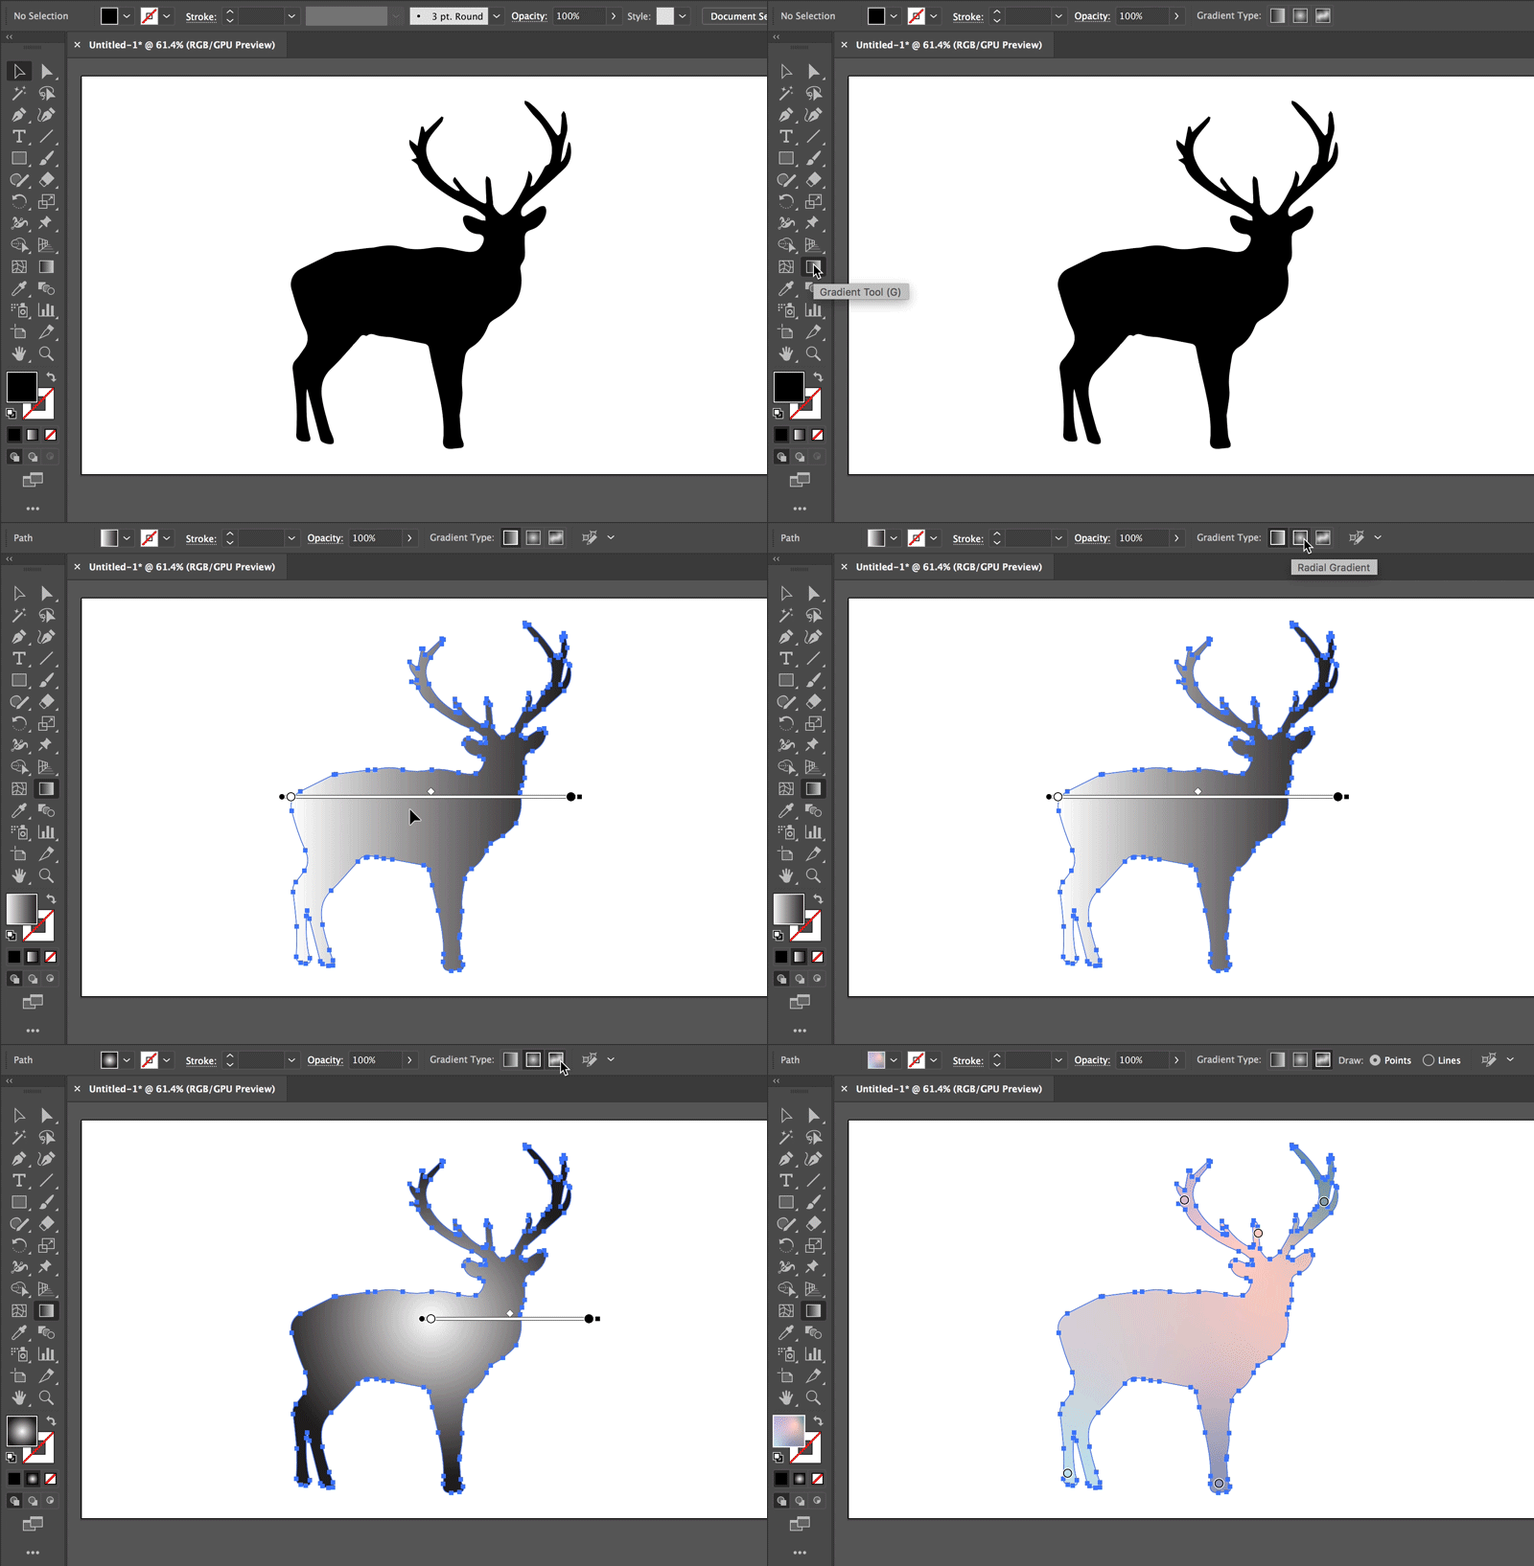
In Illustrator, you can create the following three types of gradients:
- Linear
Use this gradient type to blend colors from one point to another in a straight line.
- Radial
Use this gradient type to blend colors from one point to another point in a circular pattern.
- Freeform
Use this gradient type to create a graduated blend of color stops within a shape in an ordered or random sequence such that the blending appears smooth and natural. Freeform gradient can be applied in two modes:- Points: Use this mode to shade the area around a color stop.
- Lines: Use this mode to shade the area around a line.
A color stop is a point on the Gradient Annotator (for linear and radial) or on the object (for freeform) that controls the gradient's color. You can change the color of the color stops to set a gradient

A. Linear gradient B. Radial gradient C. Freeform gradient (Points)

Linear and Radial gradients can be applied on the fill and the stroke of an object. The Freeform gradient can be applied only on the fill of an object.
Gradient tool and Gradient panel
You can create or modify a gradient using the Gradient tool or the Gradient panel. Use the Gradient tool when you want to create or modify gradients directly in the artwork and view the modifications in real-time.
To open the Gradient tool, select Gradient Tool in the toolbox.
To open the Gradient panel, do one of the following:
- Choose Window > Gradient.
- Double-click the Gradient tool in the toolbar.
The Gradient panel is displayed on the canvas.

A. Active or previously used gradient B. Drop-down list for existing gradients C. Fill color D. Stroke color E. Reverse Gradient F. Gradient Annotator G. Color stop H. Mid point I. Color Picker J. Gradient types K. Edit Gradient (visible only when you switch to other tools in the toolbar) L. Stroke types M. Angle N. Aspect Ratio O. Delete Stop P. Opacity Q. Location R. Fill or stroke (with color) S. Color Stop T. Spread U. Freeform gradient V. Freeform gradient modes

The Gradient tool and the Gradient panel have many options common between them. However, there are some tasks that you can perform only with the tool or the panel. Using the Gradient tool and the panel, you can specify multiple color stops, their location, and spread. You can also specify the angle at which colors display, the aspect ratio of an elliptical gradient, and the opacity of each color.
You can enable the real-time Drawing and Editing feature to enhance the live appearance of objects when you work on them. To enable this feature:
[Windows] Choose Edit > Preferences > Performance > Real-time Drawing and Editing.
[macOS] Choose Illustrator > Preferences > Performance > Real-time Drawing and Editing.
Gradient Annotator
For the linear and radial gradient types, when you click the Gradient tool in the toolbar, Gradient Annotator appears in the object. Gradient Annotator is a slider that shows a starting point, an end point, a midpoint, and two color stops for the starting and end points.

A. Gradient Annotator B. Dotted ring C. Point to change aspect ratio D. Rotation cursor E. Point to resize radial gradient F. End point (arrow point) G. Color stop H. Mid point I. Selected color stop J. Origin point

You can use Gradient Annotator to modify the angle, location, and spread of a linear gradient; and the focal point, origin, and spread of a radial gradient. Once the gradient annotator appears in the object, you can either use the Gradient panel or Gradient Annotator to add new color stops, specify new colors for individual color stops, change opacity settings, and drag color stops to new locations.
To hide or show the gradient annotator, choose View > Hide Gradient Annotator or View > Show Gradient Annotator.
In linear and radial gradient annotators, dragging the circular end (starting point) of the gradient slider repositions the origin of the gradient and dragging the arrow end (end point) increases or decreases the range of the gradient. If you place the pointer over the end point, a rotation cursor appears that you can use to change the angle of the gradient.
Note: Freeform gradient lets you place color stops anywhere in the object. Therefore, Freeform gradient doesn’t require a Gradient Annotator.
Apply a predefined gradient
When you click the Gradient tool to apply a gradient for the first time, the White, Black gradient is applied by default. If you had applied the gradient previously, the last used gradient is applied on the object by default.
Illustrator also provides a predefined set of gradients that you can set using the Gradient panel or the Swatches panel. In addition, you can create a gradient and save it in the Swatches panel for future use. To apply a predefined or a saved gradient from the Gradient panel:
- Select the object on the canvas and click the Gradient drop-down in the Gradient panel.
To apply a predefined gradient from the swatch library:
- Click Window > Swatches to open the Swatches panel.
- In the Swatches panel, click the drop-down in the upper-right corner. In the list, choose Open Swatch Library > Gradients and then choose the gradient you want to apply.
- To display only gradients in the Swatches panel, click the Show Swatch Kinds drop-down list and choose Show Gradient Swatches.


Create and apply linear, radial, and freeform gradients
Based on your requirements, you can choose to apply a linear, radial, and freeform gradient to your artwork.

Create and apply a linear gradient
To create a linear gradient, do one of the following:
- Click the Gradient tool and then click the object on the canvas. The Gradient Type buttons are displayed in the Control panel or Properties panel. With the object selected, click Linear Gradient to apply the Linear gradient on the object.
- In the Gradient panel, click Linear Gradient.
- In the Properties panel, click Linear Gradient in the Gradient section.
Create and apply a radial gradient
To create or apply a radial gradient, do one of the following:
- Click the Gradient tool and then click the object on the canvas. The Gradient Type buttons are displayed in the Control panel or Properties panel. With the object selected, click Radial Gradient to apply the Radial gradient on the object.
- In the Gradient panel, click Radial Gradient.
- In the Properties panel, click Radial Gradient in the Gradient section.
Create and apply a freeform gradient
To create and apply a freeform gradient, do one of the following:
- Click the Gradient tool and then click the object on the canvas. The Gradient Type buttons are displayed in the Control panel or Properties panel. With the object selected, click Freeform Gradient to apply the Freeform gradient on the object.
- In the Gradient panel, click Freeform Gradient.
- In the Properties panel, click Freeform Gradient in the Gradient section.
After you click Freeform gradient, the following two options are available:
- Points: Select this option if you want to create color stops as independent points in the object.
- Lines: Select this option if you want to create color stops over a line segment in the object.
To copy a freeform gradient from one object to another, use the Color Picker tool in the toolbar.
Create freeform gradient in points mode
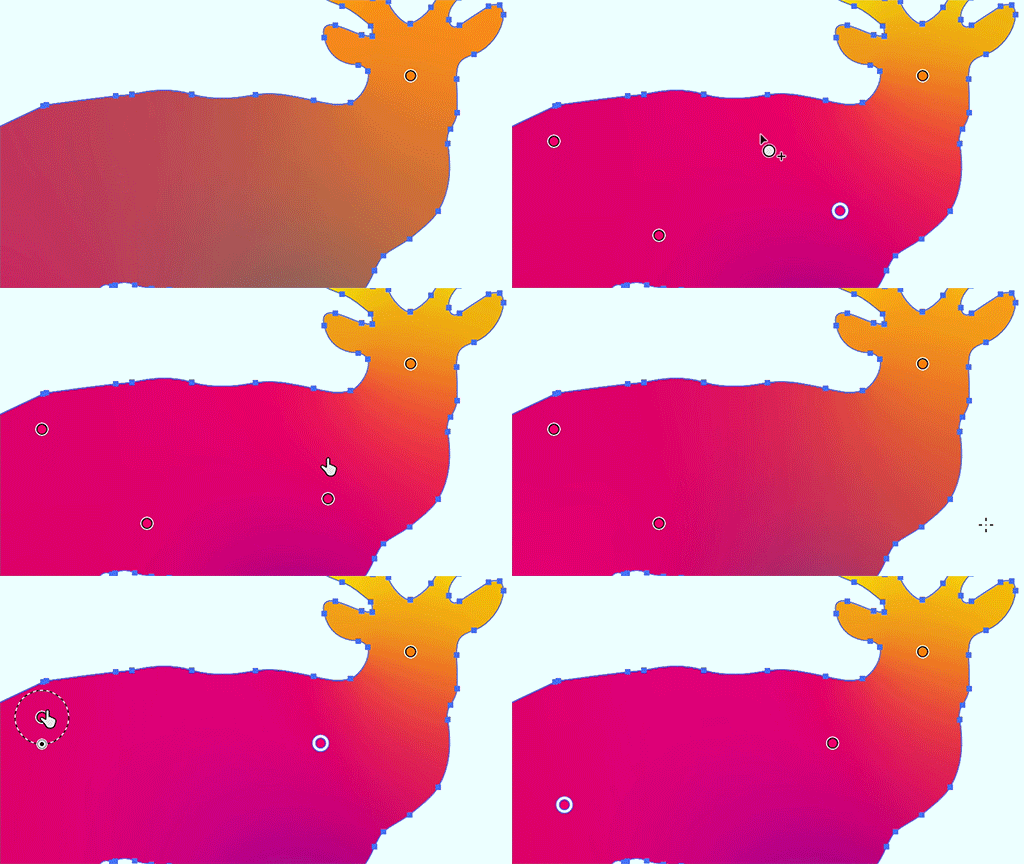
Do the following to create, modify, and delete the freeform gradient for the point mode:
- To add one or more color stops, click anywhere in the object.
- To change the position of color stops, drag them and place at the desired location.
- To delete the color stop, drag them outside the object area or click Delete in the Gradient panel or press the Delete key.

Set spread for freeform gradient in points mode
You can set the spread of a color stop in the points freeform gradient. Spread is the circular area around the color stop in which a gradient is to be applied. To set the spread of a color stop, select the color stop and do one of the following:
- In the Gradient panel, select or type a value in the Spread drop-down list.
- Type a value in the Spread drop-down list in the Control panel, Properties panel, or Gradient panel. You can also use slider that appears when you click Spread.
By default the spread of color stops is 0%.
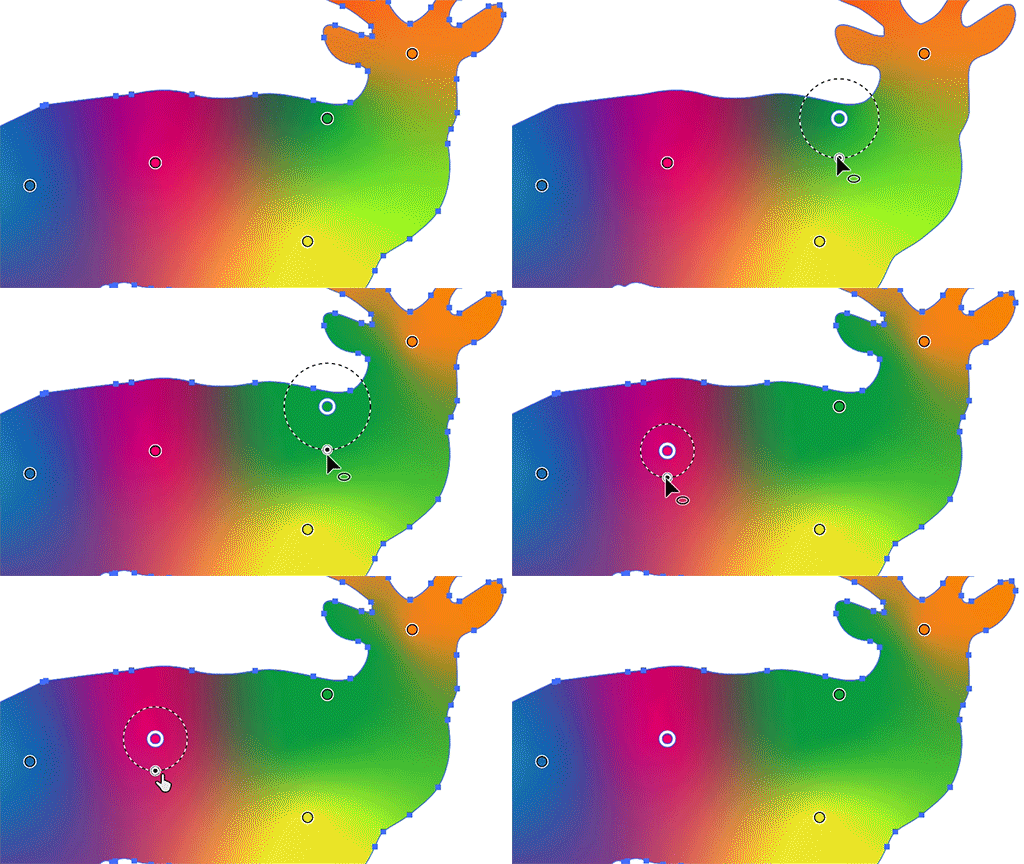

Spread is supported only for the point mode.
Create freeform gradient in lines mode
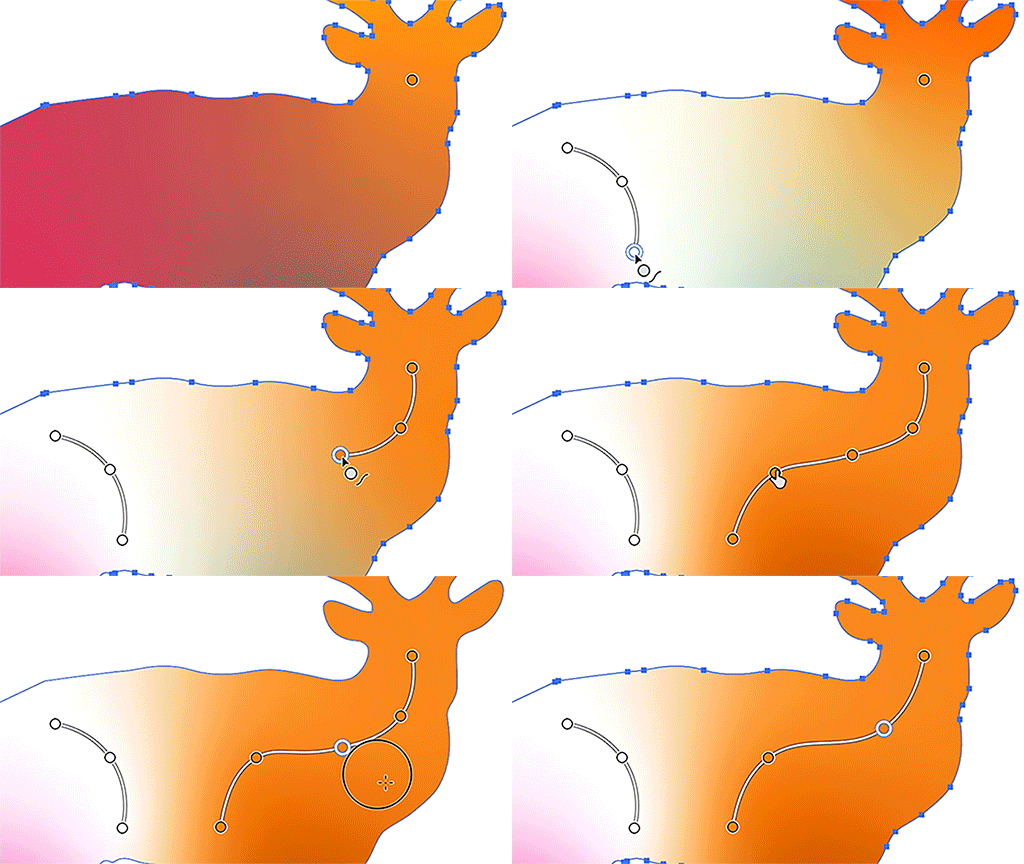
To add color stops for the freeform gradient for line mode, do one of the following:
- Click anywhere in the object to create the first color stop, which is the starting point for the line segment.
- Click to create the next color stop. A straight line is added connecting the first and the second color stops.
- Click again to create further color stops. The straight line changes into a curved line.
You can create multiple individual line segments in an object. To create a new line segment:
- Drag the pointer outside the object and bring it back to the object and then click anywhere to create the first color stop for the line segment.
Note: You can also drag the line segments and join them together if you want.
To delete the selected color stops:
- Drag them outside the object area or click Delete in the Gradient Panel.
To change the position of color stops:
- Drag the color stop and place it at the desired location. The line segment also shrinks or expands when you change the position of a color stop. The position of other color stops remains unchanged.

When you apply a gradient, the default experience is applied on the selected object. To disable this feature, you can deselect the Enable Content Aware Defaults option in the Edit > Preferences > General (Windows) or Illustrator > Preferences > General (Mac OS) menu. This option is disabled for the Windows 32-bit machine.
-
-
Select More options and then select Create Gradients.
Create gradients directly using More options in the Swatches panel. Create gradients directly using More options in the Swatches panel.
- Pick two or more colors to enable Create Gradients under More options.
- You can't create a new gradient using other gradients.
- You can save a new gradient and add it to your existing Swatches list.
Modify gradients
You can modify the color, origin, opacity, location, and angle of a gradient from the Gradient tool, Gradient panel, Control panel, and Properties panel.
To directly enter into the gradient editing mode from the Gradient panel, select the object and click the Edit Gradient button. You can then edit the options, such as color stops, color, angle, opacity, location, aspect ratio, etc.

A. Shades of the same color B. Two different colors C. Modified angle D. Resized annotator E. Changed location


A. Two different colors B. Changed origin within the dotted ring C. Changed location of Gradient Annotator D. Changed aspect ratio E. Changed mid-point location

Add and modify color stops
After a gradient is applied, you can add various color stops on the Gradient Annotator.
To add color stops:
- Place the pointer on the Gradient annotator and when you see a + symbol below the pointer, click the Gradient Annotator.
A color stop is added at the point you click.
To delete a color stop, select the color stop and do one of the following:
- Press the Delete key.
- Click the Delete button in the Gradient panel.
To select multiple color stops, press the Shift key and click the color stops.
To clear all the selected color stops, press the Escape key.
Note: When you select a color stop for gradient, the Control panel and the toolbar show options for modifying color stops. In addition, the color options are displayed on the Color tab to the right.
Modify color
To change the color of a color stop, do one of the following:
- Double-click the color stop.
The color panel is displayed in which you can choose a color you want to apply. The selected color is applied from the currently selected color stop to the next color stop.

A. Color stop B. Spread C. Opacity D. Color E. Swatches F. Color Picker G. Swatch colors

- Click the Swatches button on the color panel to choose a color from the available swatches.
- Click Color Picker on Color panel to pick and apply any color from the canvas and apply anywhere. Press Escape or Enter to exit the color picker mode. The Color panel, Gradient panel, and Properties panel provide the color picker option.
- Open the Swatches panel by clicking Windows > Swatches. Click the object fill in the Swatches panel. The selected color is applied on the selected color stop.

Modify origin, resize and rotate gradient annotator
The starting point of Gradient Annotator is called origin.
- To change the origin, place the pointer on the starting point and drag to move it.
- To resize the gradient annotator, drag the end point closer to or away from the starting point.
Gradient Annotator can’t be resized with the starting point (origin).


- To rotate the gradient annotator for Linear gradient, hold the end point of the gradient annotator. When you see a circular arrow symbol, drag the annotator and rotate in any direction. A dotted rectangle is displayed to indicate the new position of the annotator.
- To rotate the gradient annotator for Radial gradients, place the pointer on the end point of the Gradient Annotator and drag the annotator when a circular arrow symbol appears.
When you place the pointer within the radius range of the radial gradient, a dotted ring is displayed. You can rotate this ring along its axis to change the angle of the radial gradient. In addition, two points are displayed on the dotted ring. You can click one of those points to change the shape of the ring (aspect ratio) and click the other point to change the size of the dotted ring (spread of the gradient).


Modify location
To change the location of color stops and their midpoints:
- Drag them along the gradient slider.
- Add the value in the Location box in the Gradient panel. (show example of changing location of color stop).
By changing the midpoint, you can adjust the color division between the two color stops.
Modify angle
To change the angle of the gradient:
- Rotate the gradient annotator on the object.
- Select or type a value in the Angle drop-down box in the Gradient panel.
Modify opacity
To change the opacity of the color stop, click a color stop and do one of the following:
- Select or type a value in the Opacity box in the Gradient panel or Control panel.
- Move the opacity slider in the Control panel.
When a color stop has an opacity value less than 100%, the color appears in the checkered form in the Gradient annotator.


Reverse gradient
To reverse the colors in the gradient, click Reverse Gradient in the Gradient panel.
Save gradients as swatches
To save the new or modified gradient as a swatch in the current file, do one of the following:
- Click the Add to Swatches button in the Gradient Menu.
- Click the swatches menu in the Swatches panel and choose New Swatch.
- Drag the Gradient fill box from the Gradient Panel to the Swatches panel.
To use the gradients for future sessions, save the gradients in the Creative Cloud library.
Apply gradients on stroke
To apply a gradient on stroke of the object, select the object and do the following:
-
Select Stroke(X) from the toolbar, Swatches panel, Gradient panel, or Properties panel.
-
Choose a gradient in the Gradient panel.
-
Select one of the following stroke styles:
- Apply gradient within stroke
- Apply gradient along stroke
- Apply gradient across stroke


Apply gradients across multiple objects
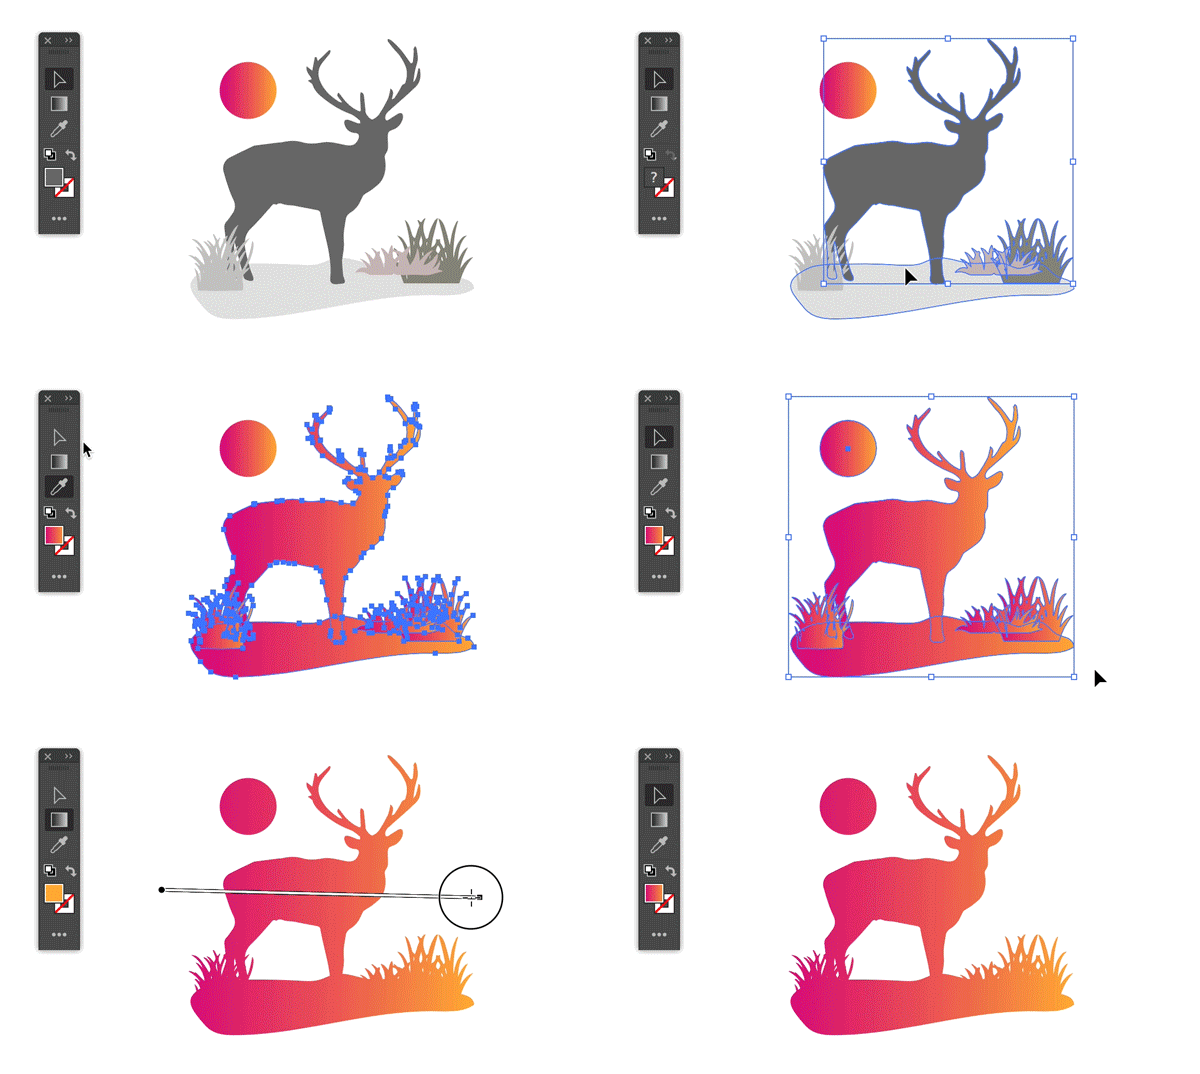
To apply a linear or a radial gradient for multiple objects, do the following:
- Apply gradient on one object. Select the other objects that you want to fill with same gradient. To do this, click the Selection tool from the toolbar. Hold the Shift key and click the objects that you want to fill with same gradient.
- Select the Color picker tool from the toolbar and click the gradient. Then, select objects on which the selected gradient is to be applied.
- Click the Fill icon in the Gradient panel, toolbar, or Properties panel.
Using the Gradient tool, do one of the following:
- To create a gradient with one Gradient annotator, click anywhere on the canvas where you want the gradient to start, and drag to where you want the gradient to end.
- To create a gradient with a Gradient annotator for every selected object, click in the artboard where you want the gradient to start, and Alt-drag (Windows) or Option-drag (macOS) to where you want the gradient to end. You can then adjust the different gradient sliders for the different objects. (Multiple gradient sliders are only created for simple paths.)

If you want to create a single, multicolored object on which colors can flow in different directions, use a mesh object. For details, see Meshes.
Have a question or an idea?


If you have a question to ask or an idea to share, come and participate in Adobe Illustrator Community. We would love to hear from you and see your creations.
